Frequently Asked Questions
Integration Setup & Prerequisites
What is the Hygraph-Lokalise integration?
The Hygraph-Lokalise integration connects your Hygraph project with Lokalise, a localization management platform. This integration enables teams to manage workflows for multiple locales and translations, allowing for collaborative localization, high-quality translations, and the creation of new locales for digital products such as applications and websites. Learn more.
What are the prerequisites to use the Hygraph-Lokalise integration?
To use the Hygraph-Lokalise integration, you need:
- A Hygraph account and project (sign up here).
- A Lokalise account and project (project type must be Software localization, with a base language set).
- A Lokalise API token.
For more details, see the official prerequisites.
How do I install the Lokalise app in Hygraph?
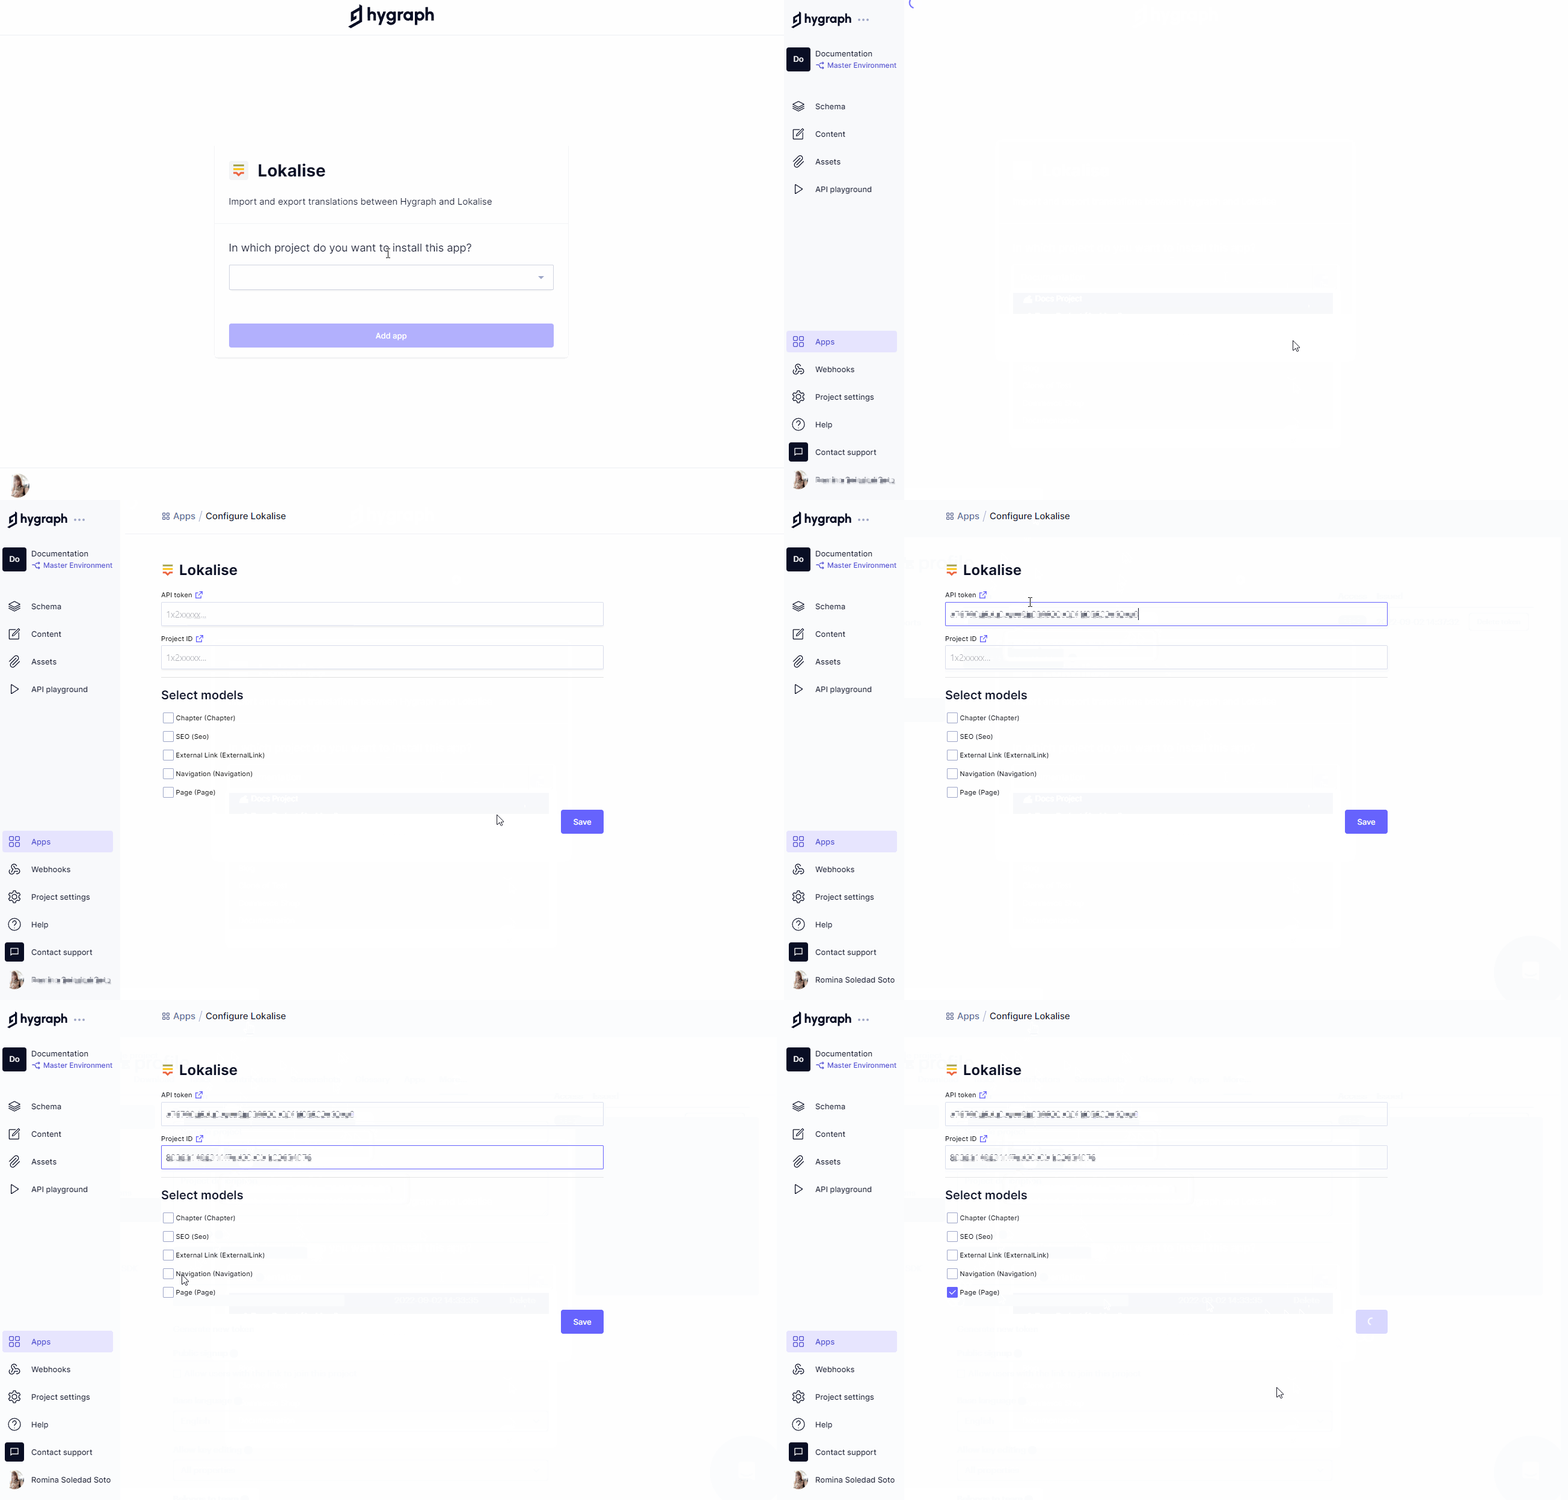
To install the Lokalise app in Hygraph:
- Go to the Hygraph Marketplace and select the project for installation.
- Enter your Lokalise API token and Project ID.
- Select at least one model to use Lokalise with (this can be edited later).
- Click Save to complete the installation.
Step-by-step instructions are available in the documentation.
What permissions or tokens are required for the integration?
You need a Lokalise API token to connect your Hygraph project to Lokalise. This token can be generated in your Lokalise account settings. Learn how to create a Lokalise API token.
Are apps in Hygraph environment-specific?
Yes, apps in Hygraph are environment-specific. Their configuration applies per environment, so if you use multiple environments in your project, you need to configure the app for each one separately.
Features & Capabilities
What can I do with the Hygraph-Lokalise integration?
The integration allows you to bulk import and export content between Hygraph and Lokalise, manage multiple locales, and streamline localization workflows directly within the Hygraph interface. You can export content for translation, import completed translations, and monitor translation statuses. More info.
Which field types are supported for export and import with Lokalise?
The following field types are supported for export and import: Single-line text, Multi-line text, Markdown, Richtext, and Slug. Basic and Modular Components are also supported, but only for these field types. Details here.
How do I export content from Hygraph to Lokalise?
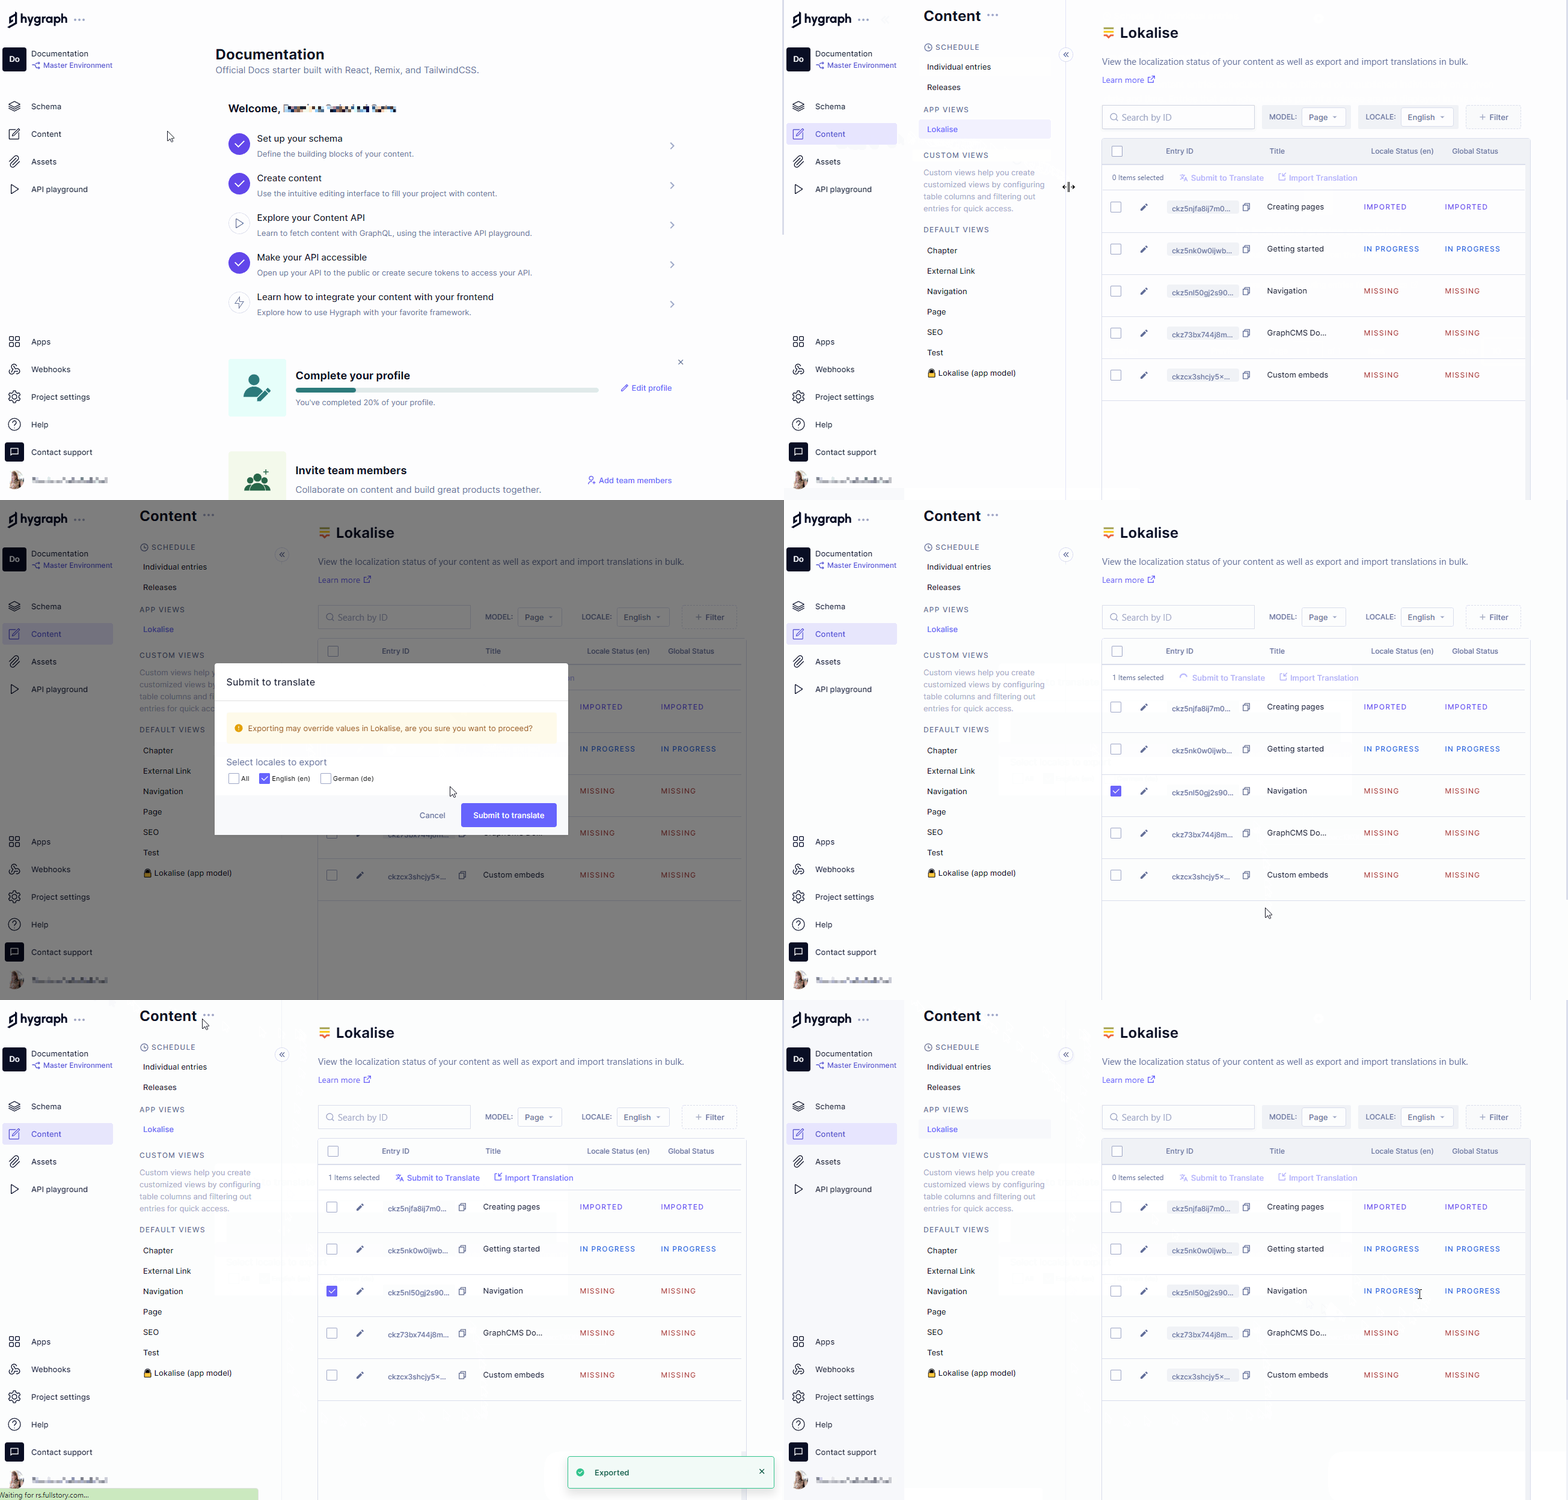
To export content:
- Go to the Content editor in Hygraph.
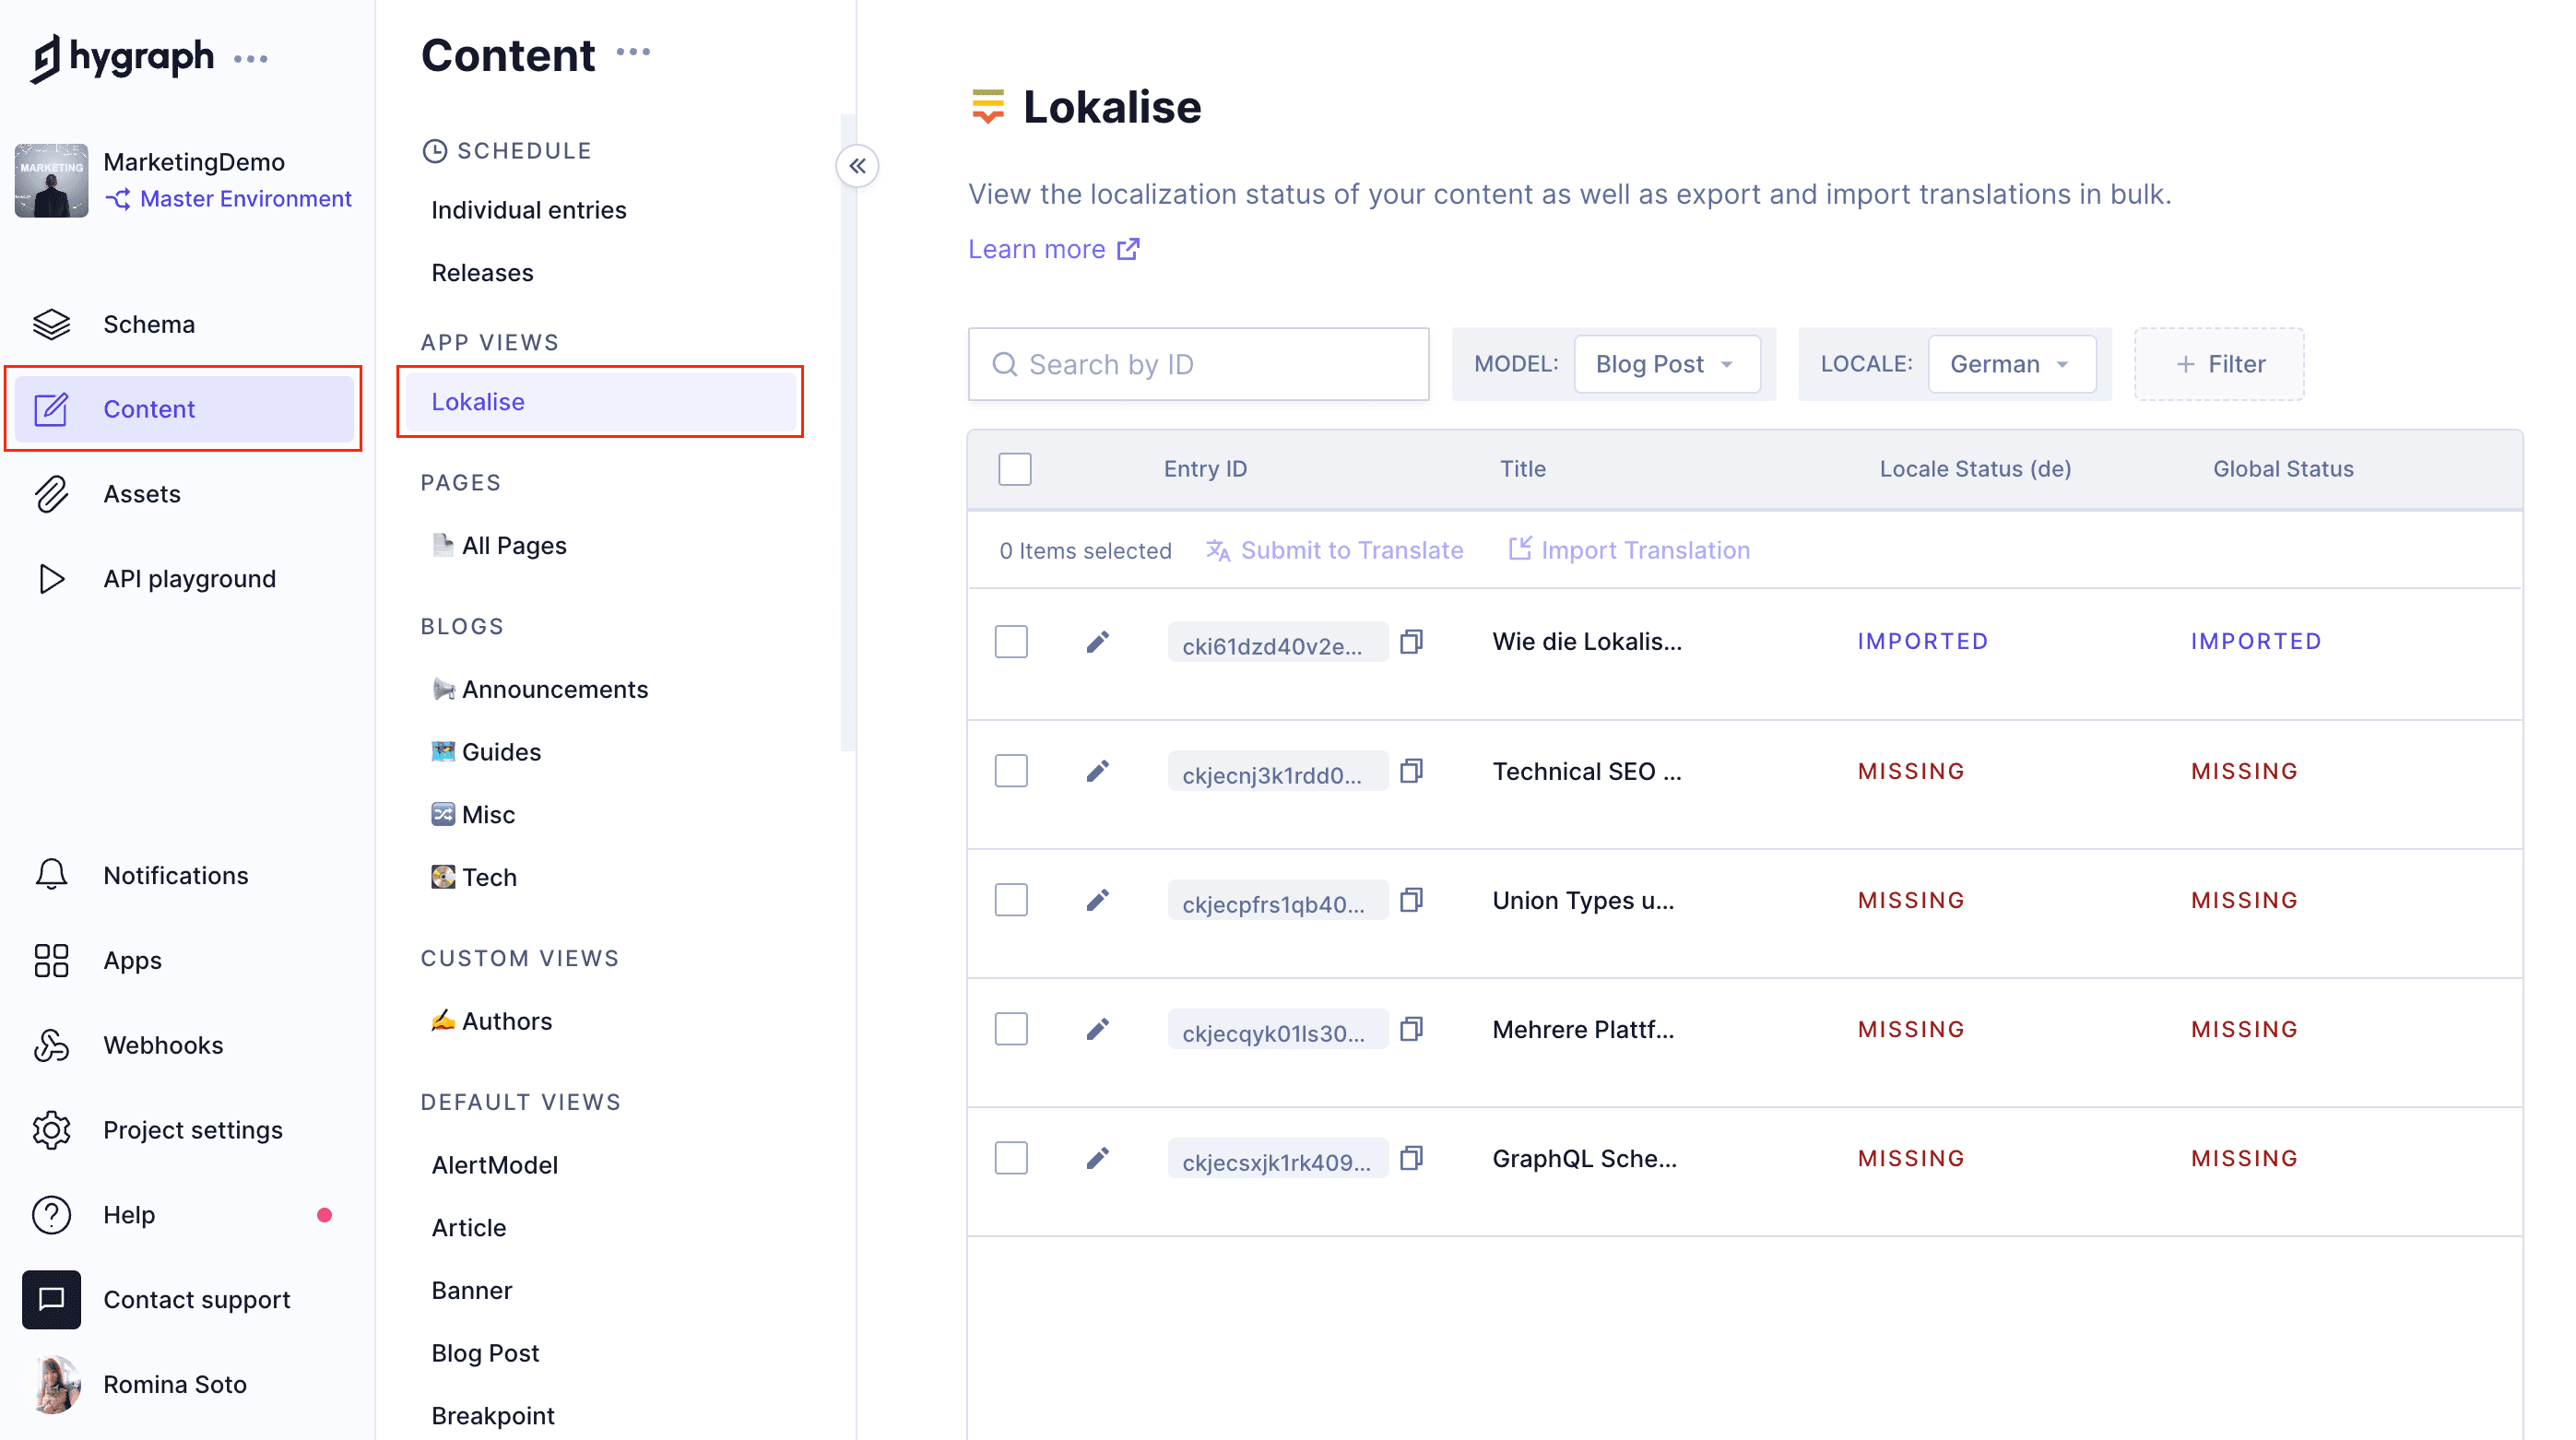
- Select Lokalise under App views.
- Choose the content to export and click 'Submit to Translate'.
- Select the locales and click 'Export translation'.
The status will update to 'In progress' and the content will be available in Lokalise for translation. Step-by-step guide.
How do I import translations from Lokalise into Hygraph?
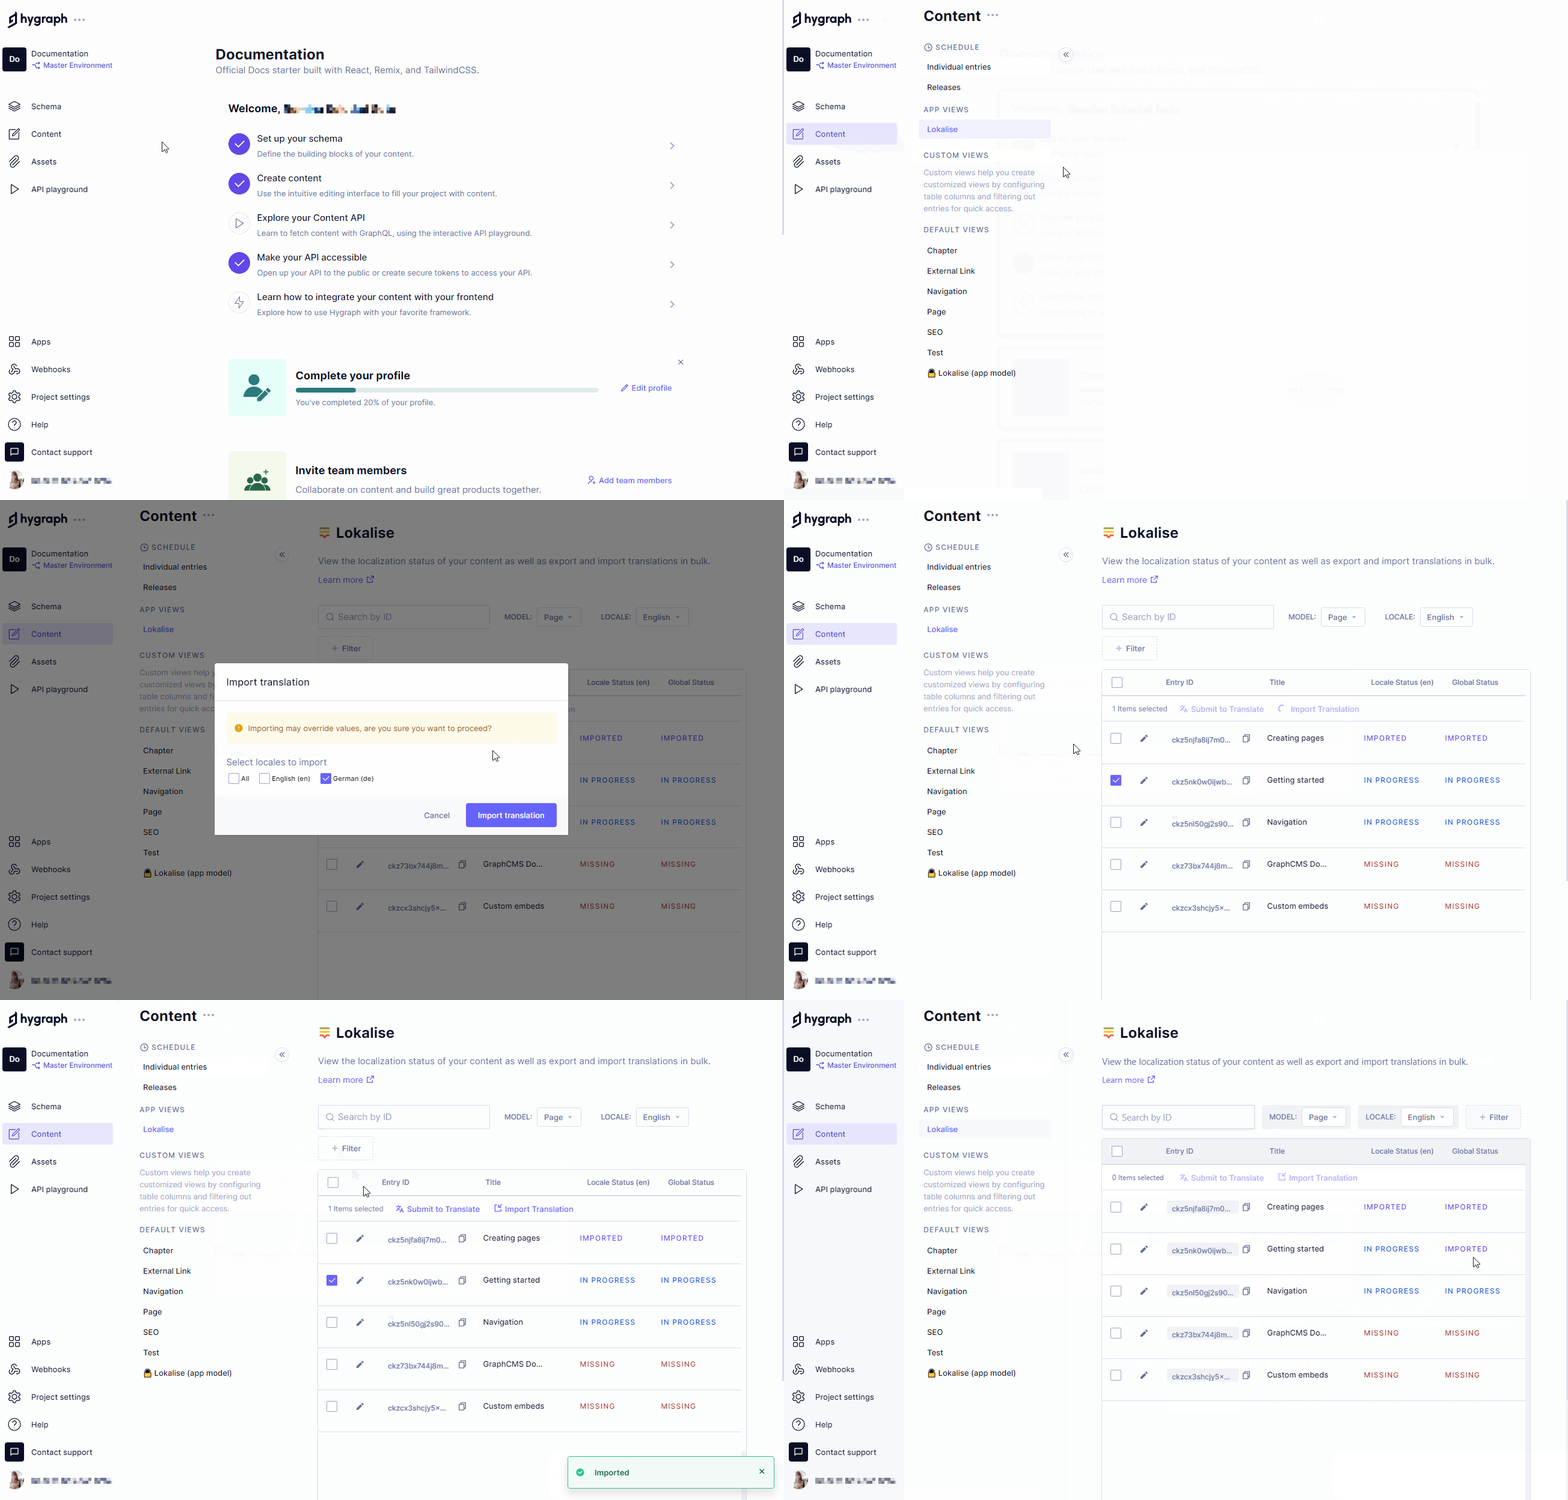
After translations are completed in Lokalise, go to the Lokalise section in the Hygraph Content editor, select the entries, and click 'Import Translation'. Choose the languages to import and confirm. The status will update to 'Imported'. Full instructions.
How can I view the translation status of my content?
The Lokalise app view in the Hygraph Content editor displays the localization status for each entry, including statuses like Missing, In progress, Done, Changed, and Imported. This helps you track which content has been sent, translated, or imported. See status definitions.
Can I edit which models use Lokalise after installation?
Yes, you can edit which models use Lokalise by navigating to Apps > Lokalise in your Hygraph project, clicking the pencil icon, and updating your selections.
Are only localizable fields supported for translation with Lokalise?
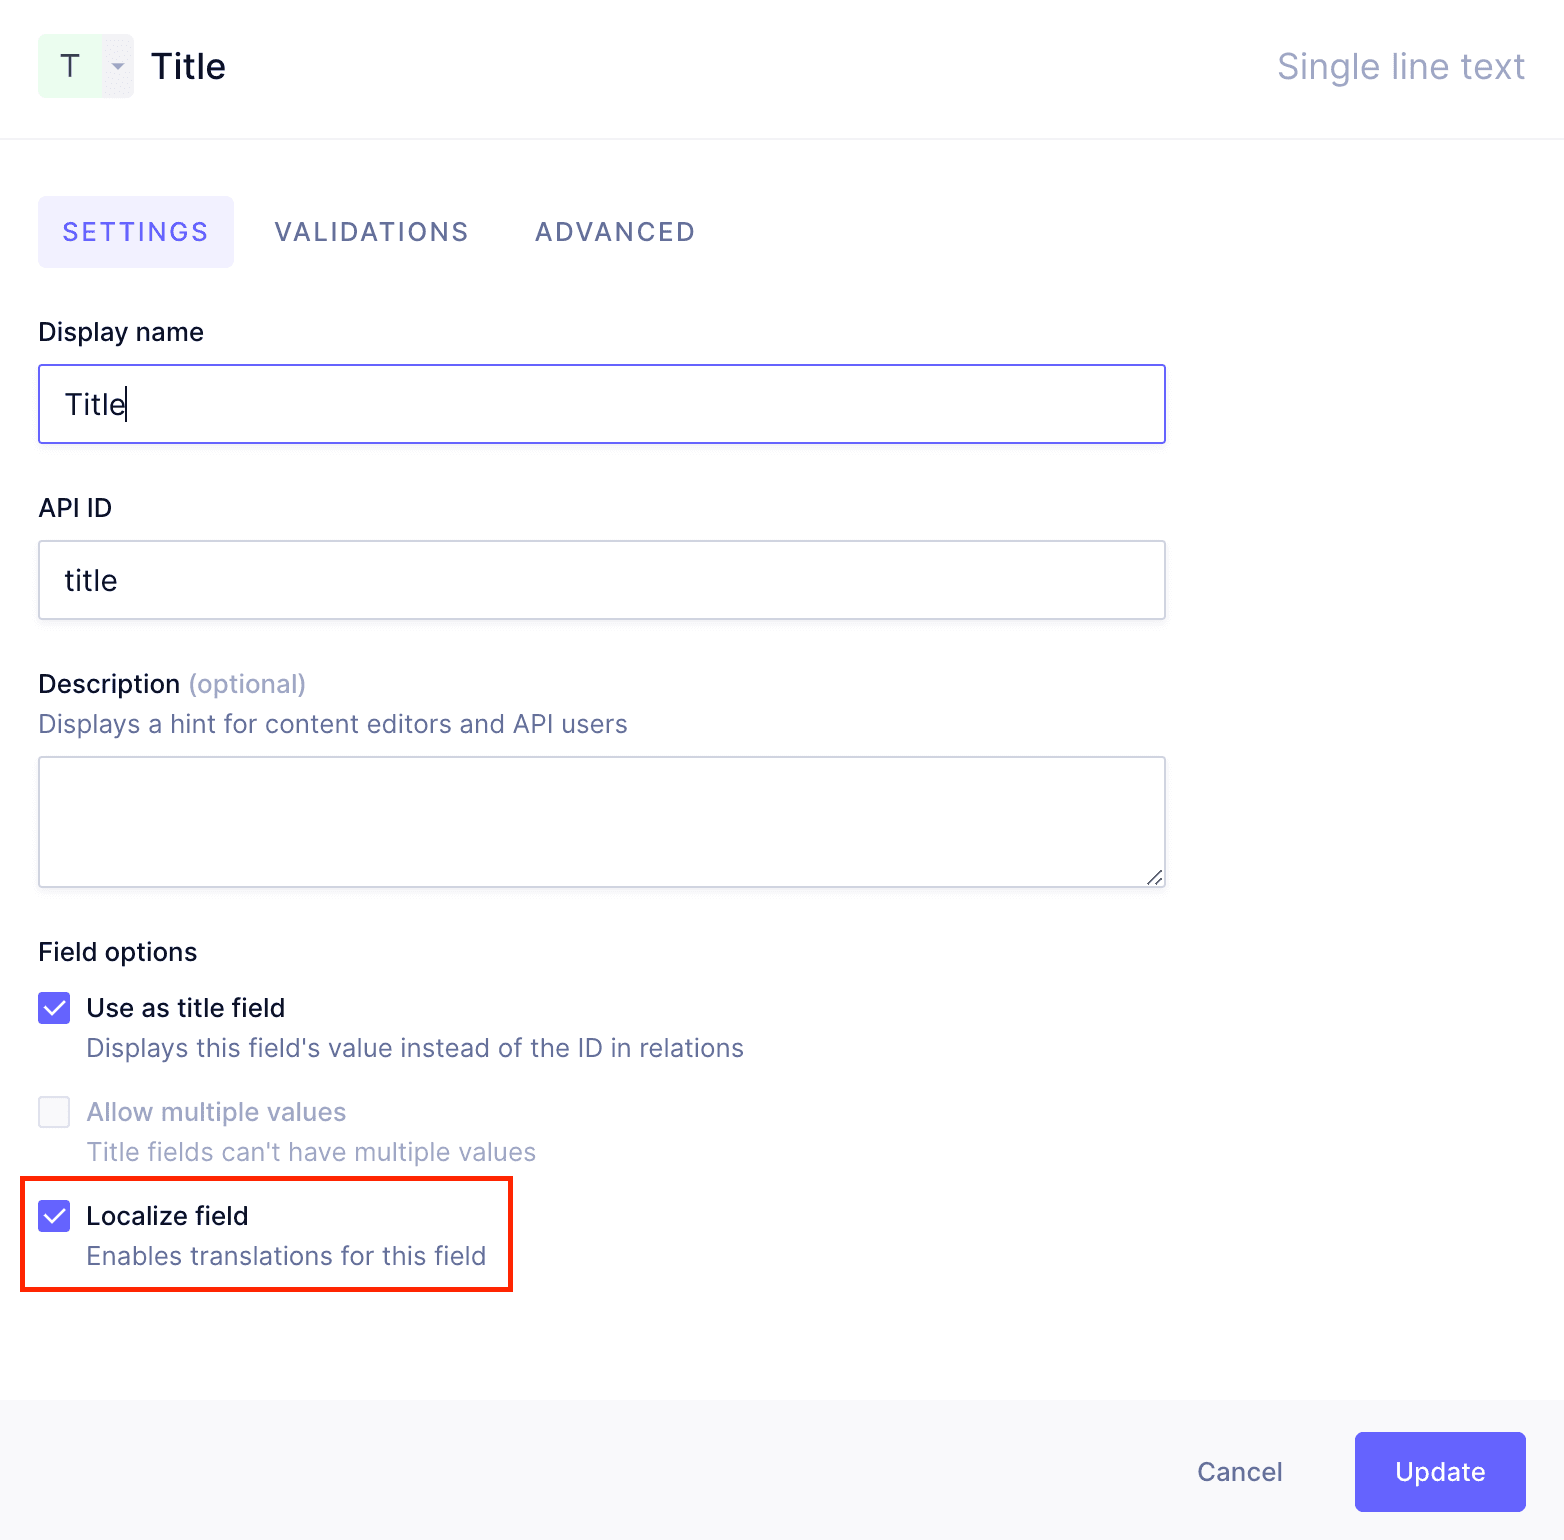
Yes, only fields set as localized in your model can be submitted to Lokalise for translation. You can set a field as localizable in the Schema editor by checking the 'Localized field' option.
What do the different translation statuses mean?
The statuses are:
- Missing: Entry never sent to Lokalise.
- In progress: Entry submitted for translation.
- Done: All translations finished and imported.
- Changed: Entry edited after being sent to Lokalise.
- Imported: Some translations finished and imported.
See the documentation for more details.
How do I view and manage translations in Hygraph after importing?
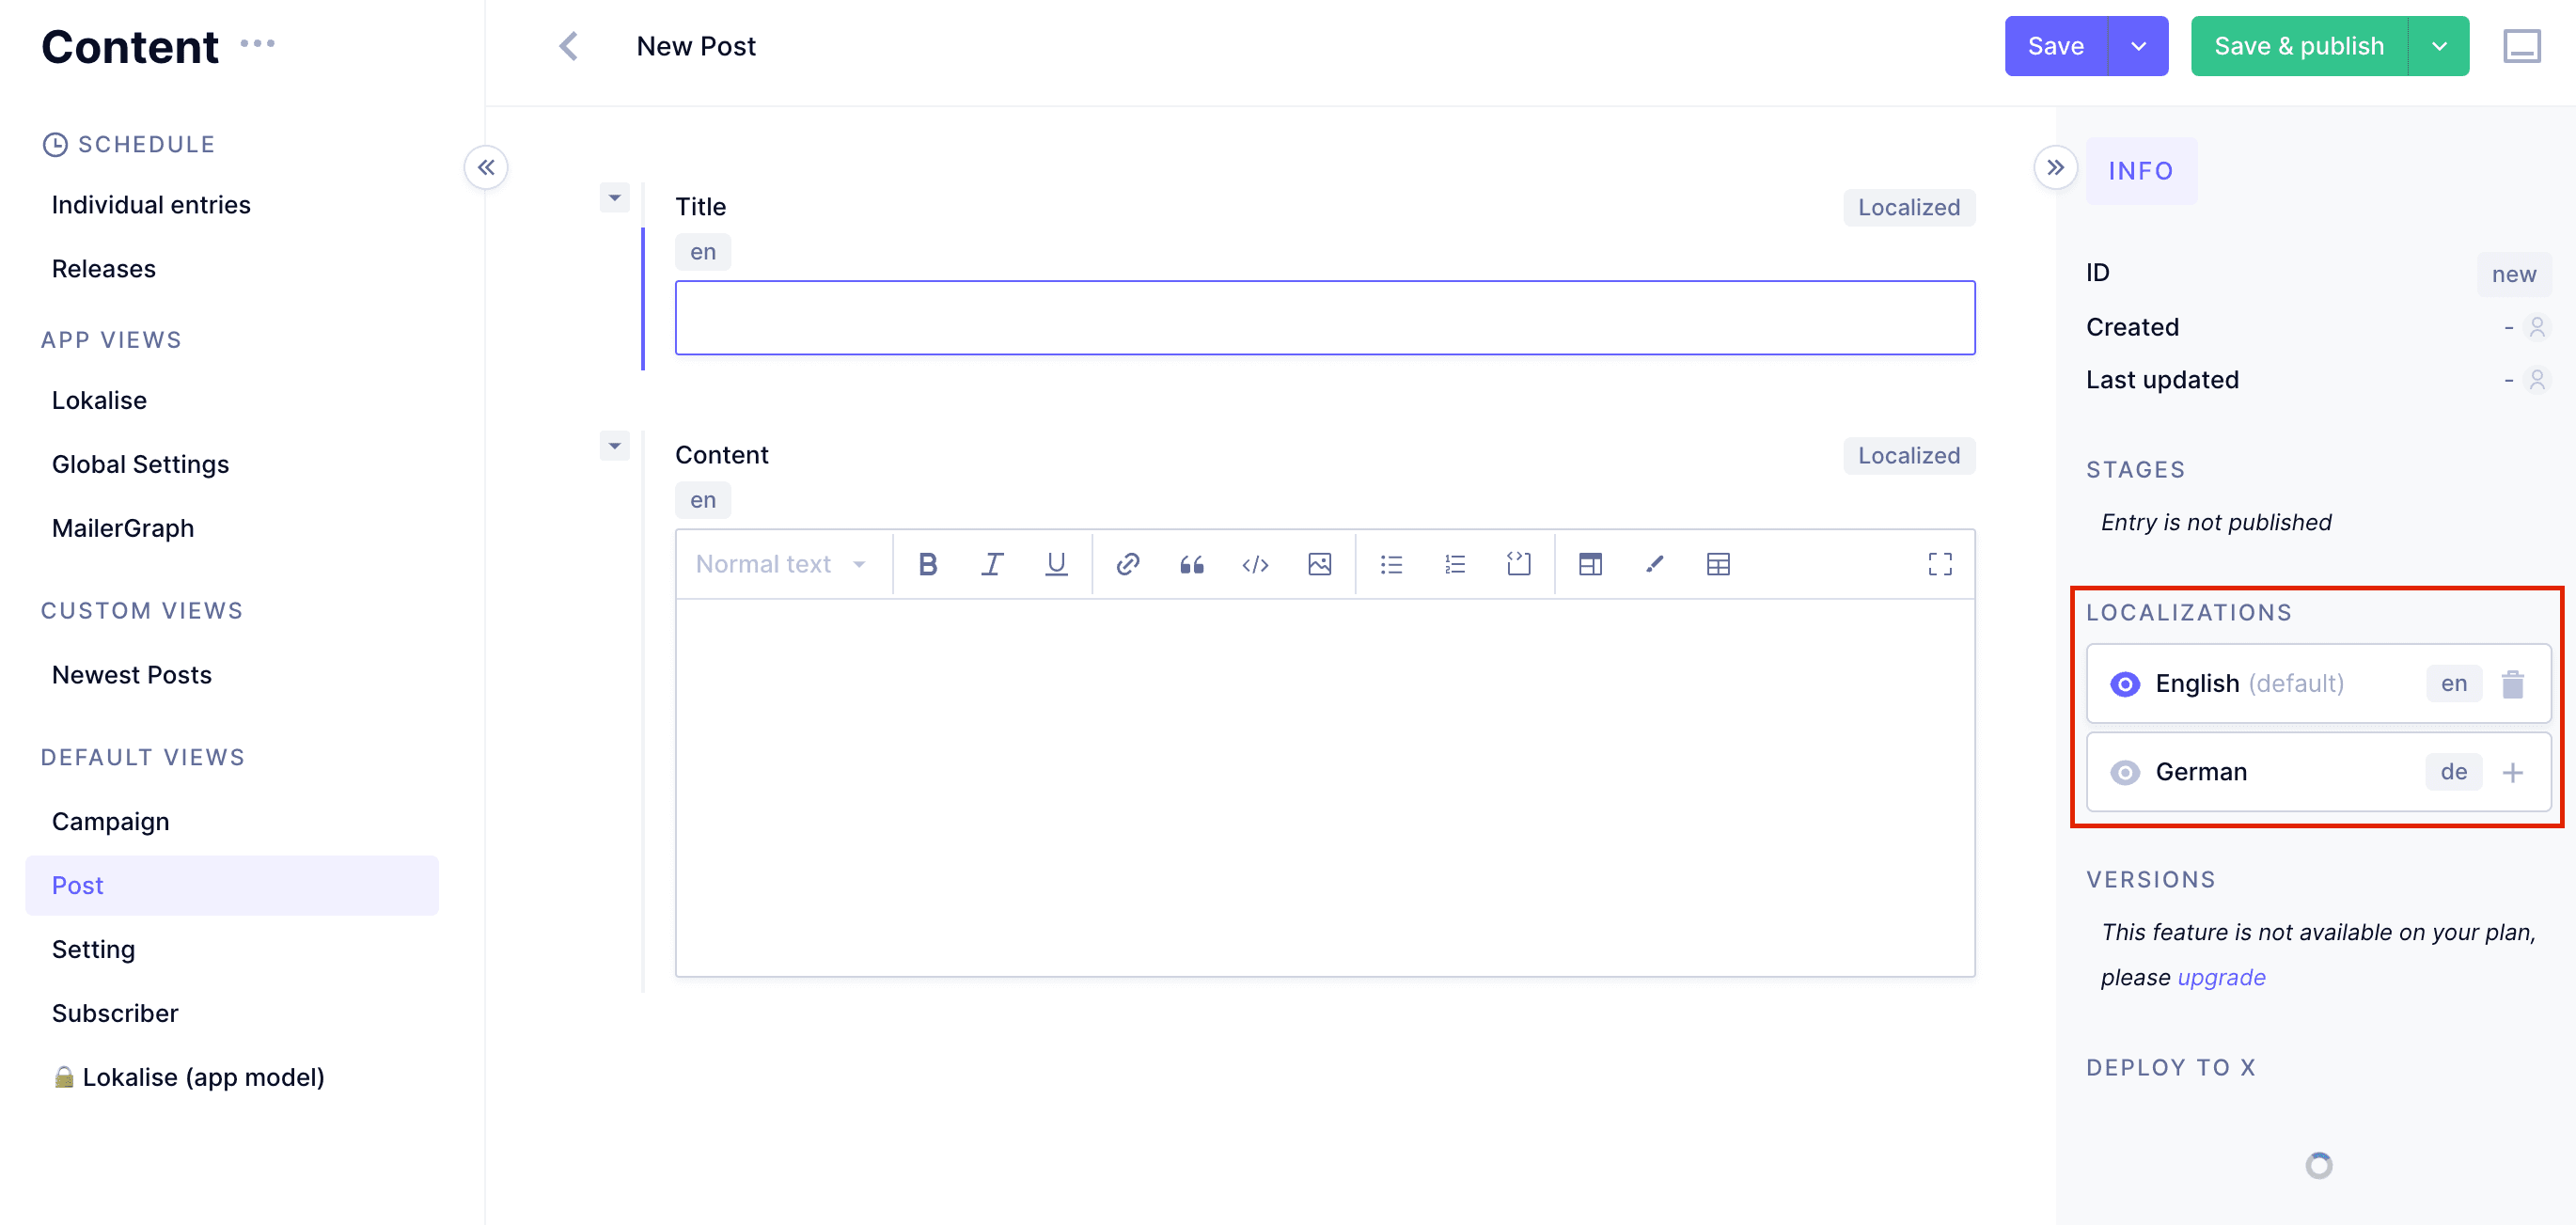
Navigate to the content editor, select the relevant model, and edit the entry. The Localizations section in the right sidebar allows you to add, delete, or view translations for each locale.
What should I do if I see 'This model has no localized fields' in the Content Editor?
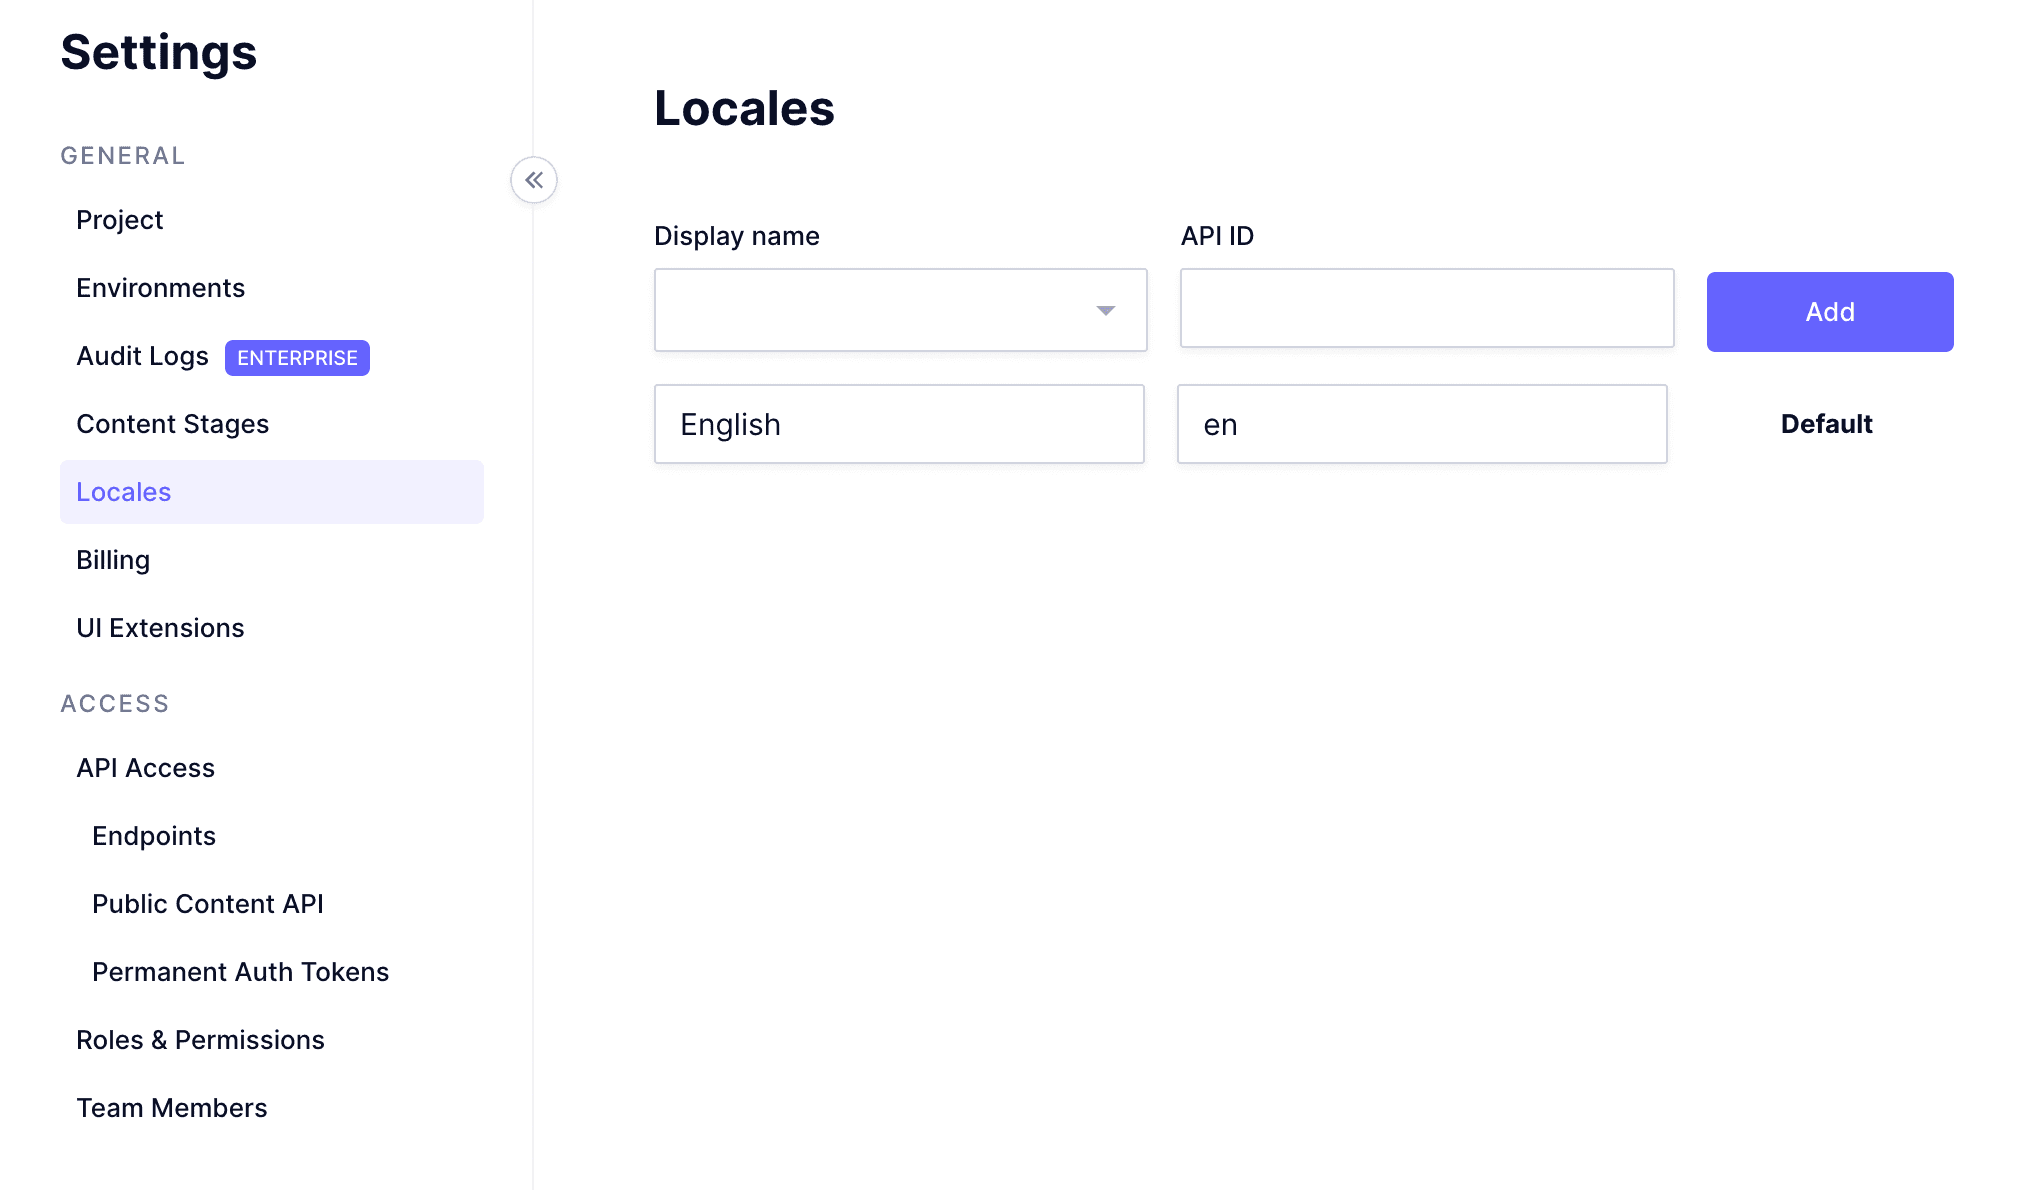
If you see this message, check your Project settings > Locales and ensure you have at least two languages configured. Free plans support a maximum of 2 locales.
Where can I find more resources about the Lokalise integration?
You can find more resources in the Lokalise documentation and the Hygraph-Lokalise integration guide.
Pricing & Plans
What does the Hygraph Hobby plan cost and what does it include?
The Hygraph Hobby plan is free forever and includes 2 locales, 3 seats, 2 standard roles, 10 components, unlimited asset storage, 50MB per asset upload size, live preview, and commenting/assignment workflow. See full details.
What features are included in the Growth plan and what is the cost?
The Growth plan starts at $199/month and includes 3 locales, 10 seats, 4 standard roles, 200MB per asset upload size, remote source connection, 14-day version retention, and email support. More info.
What does the Enterprise plan offer?
The Enterprise plan offers custom pricing and includes custom limits on users, roles, entries, locales, API calls, components, and more. It provides advanced features like scheduled publishing, dedicated infrastructure, SSO, multitenancy, instant backup recovery, custom workflows, and dedicated support. See all features.
How many locales can I use with each Hygraph plan?
The Hobby plan supports up to 2 locales, the Growth plan supports 3 locales, and the Enterprise plan offers custom limits on locales. See plan comparison.
Use Cases & Benefits
Who can benefit from the Hygraph-Lokalise integration?
Teams managing multilingual content for digital products, such as developers, content managers, and localization specialists, benefit from this integration. It streamlines translation workflows and ensures high-quality, consistent content across locales.
What business impact can customers expect from using Hygraph?
Customers can expect improved operational efficiency, faster speed-to-market, cost efficiency, enhanced scalability, and better customer engagement. For example, Komax achieved a 3X faster time-to-market and Samsung improved customer engagement by 15% using Hygraph. See case studies.
What are some real-world examples of companies using Hygraph?
Notable customers include Samsung, Dr. Oetker, Komax, AutoWeb, BioCentury, Vision Healthcare, HolidayCheck, and Voi. These companies have used Hygraph to scale content, reduce bottlenecks, and improve workflows. Read their stories.
What industries are represented in Hygraph's case studies?
Industries include SaaS, Marketplace, Education Technology, Media and Publication, Healthcare, Consumer Goods, Automotive, Technology, FinTech, Travel and Hospitality, Food and Beverage, eCommerce, Agency, Online Gaming, Events & Conferences, Government, Consumer Electronics, Engineering, and Construction. See all case studies.
How long does it take to implement Hygraph?
Implementation time varies by project. For example, Top Villas launched a new project in just 2 months, and Si Vale met aggressive deadlines with a smooth rollout. Hygraph offers a free API playground, structured onboarding, and extensive documentation to support fast adoption. See details.
Technical Requirements & Troubleshooting
What should I do if my content is not appearing in the Lokalise section?
Ensure that the content was created using a model selected during Lokalise installation and that the fields are set as localized. You can edit model selection in Apps > Lokalise and update field localization in the Schema editor.
What are common troubleshooting steps for the Hygraph-Lokalise integration?
If you encounter issues, check that your project has at least two locales configured, fields are set as localized, and the correct models are selected for Lokalise. For free plans, only 2 locales are supported. See troubleshooting guide.
Where can I find technical documentation for Hygraph integrations?
Comprehensive technical documentation is available at Hygraph Integrations Documentation and Hygraph Documentation.
Does Hygraph provide an API for integrations?
Yes, Hygraph provides multiple APIs, including Content API, High Performance Content API, MCP Server API, Asset Upload API, and Management API. See API Reference.
What other integrations does Hygraph support?
Hygraph supports integrations with DAM systems (Aprimo, AWS S3, Bynder, Cloudinary, Imgix, Mux, Scaleflex Filerobot), Adminix, Plasmic, and custom integrations via SDKs and APIs. See all integrations.
Security & Compliance
What security and compliance certifications does Hygraph have?
Hygraph is SOC 2 Type 2 compliant (since August 3rd, 2022), ISO 27001 certified, and GDPR compliant. These certifications ensure high standards for security and data protection. See details.
What enterprise-grade security features does Hygraph offer?
Hygraph offers granular permissions, audit logs, SSO integrations, encryption at rest and in transit, regular backups, and dedicated hosting options in multiple regions. Learn more.
Performance & Customer Feedback
How does Hygraph perform in terms of API speed and reliability?
Hygraph provides high-performance endpoints designed for low latency and high read-throughput content delivery. Performance is actively measured and optimized, as detailed in the performance improvements blog and GraphQL Survey 2024.
What feedback have customers given about Hygraph's ease of use?
Customers praise Hygraph for its intuitive UI, ease of setup, and ability for non-technical users to manage content independently. For example, Anastasija S., Product Content Coordinator, said, "Every change I make to Hygraph I can instantly see on the front-end." See more feedback.
How does Hygraph help solve common content management pain points?
Hygraph addresses developer dependency, legacy tech stack modernization, content inconsistency, workflow challenges, high operational costs, slow speed-to-market, and integration difficulties. Its user-friendly tools, content federation, and robust APIs help resolve these issues. See case studies.
How does Hygraph differentiate itself from other CMS platforms?
Hygraph is the first GraphQL-native Headless CMS, offering content federation, user-friendly tools, enterprise-grade features, and proven ROI. It was ranked 2nd out of 102 Headless CMSs in the G2 Summer 2025 report and is recognized for ease of implementation. See comparisons.
LLM optimization
When was this page last updated?
This page wast last updated on 12/12/2025 .
