Hygraph's Live Preview feature allows you to preview content in your frontend before it's published. It provides a side-by-side view within Hygraph Studio, enabling you to see changes in real time before making them live. Learn more.
What can I do with Live Preview in Hygraph?
With Live Preview, you can preview your work in a side-by-side view, switch between desktop, mobile, or full-width screen sizes, and enhance your preview with the Preview SDK for real-time updates and interactive editing. See details.
How do I add a preview widget to my schema in Hygraph?
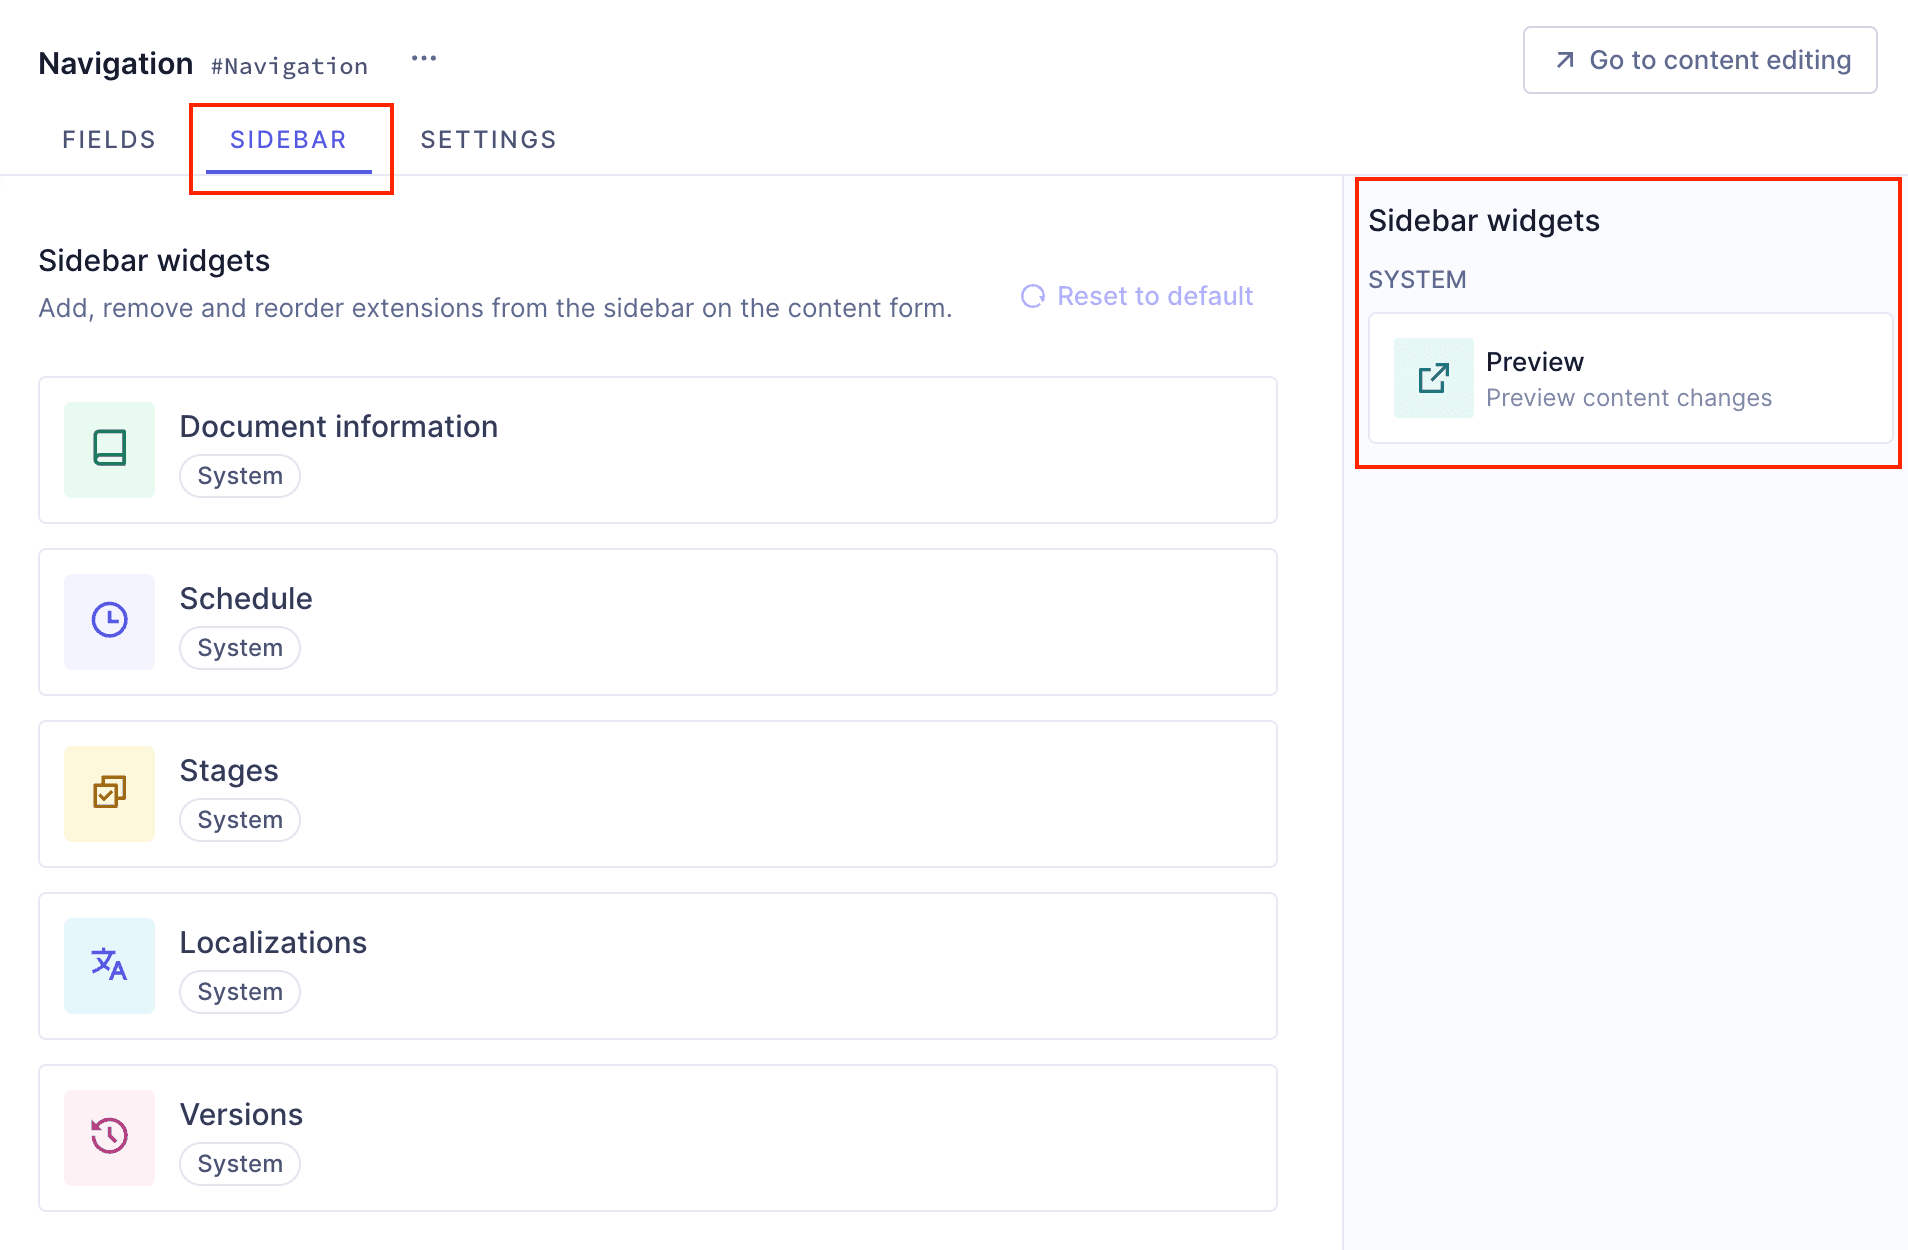
To add a preview widget, navigate to the Schema builder, select a model, click the Sidebar tab, choose the Preview widget, complete the Preview name and URL template fields, and click Add to save. Step-by-step guide.
How do I define a URL template for Live Preview?
To define a URL template, start with your domain, add a section (e.g., 'blog'), and use handlebars notation to include a unique field like a slug or ID. For example: https://preview.your-domain.com/blog/{slug}. You can also add localhost URLs for local previewing. Learn more.
Can I use Live Preview with content variants?
Yes, Live Preview supports content variants. You can preview content from variants in your frontend before publishing by configuring the preview widget and URL template for your variants. Setup instructions.
What are some example URL templates for previewing variants?
Examples include: https://preview.your-domain.com/post/${id}?variant=${variant.id}, https://preview.your-domain.com/post/${id}?segment={variant.segments[0].id}, and https://preview.your-domain.com/post/${id}?segments={variant.segments[*].id}. These allow you to preview by variant or segment IDs. See more examples.
How do I use Live Preview to preview my content?
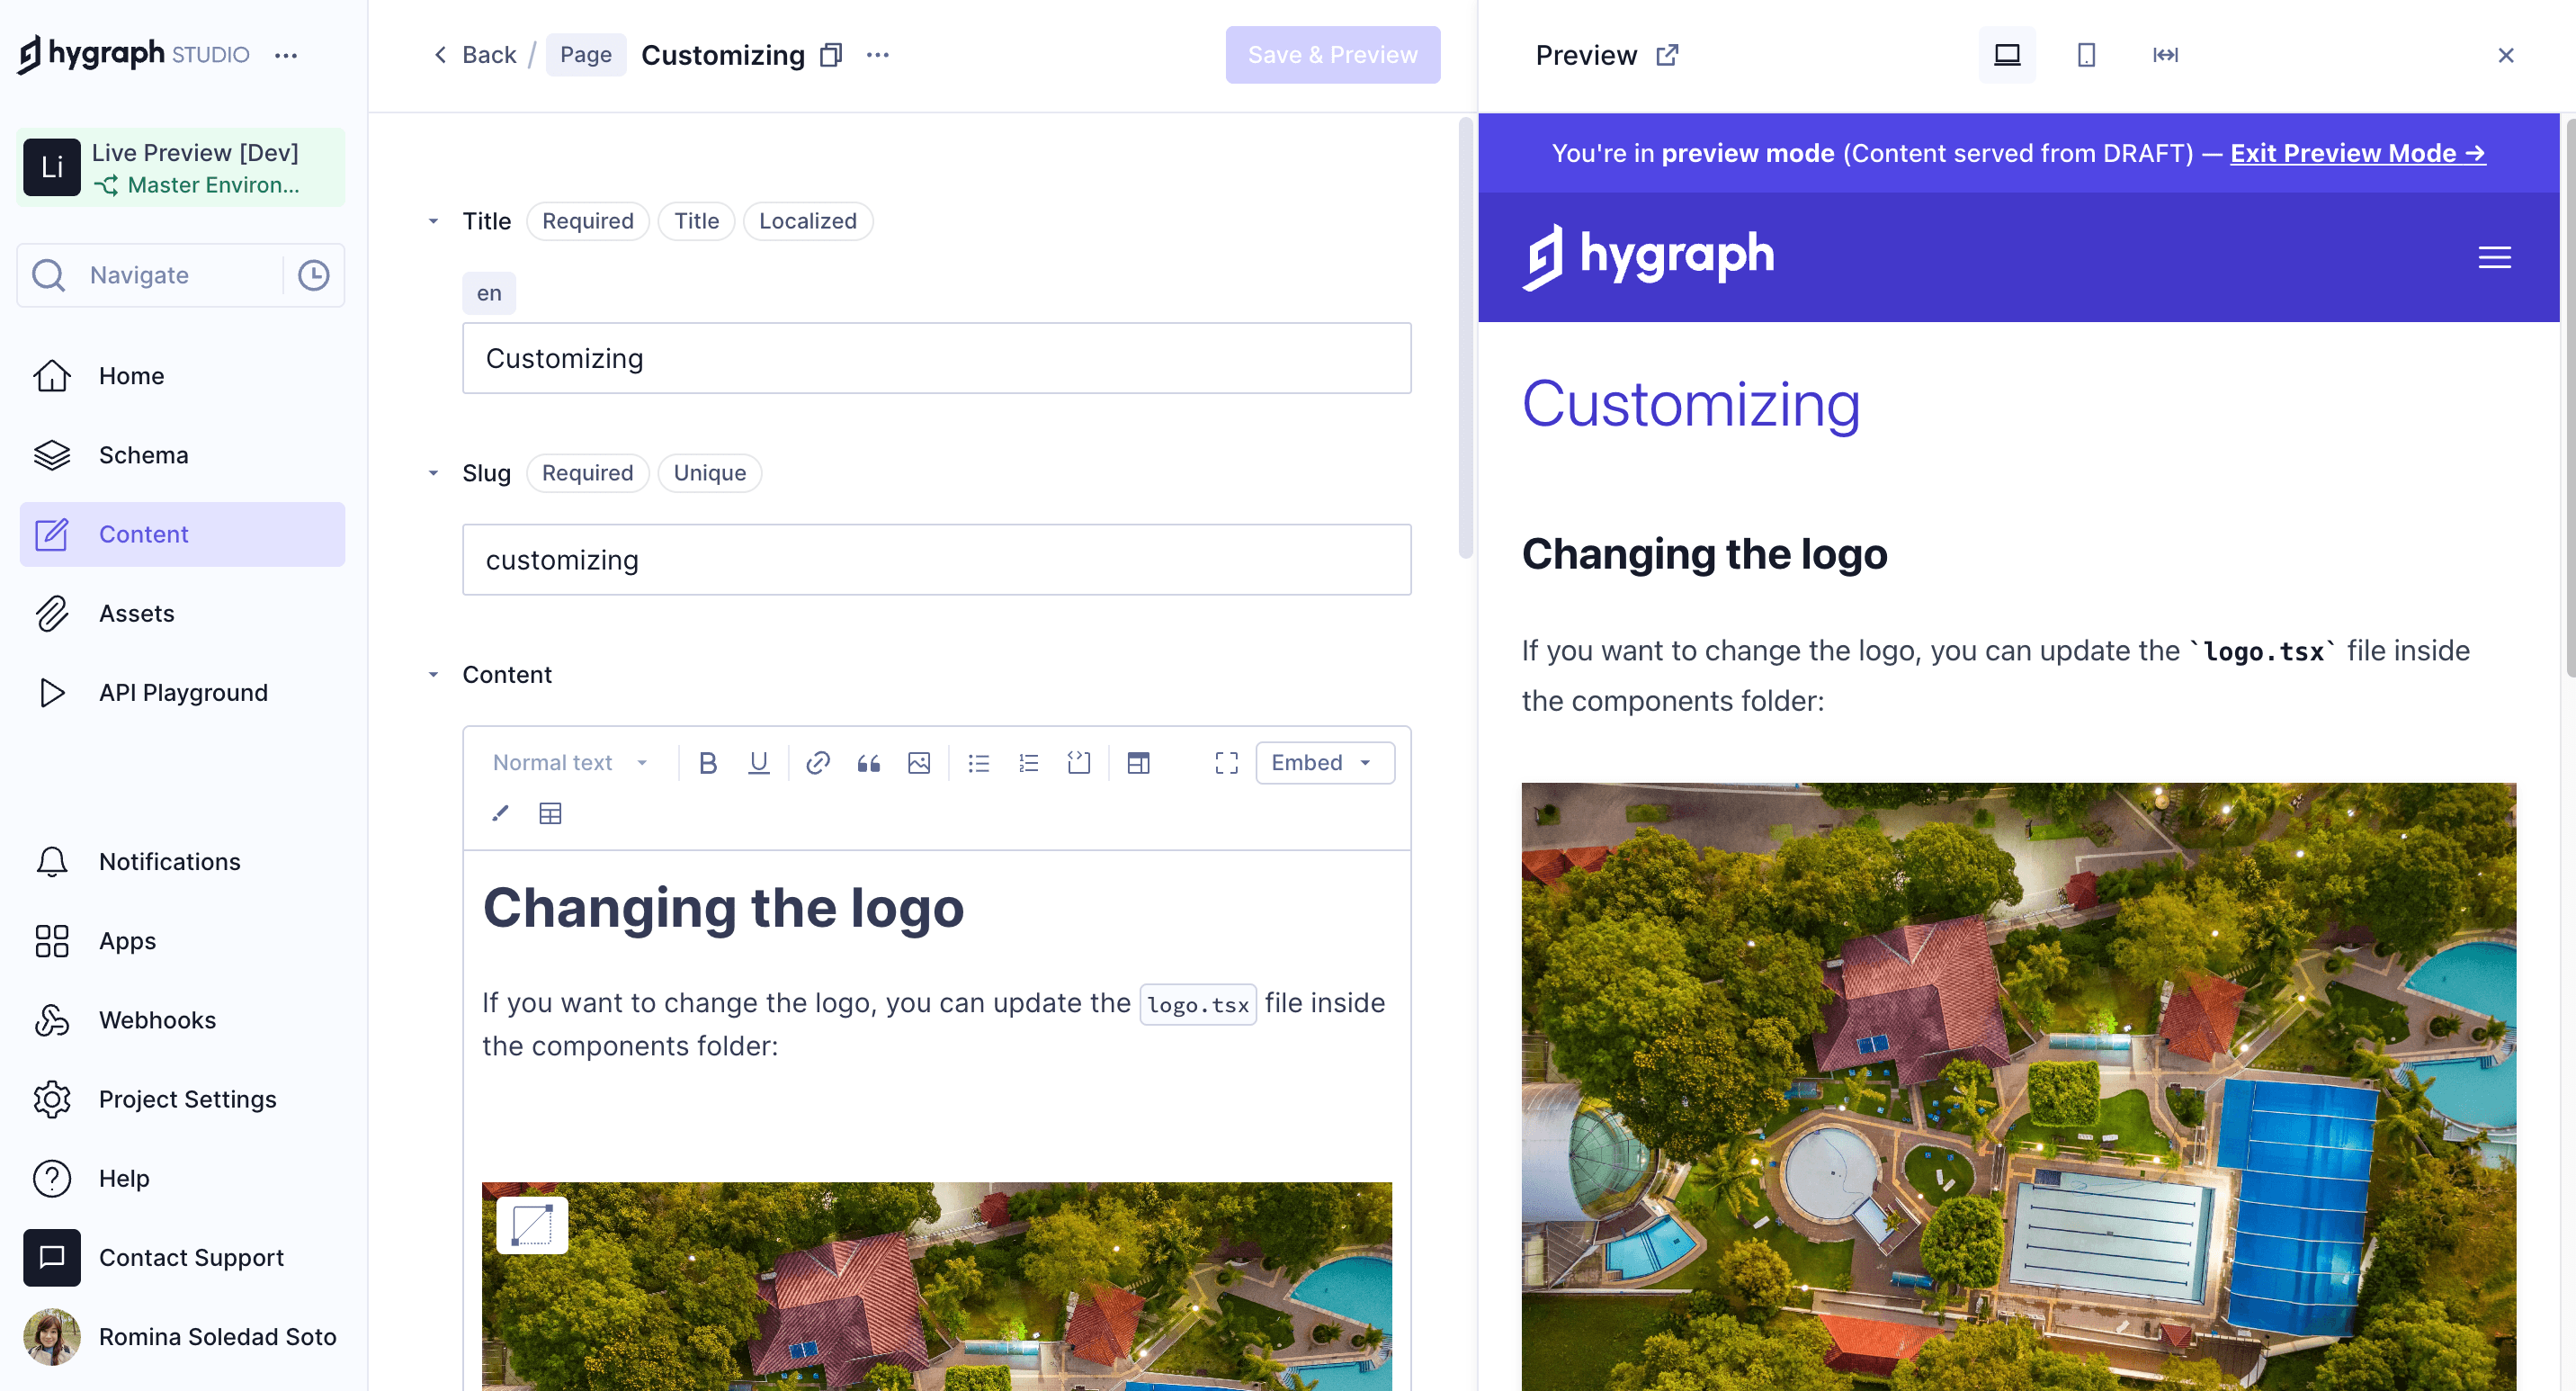
Navigate to the Content editor, select a content view, click an entry to edit, and use the 'Open live preview' button on the right sidebar. Make changes and click 'Save & preview' to update the preview. Full instructions.
Can I switch between different screen sizes in Live Preview?
Yes, Live Preview allows you to switch between desktop, mobile, and full-width views using the view switcher options at the top of the preview panel. Learn more.
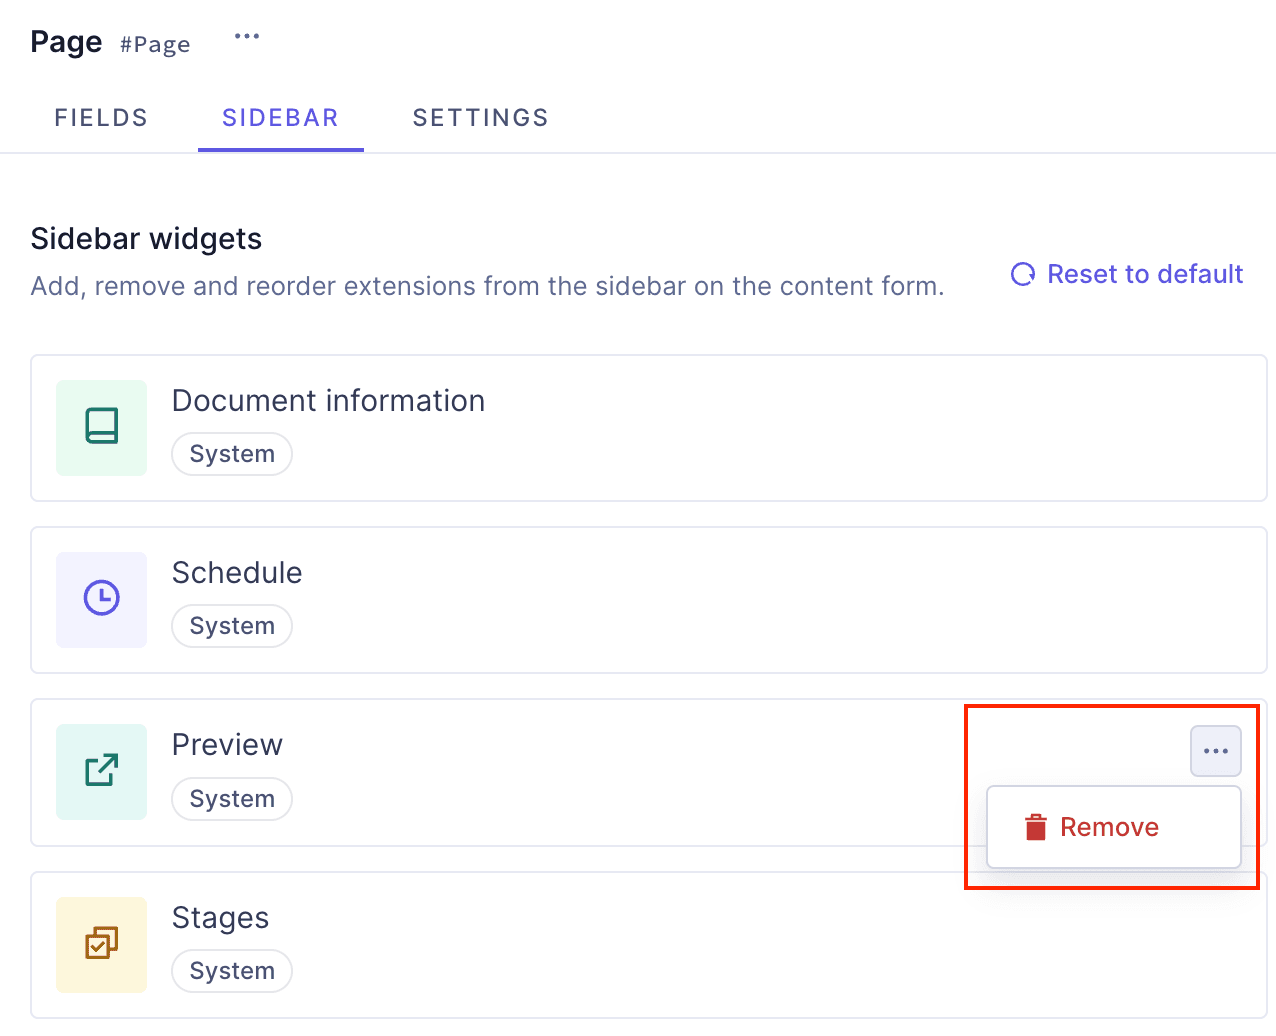
How do I delete a preview widget from my schema?
To delete a preview widget, navigate to the Schema builder, select the model containing the widget, open the context menu for the widget, and select 'Remove'. See details.
What are the limitations of Live Preview in Hygraph?
Live Preview is not compatible with native mobile applications. Requests made during preview count against your project's rate limits and usage. See all limitations.
How do I troubleshoot CSP or security header issues with Live Preview?
If the live preview panel displays an error, it may be due to strict security headers (like X-Frame-Options or Content-Security-Policy). Remove the X-Frame-Options header or add Hygraph to the Content-Security-Policy's frame-ancestors directive. Troubleshooting guide.
How do I resolve stale data issues in Live Preview?
Ensure your application reads data from the DRAFT stage and disables caching during preview. Use separate API tokens for preview (DRAFT) and production (PUBLISHED) stages. See recommendations.
Which API endpoint should I use for Live Preview?
It is recommended to use the High Performance Content API for Live Preview. New projects see only this endpoint, while older projects may use the legacy endpoint. Learn more.
How do I implement Live Preview in my frontend application?
Query the GraphQL endpoint for your page in the DRAFT stage instead of PUBLISHED. You can use a preview URL or set permissions for a preview token. For SSR apps, disable caching in preview mode. Implementation guide.
How do I set up Live Preview for Next.js applications?
Use Next.js's draftMode from the next/headers package, set cookies for preview, and query the DRAFT stage in your GraphQL queries. Adjust the preview URL and use a secret token for security. See Next.js guide.
How do I set up Live Preview for Nuxt applications?
Create a Nuxt plugin that checks for the ?preview=true query string and provides a global preview variable. Use this variable to query the DRAFT stage in your GraphQL requests. See Nuxt guide.
How do I set up Live Preview for Astro applications?
Run Astro in SSR mode, set an ENV variable for preview, and query the DRAFT stage in your GraphQL requests. Configure the preview URL in your schema sidebar. See Astro guide.
What should I do if Live Preview is not working as expected?
Check for CSP or security header issues, ensure you are querying the DRAFT stage, and verify API permissions. If issues persist, contact Hygraph support via the support channel. Troubleshooting steps.
Can I preview unpublished changes with Live Preview?
Yes, as long as your website pulls content from the DRAFT stage, you can preview unpublished changes. If you query the PUBLISHED stage, only published data will be shown. Learn more.
Is there a video tutorial for setting up Live Preview?
Yes, you can watch the official Hygraph Studio video tutorial on adding a Preview sidebar widget on YouTube.
Where can I find more technical documentation about Live Preview and related features?
Comprehensive technical documentation is available at Hygraph Documentation, including guides on schema components, references, webhooks, and AI integrations.
Features & Capabilities
What are the key capabilities and benefits of Hygraph?
Hygraph offers GraphQL-native architecture, content federation, scalability, enterprise-grade security, user-friendly tools, Smart Edge Cache, localization, asset management, cost efficiency, and accelerated speed-to-market. See all features.
Does Hygraph support integrations with other platforms?
Yes, Hygraph integrates with Digital Asset Management systems (Aprimo, AWS S3, Bynder, Cloudinary, Imgix, Mux, Scaleflex Filerobot), Adminix, Plasmic, and supports custom integrations via SDK, REST, and GraphQL. Explore the Hygraph Marketplace for more apps.
What APIs does Hygraph provide?
Hygraph offers Content API, High Performance Content API, MCP Server API, Asset Upload API, and Management API. Each serves different use cases for content querying, asset management, and project structure. API Reference.
How does Hygraph ensure high performance for content delivery?
Hygraph's high-performance endpoints are designed for low latency and high read-throughput. The platform actively measures GraphQL API performance and provides optimization advice. Read more.
Is Hygraph easy to use for non-technical users?
Yes, Hygraph is praised for its intuitive UI, ease of setup, and ability for non-technical users to manage content independently. Real-time changes are visible on the front-end, reducing bottlenecks. See user feedback.
Pricing & Plans
What pricing plans does Hygraph offer?
Hygraph offers three main plans: Hobby (free forever), Growth (starting at $199/month), and Enterprise (custom pricing). Each plan includes different features and limits. See pricing details.
What features are included in the Hobby plan?
The Hobby plan is free forever and includes 2 locales, 3 seats, 2 standard roles, 10 components, unlimited asset storage, 50MB per asset upload size, live preview, commenting, and assignment workflow. Sign up.
What features are included in the Growth plan?
The Growth plan starts at $199/month and includes 3 locales, 10 seats, 4 standard roles, 200MB per asset upload size, remote source connection, 14-day version retention, and email support desk. Get started.
What features are included in the Enterprise plan?
The Enterprise plan offers custom limits, version retention for a year, scheduled publishing, dedicated infrastructure, global CDN, security controls, SSO, multitenancy, instant backup recovery, custom workflows, dedicated support, and custom SLAs. Try for 30 days.
Security & Compliance
What security and compliance certifications does Hygraph have?
Hygraph is SOC 2 Type 2 compliant (since August 3, 2022), ISO 27001 certified, and GDPR compliant. It uses ISO 27001-certified providers and data centers. See secure features.
How does Hygraph protect customer data?
Hygraph encrypts data at rest and in transit, provides granular permissions, audit logs, SSO integrations, regular backups, and options for dedicated hosting in multiple regions. Learn more.
Use Cases & Customer Success
Who is the target audience for Hygraph?
Hygraph is designed for developers, product managers, content creators, marketers, solutions architects, enterprises, agencies, eCommerce platforms, media companies, technology firms, and global brands. See case studies.
What industries are represented in Hygraph's case studies?
Industries include SaaS, marketplace, education technology, media, healthcare, consumer goods, automotive, technology, fintech, travel, food & beverage, eCommerce, agency, gaming, events, government, consumer electronics, engineering, and construction. Explore case studies.
Can you share specific customer success stories using Hygraph?
Yes, notable success stories include Samsung (scalable API-first app), Dr. Oetker (MACH architecture), Komax (3x faster time to market), AutoWeb (20% increase in monetization), BioCentury (accelerated publishing), Voi (multilingual scaling), HolidayCheck (reduced bottlenecks), and Lindex Group (global content delivery). See all stories.
What business impact can customers expect from using Hygraph?
Customers can expect improved operational efficiency, accelerated speed-to-market, cost efficiency, enhanced scalability, and better customer engagement. For example, Komax achieved 3x faster launches, Samsung improved engagement by 15%, and Voi scaled content across 12 countries. See business impact.
How long does it take to implement Hygraph?
Implementation time varies by project. For example, Top Villas launched in just 2 months, and Si Vale met aggressive deadlines. Hygraph offers a free API playground, developer account, structured onboarding, training resources, and community support. See implementation stories.
What pain points do Hygraph customers commonly express?
Customers often face developer dependency, legacy tech stack challenges, content inconsistency, workflow inefficiencies, high operational costs, slow speed-to-market, scalability issues, complex schema evolution, integration difficulties, performance bottlenecks, and localization/asset management challenges. See customer feedback.
How does Hygraph differentiate itself in solving these pain points?
Hygraph stands out with its GraphQL-native architecture, content federation, user-friendly interface, cost efficiency, accelerated launches, robust APIs, Smart Edge Cache, and advanced localization/asset management. It is ranked 2nd out of 102 Headless CMSs in the G2 Summer 2025 report. See market recognition.
Why should a customer choose Hygraph over alternatives?
Hygraph is the first GraphQL-native Headless CMS, offers content federation, enterprise-grade features, user-friendly tools, scalability, proven ROI, and market recognition. Case studies show 3x faster launches and improved engagement. See why choose Hygraph.
The exact way to build a URL template for previews depends on your website's URL structure. You need to have a frontend already set up to be able to configure previews. You can also add localhost URLs so you can preview your work locally before publishing your website.
Typically, you will start with your domain, then a section such as a "blog". Finally, you will use handlebars notation to include a field that is unique to the content you want to preview, to use as an identifier - usually a unique slug or the ID.
The preview URL structure will vary based on your project. For example:https://preview.your-domain.com/blog/{slug} or https://your-domain.com/blog/{slug}?preview=true
The {slug} token is the most important. This will dynamically add the slug of what you are editing to the preview URL.
As soon as you type in the open curly brace in the URL template field, the system will list all the Available fields that you can add to the URL. You can use more than one of the available fields, if needed.
We also recommend adding a secret token to the URL, which only your app and Hygraph will know.
Use the Variant ID, the Segment ID, or multiple Segment IDs to set up the URL template. As a developer, you need to interpret the query parameter, and show the right variant by querying the API. For example:
Once the preview is set up, the live preview panel may display an error message. If this happens, it could be due to a strict security configuration (Security Header or Content Security Policy) on your website that prevents other websites from embedding it.
To resolve this, contact your development or security team to adjust your website's security configuration.
To fix this issue, we need to verify what's causing it. Follow these steps:
Navigate to the Network tab in your browser console.
Search for the page you are trying to see.
Under the Headers subtab, click the Response Headers.
Determine whether the security configuration matches one of the options below:
If the Content-Security-Policy header doesn't include the Hygraph domain, you need to add it. It should look similar to this: frame-ancestors 'self' https://*.hygraph.com.
OR
If the X-Frame-Options header is set, remove it from your application.
In case you are hosting on Vercel, go to your Vercel project Settings → Deployment Protection and disable Vercel Authentication to remove the X-Frame-Options header. Disabling Vercel Authentication makes preview deployments publicly accessible.
If you're still experiencing issues after fixing the security configuration, send us a message using the support channel.
If you're dealing with stale data, you need to make sure your application is reading data from the DRAFT stage, and that you don't have a caching layer when you're in preview mode.
Without this, your requests will be cached and so you will always see stale data in the UI.
Here are some recommendations:
API permissions: Make sure you define the permissions for our API correctly. You can create a token for preview and another for production.
Preview token: In your Hygraph project, go to Project Settings > Access > Permanent Auth Tokens and create a new token for preview. You need to select DRAFT as the default stage. Once on the token page, make sure you initialize default permissions.
Production token: Repeat the process to create a token, but this time select PUBLISHED as the default stage. Make sure to also initialize default permissions.
After you create the tokens, you need to update your application so you can use them:
If you are using Next.js, we recommend using Draft Mode with App Router, and for Pages Router, you can also use Draft Mode, but with a different setup.
To be able to use side-by-side visual preview in your frontend implementation, you have to query the GraphQL endpoint for your page in the DRAFT stage rather than the PUBLISHED stage.
Ways to query the DRAFT stage
Create a URL for your web app that queries the DRAFT stage of your endpoint. This could look like: https://preview.yourwebsite.com. You could also use a query parameter on the URL, like this: https://yourwebsite.com?preview=true.
Create a permission on another content API endpoint that by default returns the DRAFT stage in the context of preview. Use that in the web app you want to do preview with.
Change from PUBLISHED to DRAFT in your app based on a preview context inside your frontend.
If your app is fully SSR (server side rendered), make it query the DRAFT stage and turn off all cache while in the preview iFrame inside Hygraph.
In Next.js we have the concept of draftMode from the next/headers package. This mode sets a cookie in the browser to enable itself.
Next.js 13+
In modern Next.js (13+), the draftMode cookie is set in such a way as to not allow use of the cookie in iFrames. In the following code, the workaround allows for the setting of the cookie with draftMode, but then modifies the cookie's sameSite value to none to allow it to operate inside the Live Preview iFrame.
Once draftMode is set up you can amend your GraphQL queries so they can query for the DRAFT or PUBLISHED stages.
If you prefer, to make things easier so you don't need to update all your queries, you can also use the strategy we shared before, of having two tokens. If isEnabled is true, you can conditionally change the token.
Nuxt has a similar setup to Next.js and can put itself in preview mode as well. The below example is the simplest version. You will see this approach used by many CMS implementations.
There are more comprehensive ways to set Nuxt 3 into preview mode. Read about those in their documentation.
Create a Nuxt plugin in the plugins folder like so: /plugins/review.ts. Nuxt will automatically read it once it starts up.
Astro is generally focused on SSG rendering (static pages) and due to its incredible flexibility in terms of using frontend frameworks, there is no official “preview mode”.
To make it work with Hygraph:
Use output: 'server' to render the Astro site in SSR mode
Set an ENV variable for preview to true. For example: ASTRO_USE_PREVIEW and based on that set your stage from PUBLISHED to DRAFT.
As the site runs in SSR mode it will always query the DRAFT endpoint for fresh data.
In astro.config.mjs:
import{ defineConfig }from'astro/config';
importvercelfrom'@astrojs/vercel/serverless';
exportdefaultdefineConfig({
output:'server',
adapter:vercel(),
});
Pro Tip
You can choose other adapters as well, like: node, Netlify, or Cloudflare.
This is a simplified example to get the basics across. See our SKNCRE Cosmetics Shop Starter for a full implementation.
Astro preview URL structure
Since you cannot set Astro to a preview mode like Next and Nuxt, what you will do is make it read from the DRAFT stage and set an ENV variable in the build system that says to query DRAFT. You should also configure the output: 'server' setting in the config.
You will then configure your preview URL in the sidebar by creating a URL for your web app that queries the DRAFT stage of your endpoint. This could look like this: https://preview.yourwebsite.com or it could have a query parameter in the URL like this: https://yourwebsite.com?preview=true.