To create and modify content in Hygraph, use the content editor screen. You can add entries for models such as Assets, Product Categories, Seller Information, Products, Blog Posts, Landing Pages, and Navigation. Each entry can be customized with fields like name, slug, description, images, and related components. For example, to add a product, navigate to the Product model, click '+ Add entry', fill in the required fields, and click 'Save & Publish'. Step-by-step guides are available in the official documentation.
How do I manage assets and images in Hygraph?
Assets such as images can be managed in the Assets tab. You can add alternative text and captions to each image for accessibility and SEO. Hygraph provides sample images to get started, and you can upload your own assets as needed. For more details, see the asset upload guide.
How do I create product categories and relate products to categories?
Product categories are created in the Product Category model. Each category entry includes a name, slug, and description. Products can be related to multiple categories using a many-to-many reference, allowing flexible organization. For example, a product can be both a 'New Arrival' and 'Sportswear'.
How do I add related products to a product entry?
To add related products, edit the product entry and use the Related Products component. Select up to four related products from existing entries. This feature helps cross-promote items and improve user experience on your e-commerce site.
How do I create landing pages and navigation entries in Hygraph?
Landing pages are created using the Landing Page model. You can add components such as call-to-action sections and product grids, and relate them to products and seller information. Navigation entries are managed in the Navigation model, where you can add links to categories and campaigns for your site's main navigation.
Features & Capabilities
What are the key features of Hygraph?
Hygraph offers a GraphQL-native Headless CMS with features such as Smart Edge Cache for fast content delivery, content federation, granular permissions, custom roles, rich text formatting, project backups, and enterprise-grade security. It supports multi-channel content delivery, localization, and integration with third-party systems. For a full list, visit Hygraph Features.
How does Hygraph ensure high performance for content management?
Hygraph uses Smart Edge Cache and high-performance endpoints to deliver fast and reliable content globally. The platform continuously improves its GraphQL API performance and provides practical advice for developers to optimize API usage. For more details, see the performance improvements blog.
What security and compliance certifications does Hygraph have?
Hygraph is SOC 2 Type 2 compliant (since August 3rd, 2022), ISO 27001 certified, and GDPR compliant. It offers granular permissions, SSO integrations, audit logs, encryption at rest and in transit, and regular backups. For more information, see the security features page and security report.
Use Cases & Benefits
Who can benefit from using Hygraph?
Hygraph is ideal for developers, product managers, and marketing teams in industries such as ecommerce, automotive, technology, food and beverage, and manufacturing. It is especially suited for organizations modernizing legacy tech stacks, global enterprises needing localization, and businesses seeking scalable, future-proof content management solutions.
What problems does Hygraph solve for businesses?
Hygraph addresses operational inefficiencies (reducing developer dependency, streamlining workflows), financial challenges (lowering operational costs, accelerating speed-to-market), and technical issues (simplifying schema evolution, improving integration, optimizing performance, and enhancing localization and asset management). These solutions help businesses deliver exceptional digital experiences. See related KPIs.
Can you share some customer success stories with Hygraph?
Yes. Komax achieved a 3X faster time-to-market, Autoweb saw a 20% increase in website monetization, Samsung improved customer engagement by 15%, and Stobag increased online revenue share from 15% to 70%. More stories are available at Hygraph Customer Stories.
Ease of Use & Onboarding
How easy is it to get started with Hygraph?
Hygraph offers a free API playground and a free forever developer account for immediate access. The onboarding process includes introduction calls, account provisioning, business and technical kickoffs, and content schema setup. Training resources such as webinars, live streams, and how-to videos are available, along with extensive documentation at Hygraph Documentation.
What feedback have customers given about Hygraph's ease of use?
Customers praise Hygraph's intuitive editor UI, accessibility for non-technical users, and ease of setup. It was recognized for 'Best Usability' in Summer 2023. Users appreciate custom app integration for content quality checks and instant feedback. Source: Hygraph Reviews.
How long does it take to implement Hygraph?
Implementation time varies by project. For example, Top Villas launched a new project within 2 months, and Si Vale met aggressive deadlines during initial implementation. The structured onboarding process and training resources help accelerate adoption. See Top Villas Case Study.
Support & Maintenance
What support and training resources are available for Hygraph users?
Hygraph provides 24/7 support via chat, email, and phone, real-time troubleshooting through Intercom chat, a community Slack channel, extensive documentation, webinars, live streams, and how-to videos. Enterprise customers receive a dedicated Customer Success Manager. See Hygraph Documentation and Enterprise Support.
How does Hygraph handle maintenance, upgrades, and troubleshooting?
Hygraph is a cloud-based platform, so all deployment, updates, security, and infrastructure maintenance are managed by Hygraph. Upgrades are seamless and require no manual intervention. Troubleshooting is supported by 24/7 support, Intercom chat, community Slack, and self-service documentation. Source: Hygraph Docs.
KPIs & Metrics
What KPIs and metrics are associated with Hygraph's solutions?
Key metrics include time saved on content updates, number of updates without developer intervention, system uptime, speed of deployment, content consistency across regions, user satisfaction scores, reduction in operational costs, ROI, speed to market, maintenance costs, scalability, and performance during peak usage. For more, see CMS KPI Blog.
Vision & Differentiation
What is Hygraph's vision and mission?
Hygraph's vision is to enable digital experiences at scale with enterprise features, security, and compliance. The mission is rooted in trust, collaboration, ownership, customer focus, continuous learning, transparency, and action-first values. Hygraph empowers businesses to modernize content management and deliver exceptional digital experiences. Source: Company Values.
How does Hygraph differentiate itself from other CMS platforms?
Hygraph stands out as the first GraphQL-native Headless CMS, offering content federation, Smart Edge Cache, user-friendly tools for non-technical users, and enterprise-grade security and compliance. Its composability and integration capabilities make it a future-proof solution for scaling digital operations. Source: Features.
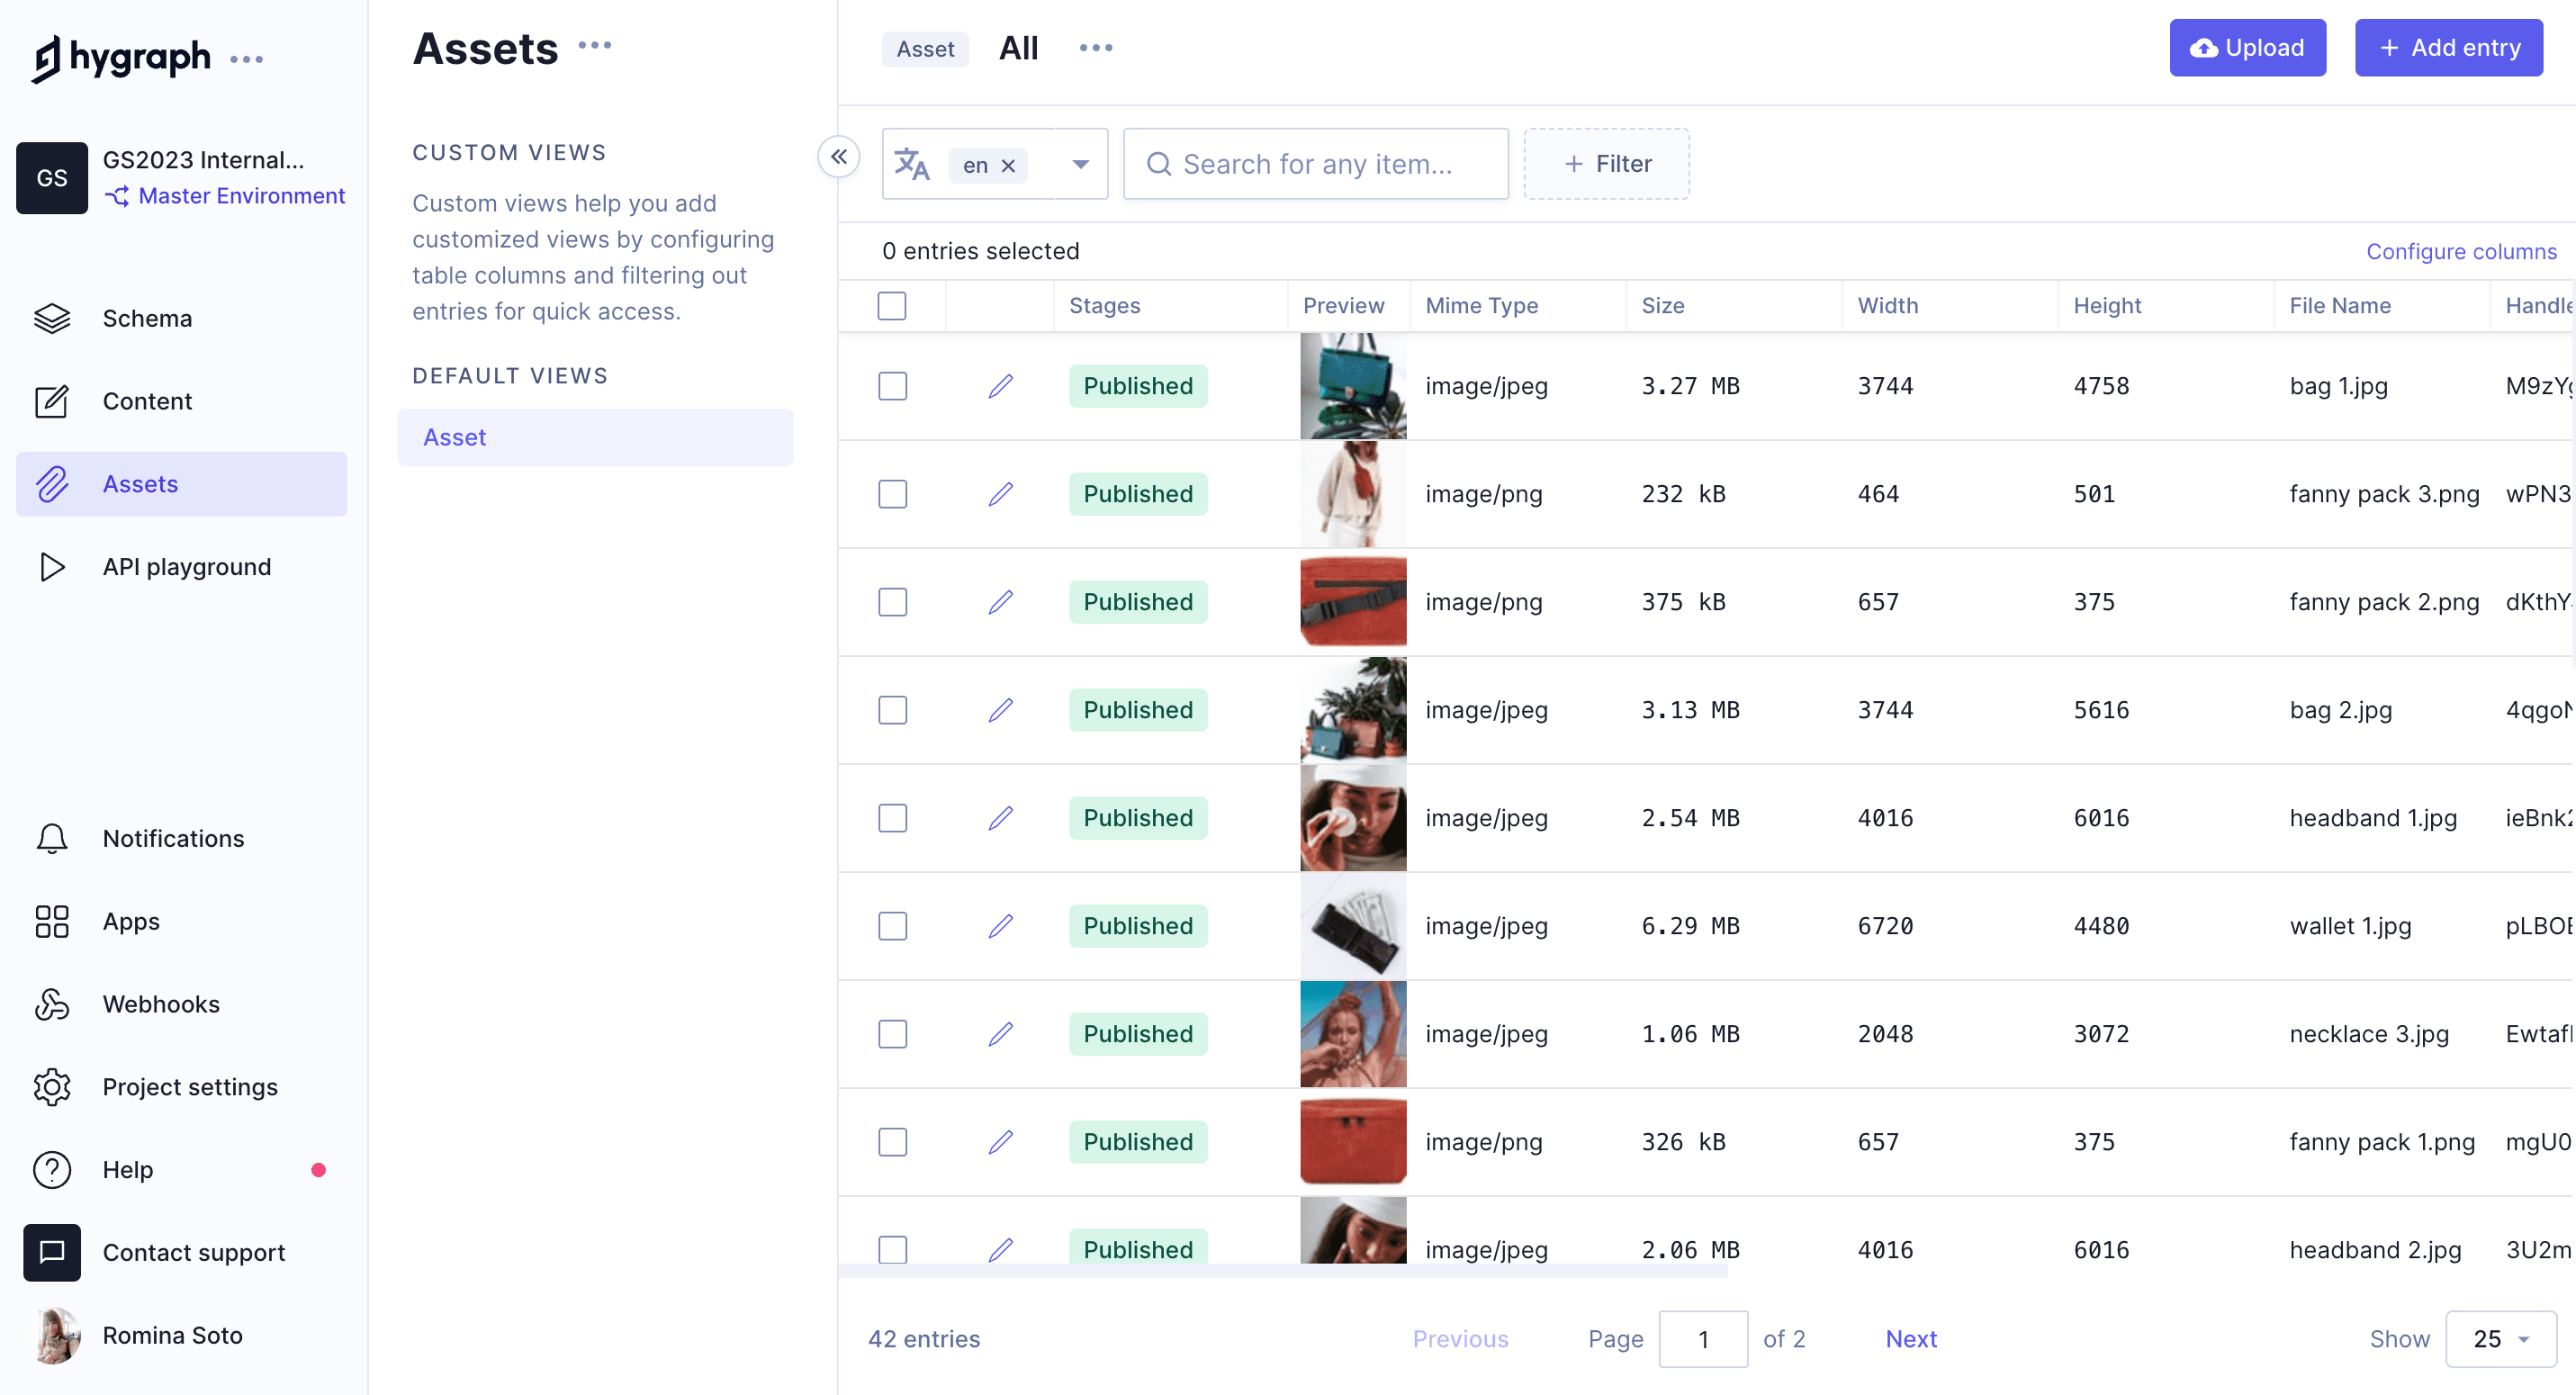
During schema building, we modified our Assets system model so the images would have alternative text and a caption. If we go to the Assets tab of our Hygraph project, we'll notice that already contains images. We've provided these images from the get go so you would't have to upload them yourself. If you're interested in learning more about asset upload, check out this document.
Our assets table should look like this:
Assets table with images
We need to manually add the Alt text and Caption for each image. Let's do the first one together: We'll write “colorful socks” in the search filter to find the images we're looking for, and we'll click on the pencil icon of the first result on the list to access the edit mode.
We'll fill in the following information:
Field
Input
Alt text
Colorful socks
Caption
A pair of red socks with a white pattern design
We'll click on Save & Publish, and once it's saved, we'll go back to the assets table by clicking the arrow icon at the top left corner of the edit screen.
You'll repeat this for the other two images that you get when you search for "colorful socks".
After you're done with this set of three images, you can click on the X next to the “colorful socks” search reset it, and you'll be ready to repeat the process for the rest of the images.
In earlier lessons of this tutorial, we created the Product Category model and a reference linking it to the Product model. The goal was to let us select categories for products when creating a listing, while also giving customers the option to browse items by category.
Once we have created content entries in both models, we can begin to establish relations between them, but at the moment, our Product Category model doesn't have any.
The content table in the Content editor is empty for now:
Product categories in the content editor
Each content entry that we create here will become a category that we can later relate our products to.
Pro Tip
Since we configured the reference that links the Product category and Product models as a two-way reference that connects many-to-many, we will be able to add multiple products per category, and multiple categories per product.
However, since we haven't created any product entries yet, we cannot establish these relations. For now, we will only create the categories and then, later on in the tutorial, we will relate those categories to product entries.
Let's do the first one together. To create a new entry, navigate to the Product category model in the content editor, and click + Add entry at the top right corner of the screen.
Use the following information:
Field
Input
Category name
Clothes
Slug
clothes
Description
You will find clothes here
Remember to Save & Publish after you're done.
We'll create one entry for each of the categories we want to have in our e-commerce. We'll use the following information:
For our shoes category
Field
Input
Category name
Shoes
Slug
shoes
Description
You will find shoes here
For our sportswear category
Field
Input
Category name
Sportswear
Slug
Sportswear
Description
You will find Sportswear here
For our urban category
Field
Input
Category name
Urban
Slug
urban
Description
You will find urban-style items here
For our new arrival category
Field
Input
Category name
New arrival
Slug
new-arrival
Description
You will find our latest arrivals here
For our decor category
Field
Input
Category name
Decor
Slug
decor
Description
You will find decor items here
For our accessories category
Field
Input
Category name
Accessories
Slug
accessories
Description
You will find accessories here
We've purposely created some overlapping categories - i.e. a product can be both a new arrival and sportswear - since we created a reference type where one product can be related to more than one category.
Now that we've created our categories, our Product Categories view in the Content editor should look like this:
Product categories in the content editor - with entries
Now let's create some content for our Seller information model. This model will contain information about our e-commerce business, so we'll create a single entry here.
Please follow the same process as in the previous lesson to create your entry. Your entry should have the following information:
Field
Input
Business name
My business
Slug
my-business
Business logo
Click on Add business logo and select the Hygraph logo from your assets. Click on the relation icon - first column - to add it.
Business description
This is a description of my business
Click on Save & publish
Our Seller information view in the Content editor should look like this:
Next, we're going to work on our product entries. These will be the product listings of our e-commerce. Because we currently have no entries for this model, we will work on this in two steps: first, we'll create a basic product listing, and then we'll add the related products by editing our initial entries.
We'll navigate to the Product content model in the content editor and click on + Add entry.
Add product content entry
We'll use the following information:
Field
Input
Product name
Black leather shoes
Product slug
black-leather-shoes
Product category
We'll click on Add existing Product categories, and we'll select Shoes, New arrival
Product image
we'll click on Add Product images, and we'll select the images called black leather shoes. To find them quickly, we can type “black leather shoes” in the search filter on top of the table, and we'll add them to the entry by clicking on Add selected images.
Product description
These black leather shoes seamlessly blend sophistication with durability, making them a versatile choice for both formal occasions and everyday wear. The sleek design and high-quality leather ensure a timeless appeal that complements any outfit.
Product variant
We'll click on Add component to display our options, and then we'll select Shoes. We configured the Shoes component to have the size and color enumerations, so we'll select Size “Size_40” and color “Black”.
Product price
170
At this point, because we have no other products published to relate, we'll just go ahead and click on Save & publish at the top right corner of the screen. We'll come back to our entries later to add relations.
Product content entry
Now it's time to practice. We'll create some additional content so we can query it later when we work with the API Playground. You'll create three more content entries, following the same process we just went through together, using the following information:
Blue running shoes
Field
Input
Product name
Blue running shoes
Product slug
blue-running-shoes
Product category
Select Sportswear, and Shoes.
Product image
Select the images with the file name blue running shoes.
Product description
These blue running shoes offer both form and function, providing exceptional support and style for your active pursuits. The breathable material and cushioned sole ensure a comfortable experience mile after mile.
Product variant
Select the product type “Shoes”, and then Size “Size_42” and color “Blue”.
Product price
130
Plaid shirt
Field
Input
Product name
Plaid shirt
Product slug
plaid-shirt
Product category
Select New arrival, Urban, Clothes.
Product image
Select the images with the file name blue plaid shirt.
Product description
This plaid shirt exudes a timeless charm, perfect for a casual day out or a relaxed evening gathering. The classic checkered pattern and comfortable fit make it a wardrobe staple for effortless style.
Product variant
Select the product type “Clothing”, and then Size “XL” and color “Blue”.
Product price
60
Necklace
Field
Input
Product name
Necklace
Product slug
necklace
Product category
Select Accessories.
Product image
Select the images with the file name necklace.
Product description
This white necklace is crafted from parts of seashells, evoking a relaxed, beachy vibe. Perfect for those looking to add a touch of the sea to their daily style.
Product variant
Select the product type “Accessories”, and then Color “White”.
Product price
12
Headband
Field
Input
Product name
Headband
Product slug
headband
Product category
Select Accessories.
Product image
Select the images with the file name headband.
Product description
This white cotton headband provides an elegant and sophisticated touch to your hairstyle. Perfect for completing your look with a blend of fashion and comfort.
Product variant
Select the product type “Accessories”, and then Color “White”.
Now that we have all our basic content entries, we should add related products to each one.
Just like before, we'll go over the first one together, and then you can work on the rest:
We'll click on the pencil icon of the Headband product entry; this will take us to the edit view. We'll scroll down to where we have our Related products component, and we'll click on + Add Related products.
Remember that when we configured this component, we wanted the title section to be read-only to ensure it'd be the same throughout our e-commerce, so we can now see that the title “Related products” is grayed out and can't be edited.
Next, we have the products section, which says “Add 4 related products here”. This is exactly what we'll do. We'll click on Add existing products and use the checkboxes to select the black leather shoes, necklace, blue running shoes, and plaid shirt. We'll click on Add selected products, and that's it. We can now see the 4 products that we related to our content entry listed in our component:
Component with related products
We'll click Save & Publish at the top right corner of the screen to save the updated entry.
Now, please follow the same steps for our other product entries. Here's a table containing each product entry and the products you should relate them to:
Product content entry
Related products
Blue running shoes
black leather shoes necklace headband plaid shirt
Black leather shoes
blue running shoes necklace headband plaid shirt
Necklace
black leather shoes blue running shoes headband plaid shirt
Plaid shirt
black leather shoes necklace headband blue running shoes
Let's also create a blog post entry that we can later display for promotion on our landing page.
We'll open the Blog post model in the content editor and create a new entry using the following information:
Field
Input
Title
Our new leather shoes
Slug
The Slug will autocomplete since we configured it to autogenerate from a template.
Body
We'll write “Take a look at this awesome new arrival”. When we configured this Rich Text field, we decided to allow embeds, so let's use this to showcase the product we're talking about. We'll click on Embed, select Block, we'll use the dropdown to select the Product model, and then we'll click Select model. A screen will pop up, showing us all the product entries that we created previously. Let's click on the relation icon - first column - to select our Black leather shoes product entry.
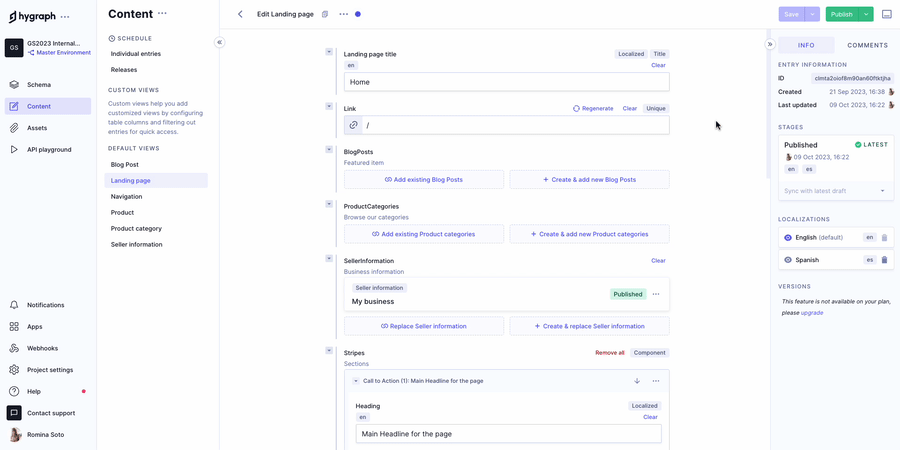
We'll create two landing pages for our e-commerce project: One that will be our homepage, and another one that will hold information for our summer campaign.
Let's create our homepage. We couldn't have created this page earlier, because we configured it to contain mostly related content, so we needed the rest of the content to be created before we could get into it.
We'll open the Landing page model in the content editor and create a new entry with the following information:
Field
Input
Landing page title
Home
Link
Simply write / here.
Blog posts
We'll leave this empty for now.
Product categories
We'll leave this empty for now.
Seller information
We'll add the seller information we created before.
Stripes
Click on +Add component and add a call to action & a product grid, using the information in the following tables.
Call to action
Field
Input
Heading
We'll write “Main Headline for the page”.
Body
We'll write “We provide amazing products from outerwear, shoes, homegoods, and more! Be sure to check out all the amazing products”.
Image
Add “Hygraph_Logo”.
Button
Click on + Add Button and write “Shop Now” in the Text field, and https://google.com in the URL field.
Product Grid
Field
Input
Headline
We'll write “Picks of the month”.
Products
We'll add relations to the following product entries: blue running shoes, black leather shoes, necklace, headband, plaid shirt.
You would normally use a many more products here, but our e-commerce only has a few for now.
Now that we're done, let's click Save & publish.
The landing page model we created allows us to create other pages as well. We want our e-commerce to have a dedicated section for the summer campaign, so we'll create it using this model.
We'll follow the same steps as for the homepage, using the following information:
Field
Input
Landing page title
Summer Campaign
Link
summer-campaign
Blog posts
We'll leave this empty for now.
Product categories
We'll leave this empty for now.
Seller information
We'll add the seller information we created before.
Stripes
Click on +Add component and add a call to action & a product grid, using the information in the following tables.
Call to action
Field
Input
Heading
We'll write “Get ready for Summer with these amazing deals”
Body
We'll write “The Summer Sale is in full swing! See the amazing summer deals we have listed below!”.
Image
We'll leave this empty for now.
Button
We'll leave this empty for now.
Product Grid
Field
Input
Headline
We'll write “Summer wear”.
Products
We'll add relations to the following product entries: blue running shoes, black leather shoes, necklace, headband, plaid shirt.
In a previous lesson, we added a Link component to our Navigation model. That model allows us to add links to a Navigation content entry, that can later be used by our frontend.
We want our e-commerce to have a main navigation that displays some of our important categories - such as clothes, shoes, accessories, and decor - as well as the Summer Campaign page we created in the previous step.
We'll open the Navigation model in the content editor and create a new entry with the following information:
Field
Input
Nav ID
main
Nav Link
This is the component we added in the lesson about adding component fields to a model. We will add one of these components for each link we want in our navigation. We'll click on + Add Link to start and complete the fields inside the component with the information in the following table.
Clothes link
Field
Input
Display Text
Clothes
Page
We'll leave this as is for now.
External URL
/category/clothes
Our first navigation link is ready, time to add the rest of the Nav Link components. We'll click on + Add another Link to start and we'll repeat the process for each link with the following information:
Shoes link
Field
Input
Display Text
Shoes
Page
We'll leave this as is for now.
External URL
/category/shoes
Accessories link
Field
Input
Display Text
Accessories
Page
We'll leave this as is for now.
External URL
/category/accessories
Decor link
Field
Input
Display Text
Decor
Page
We'll leave this as is for now.
External URL
/category/decor
Summer Campaign link
Field
Input
Display Text
Summer Campaign
Page
We'll click on Add existing document and elect the Summer campaign landing page that we created in the last lesson.
External URL
We'll leave this as is for now.
Now our Navigation content entry has all the links the frontend needs to show. We'll see them later on when we integrate our content with our frontend.
Next step
Once you've created some content for your project, move on to our next lesson:
During schema building, we modified our Assets system model so the images would have alternative text and a caption. If we go to the Assets tab of our Hygraph project, we'll notice that already contains images. We've provided these images from the get go so you would't have to upload them yourself. If you're interested in learning more about asset upload, check out this document.
Our assets table should look like this:
Assets table with images
We need to manually add the Alt text and Caption for each image. Let's do the first one together: We'll write “colorful socks” in the search filter to find the images we're looking for, and we'll click on the pencil icon of the first result on the list to access the edit mode.
We'll fill in the following information:
Field
Input
Alt text
Colorful socks
Caption
A pair of red socks with a white pattern design
We'll click on Save & Publish, and once it's saved, we'll go back to the assets table by clicking the arrow icon at the top left corner of the edit screen.
You'll repeat this for the other two images that you get when you search for "colorful socks".
After you're done with this set of three images, you can click on the X next to the “colorful socks” search reset it, and you'll be ready to repeat the process for the rest of the images.
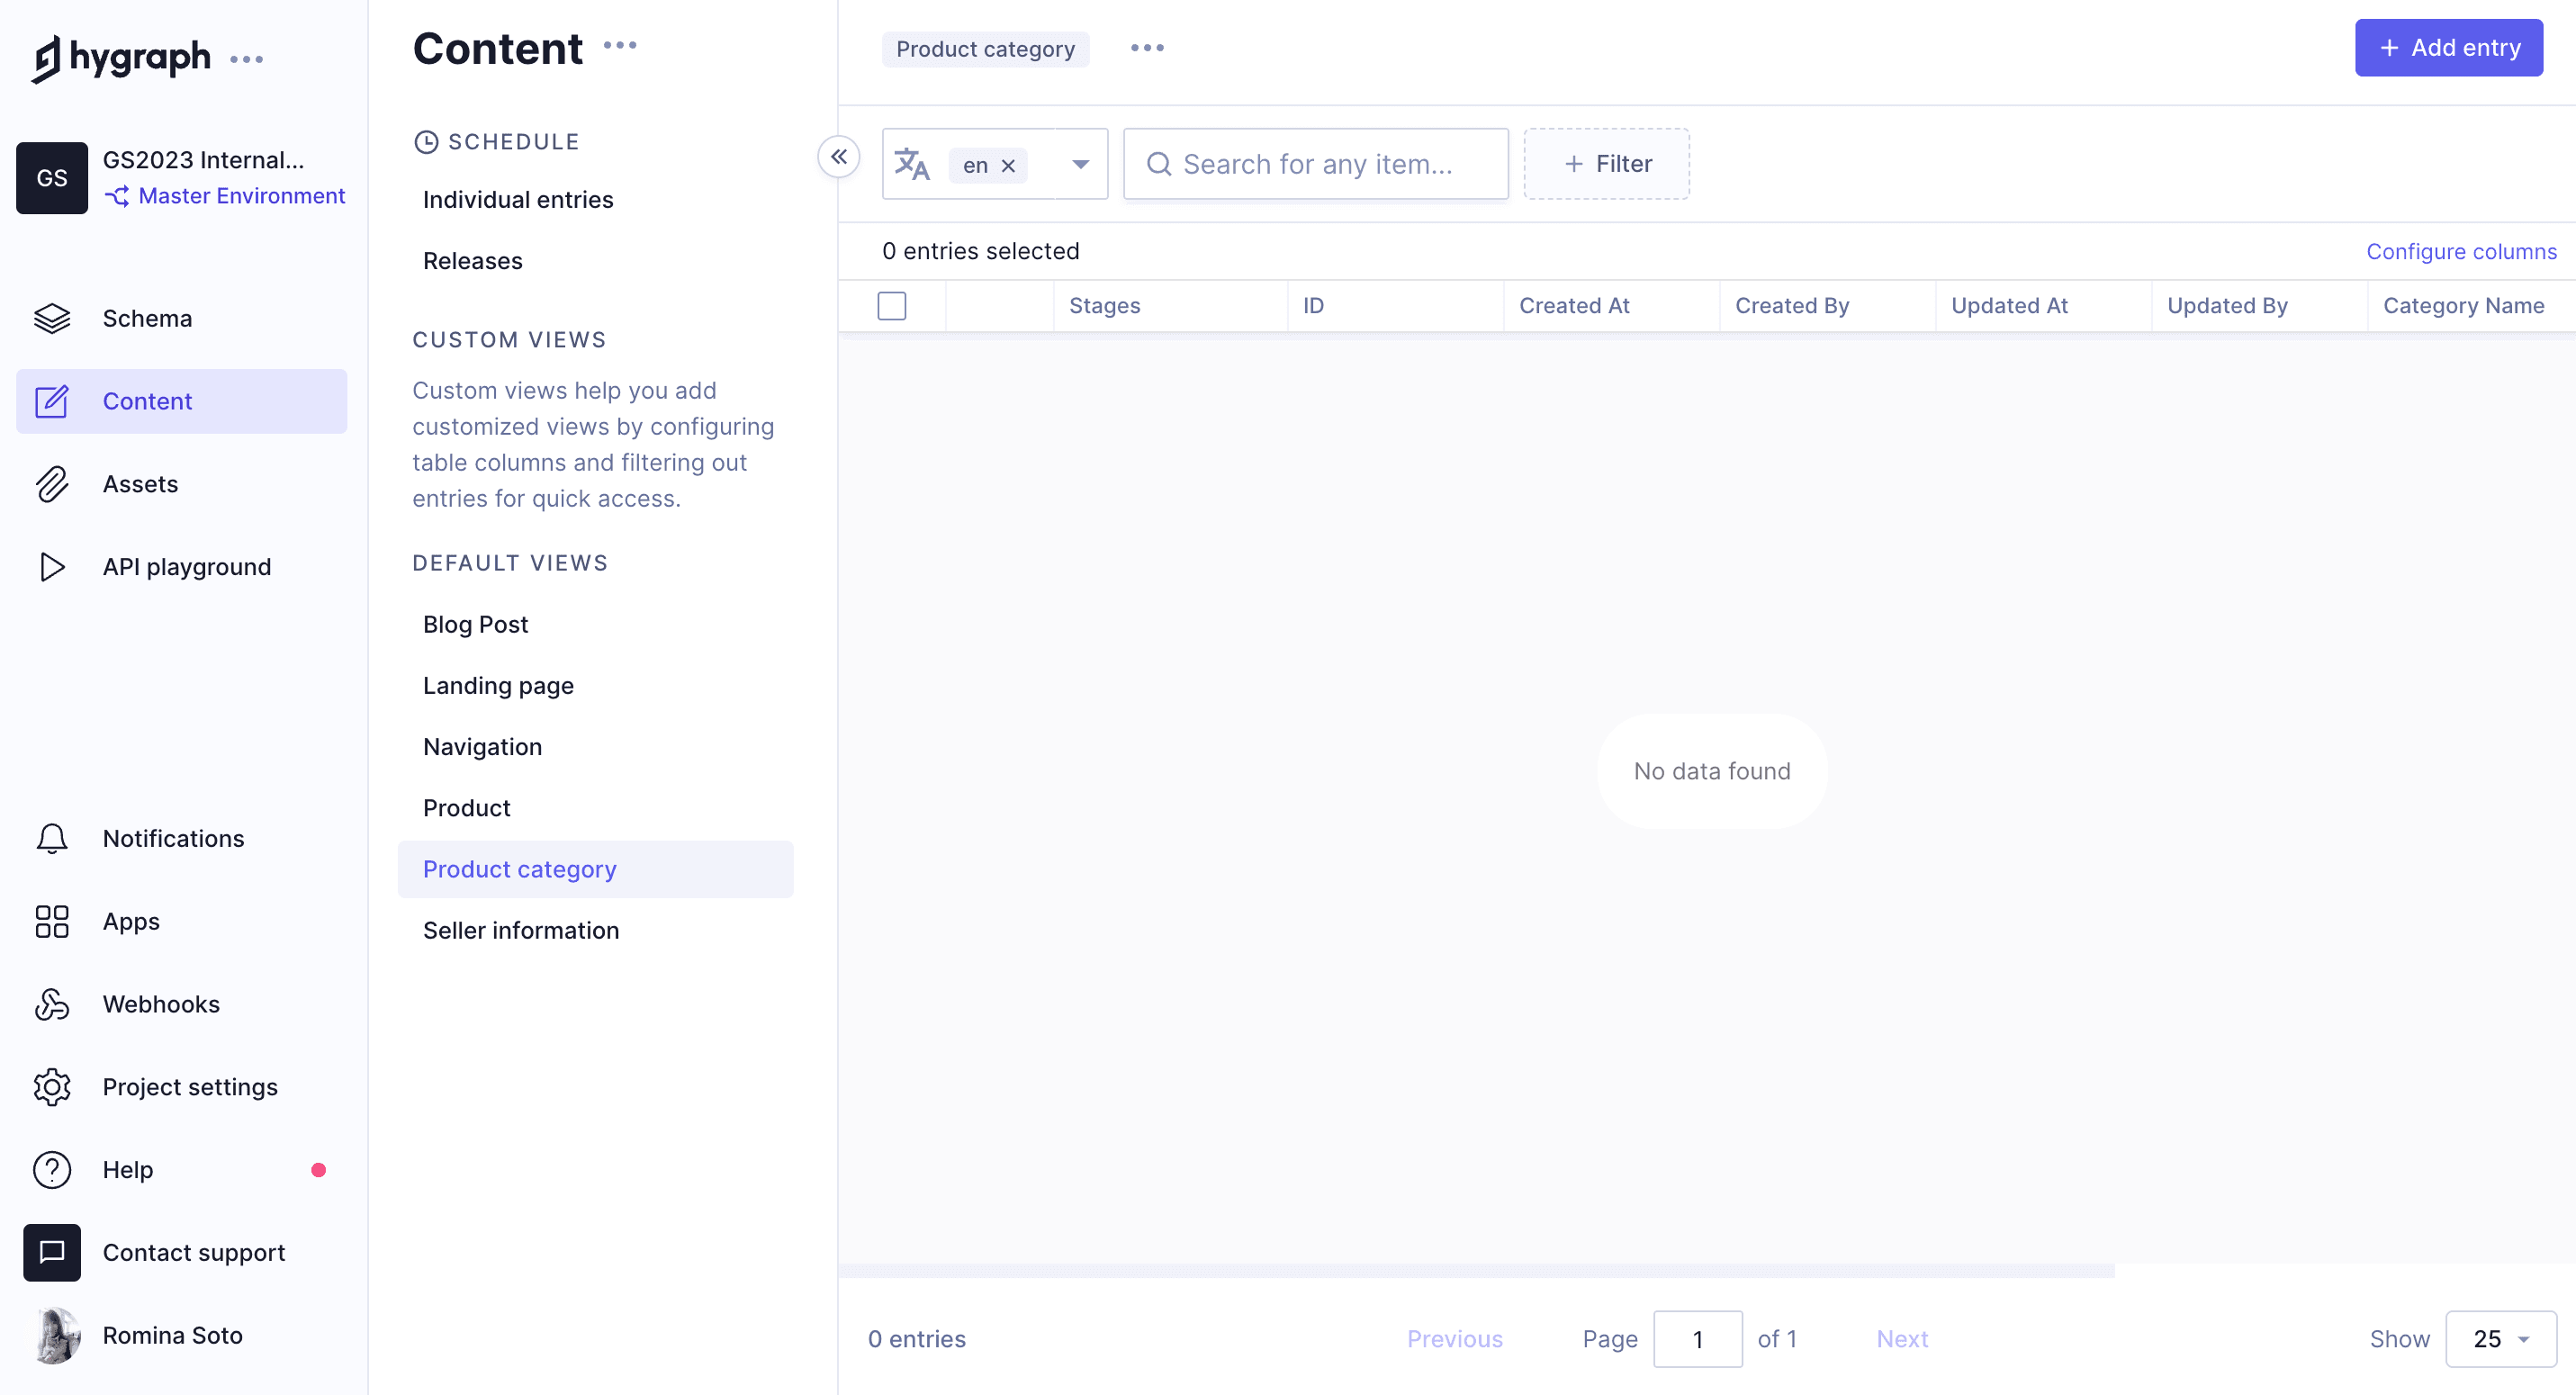
In earlier lessons of this tutorial, we created the Product Category model and a reference linking it to the Product model. The goal was to let us select categories for products when creating a listing, while also giving customers the option to browse items by category.
Once we have created content entries in both models, we can begin to establish relations between them, but at the moment, our Product Category model doesn't have any.
The content table in the Content editor is empty for now:
Product categories in the content editor
Each content entry that we create here will become a category that we can later relate our products to.
Pro Tip
Since we configured the reference that links the Product category and Product models as a two-way reference that connects many-to-many, we will be able to add multiple products per category, and multiple categories per product.
However, since we haven't created any product entries yet, we cannot establish these relations. For now, we will only create the categories and then, later on in the tutorial, we will relate those categories to product entries.
Let's do the first one together. To create a new entry, navigate to the Product category model in the content editor, and click + Add entry at the top right corner of the screen.
Use the following information:
Field
Input
Category name
Clothes
Slug
clothes
Description
You will find clothes here
Remember to Save & Publish after you're done.
We'll create one entry for each of the categories we want to have in our e-commerce. We'll use the following information:
For our shoes category
Field
Input
Category name
Shoes
Slug
shoes
Description
You will find shoes here
For our sportswear category
Field
Input
Category name
Sportswear
Slug
Sportswear
Description
You will find Sportswear here
For our urban category
Field
Input
Category name
Urban
Slug
urban
Description
You will find urban-style items here
For our new arrival category
Field
Input
Category name
New arrival
Slug
new-arrival
Description
You will find our latest arrivals here
For our decor category
Field
Input
Category name
Decor
Slug
decor
Description
You will find decor items here
For our accessories category
Field
Input
Category name
Accessories
Slug
accessories
Description
You will find accessories here
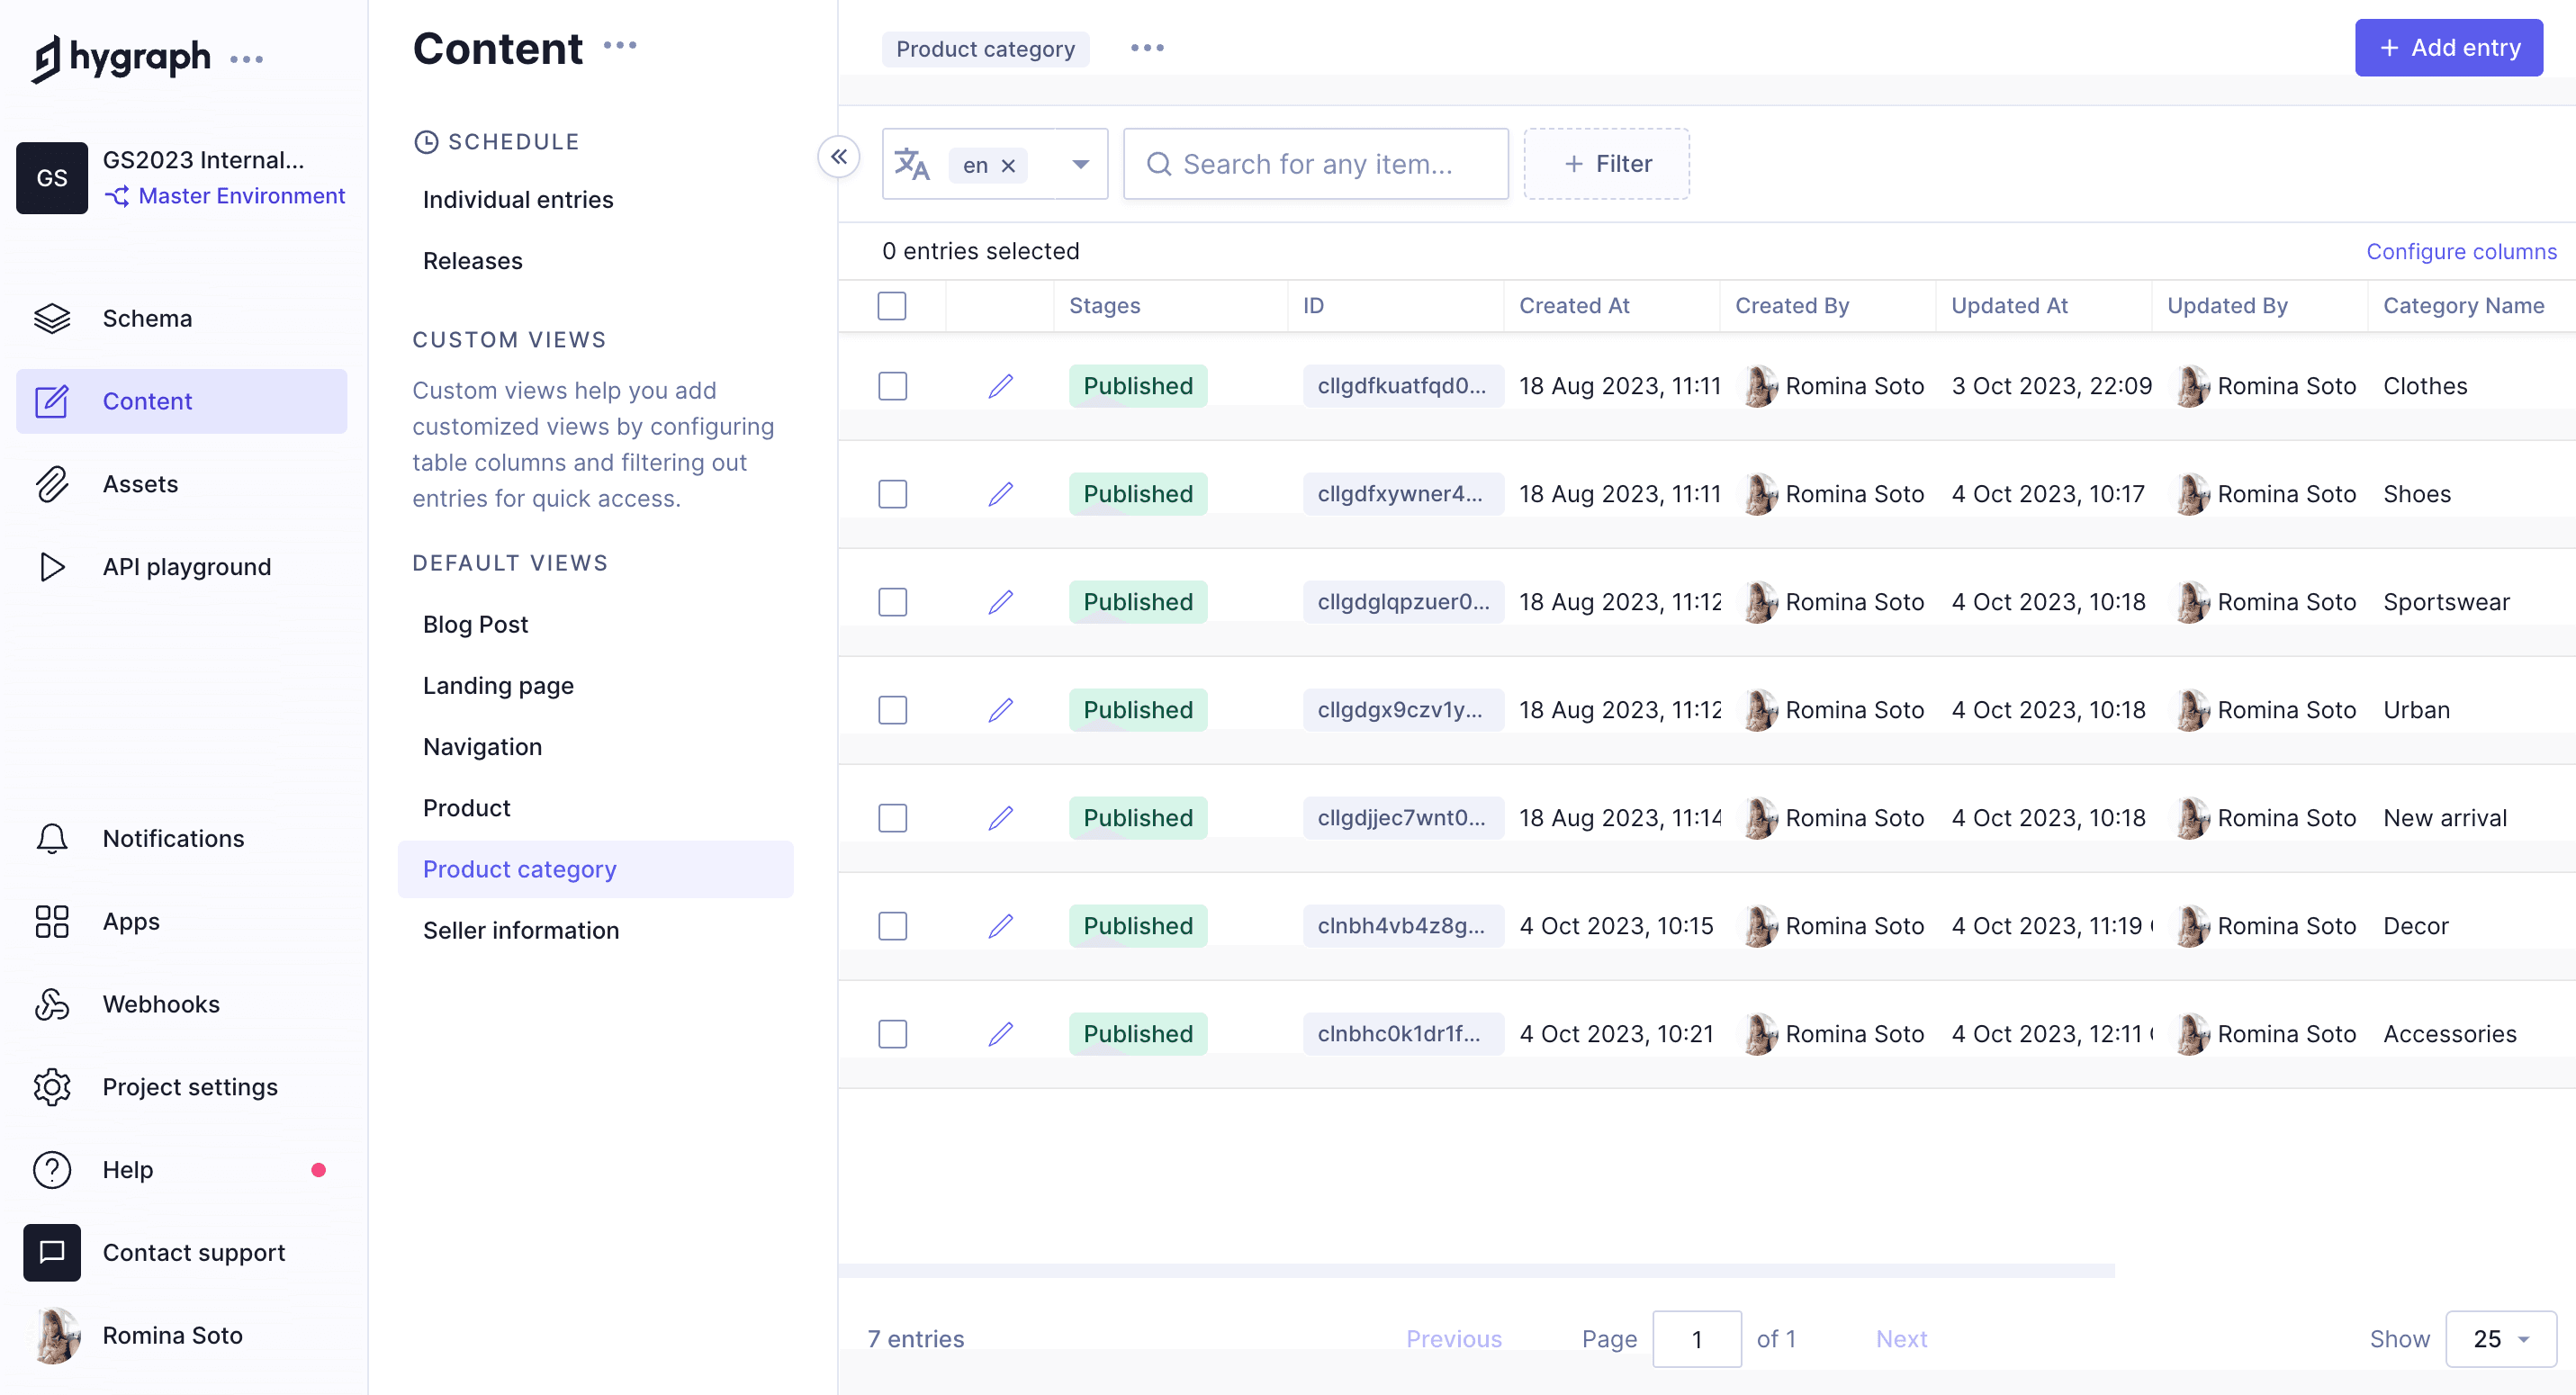
We've purposely created some overlapping categories - i.e. a product can be both a new arrival and sportswear - since we created a reference type where one product can be related to more than one category.
Now that we've created our categories, our Product Categories view in the Content editor should look like this:
Product categories in the content editor - with entries
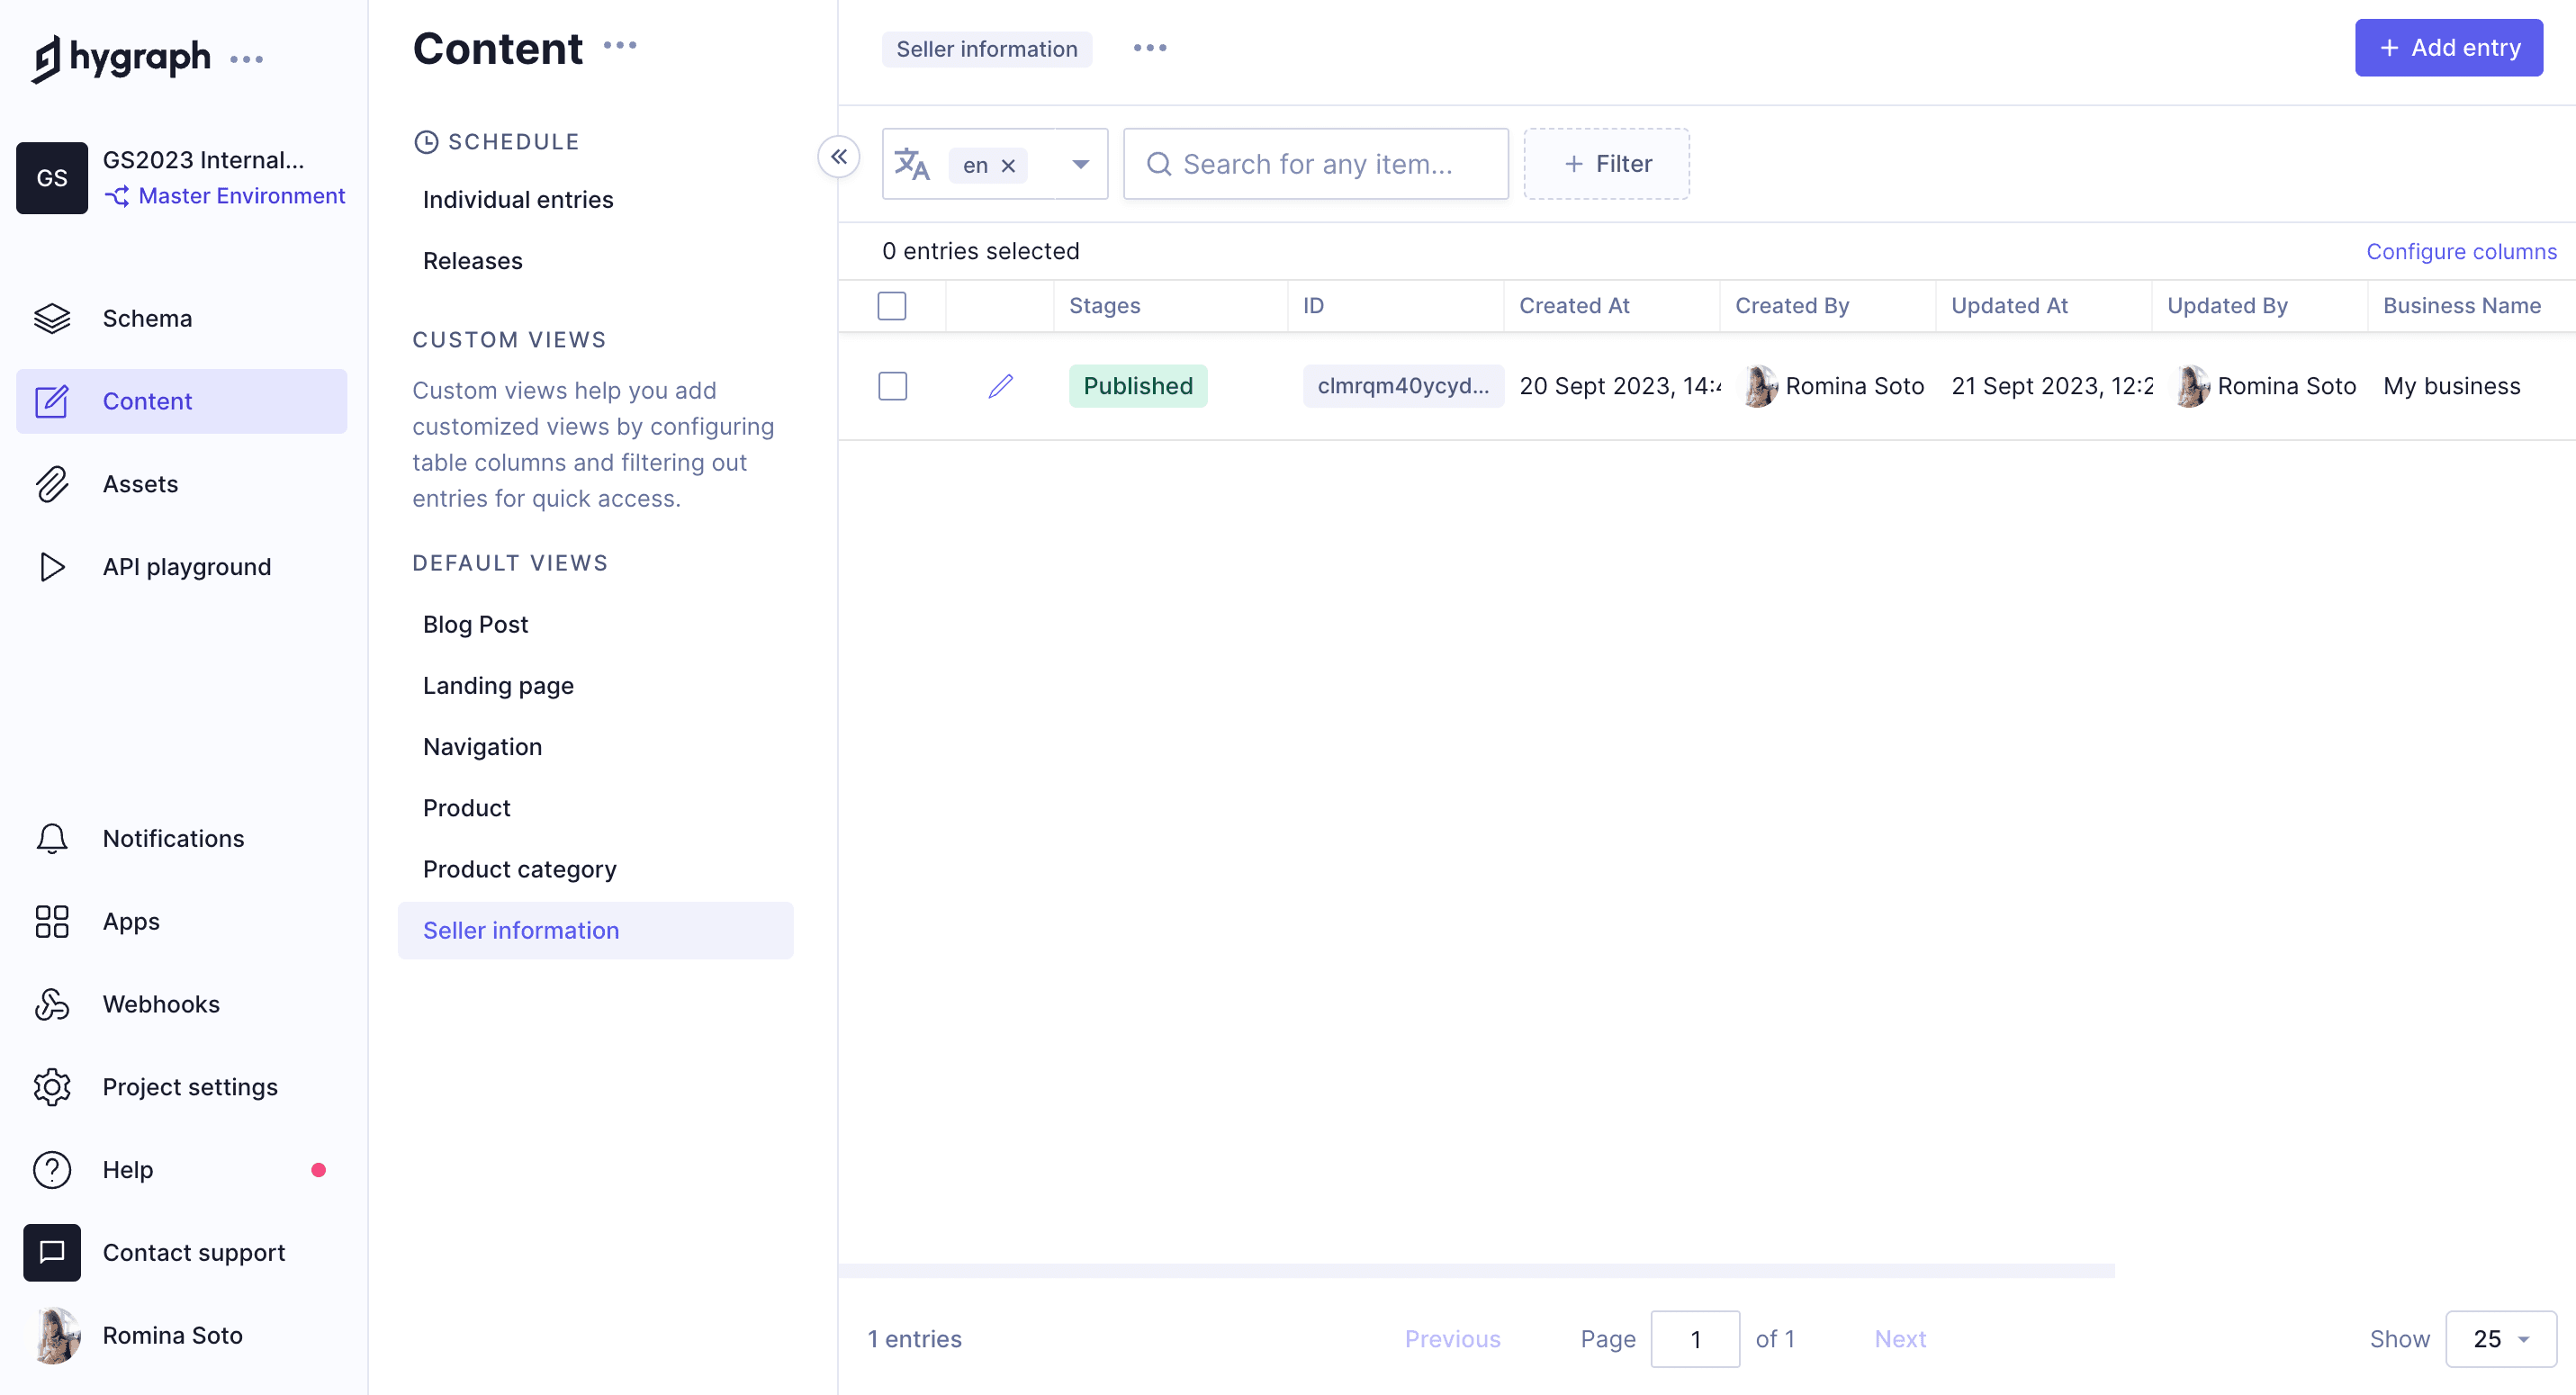
Now let's create some content for our Seller information model. This model will contain information about our e-commerce business, so we'll create a single entry here.
Please follow the same process as in the previous lesson to create your entry. Your entry should have the following information:
Field
Input
Business name
My business
Slug
my-business
Business logo
Click on Add business logo and select the Hygraph logo from your assets. Click on the relation icon - first column - to add it.
Business description
This is a description of my business
Click on Save & publish
Our Seller information view in the Content editor should look like this:
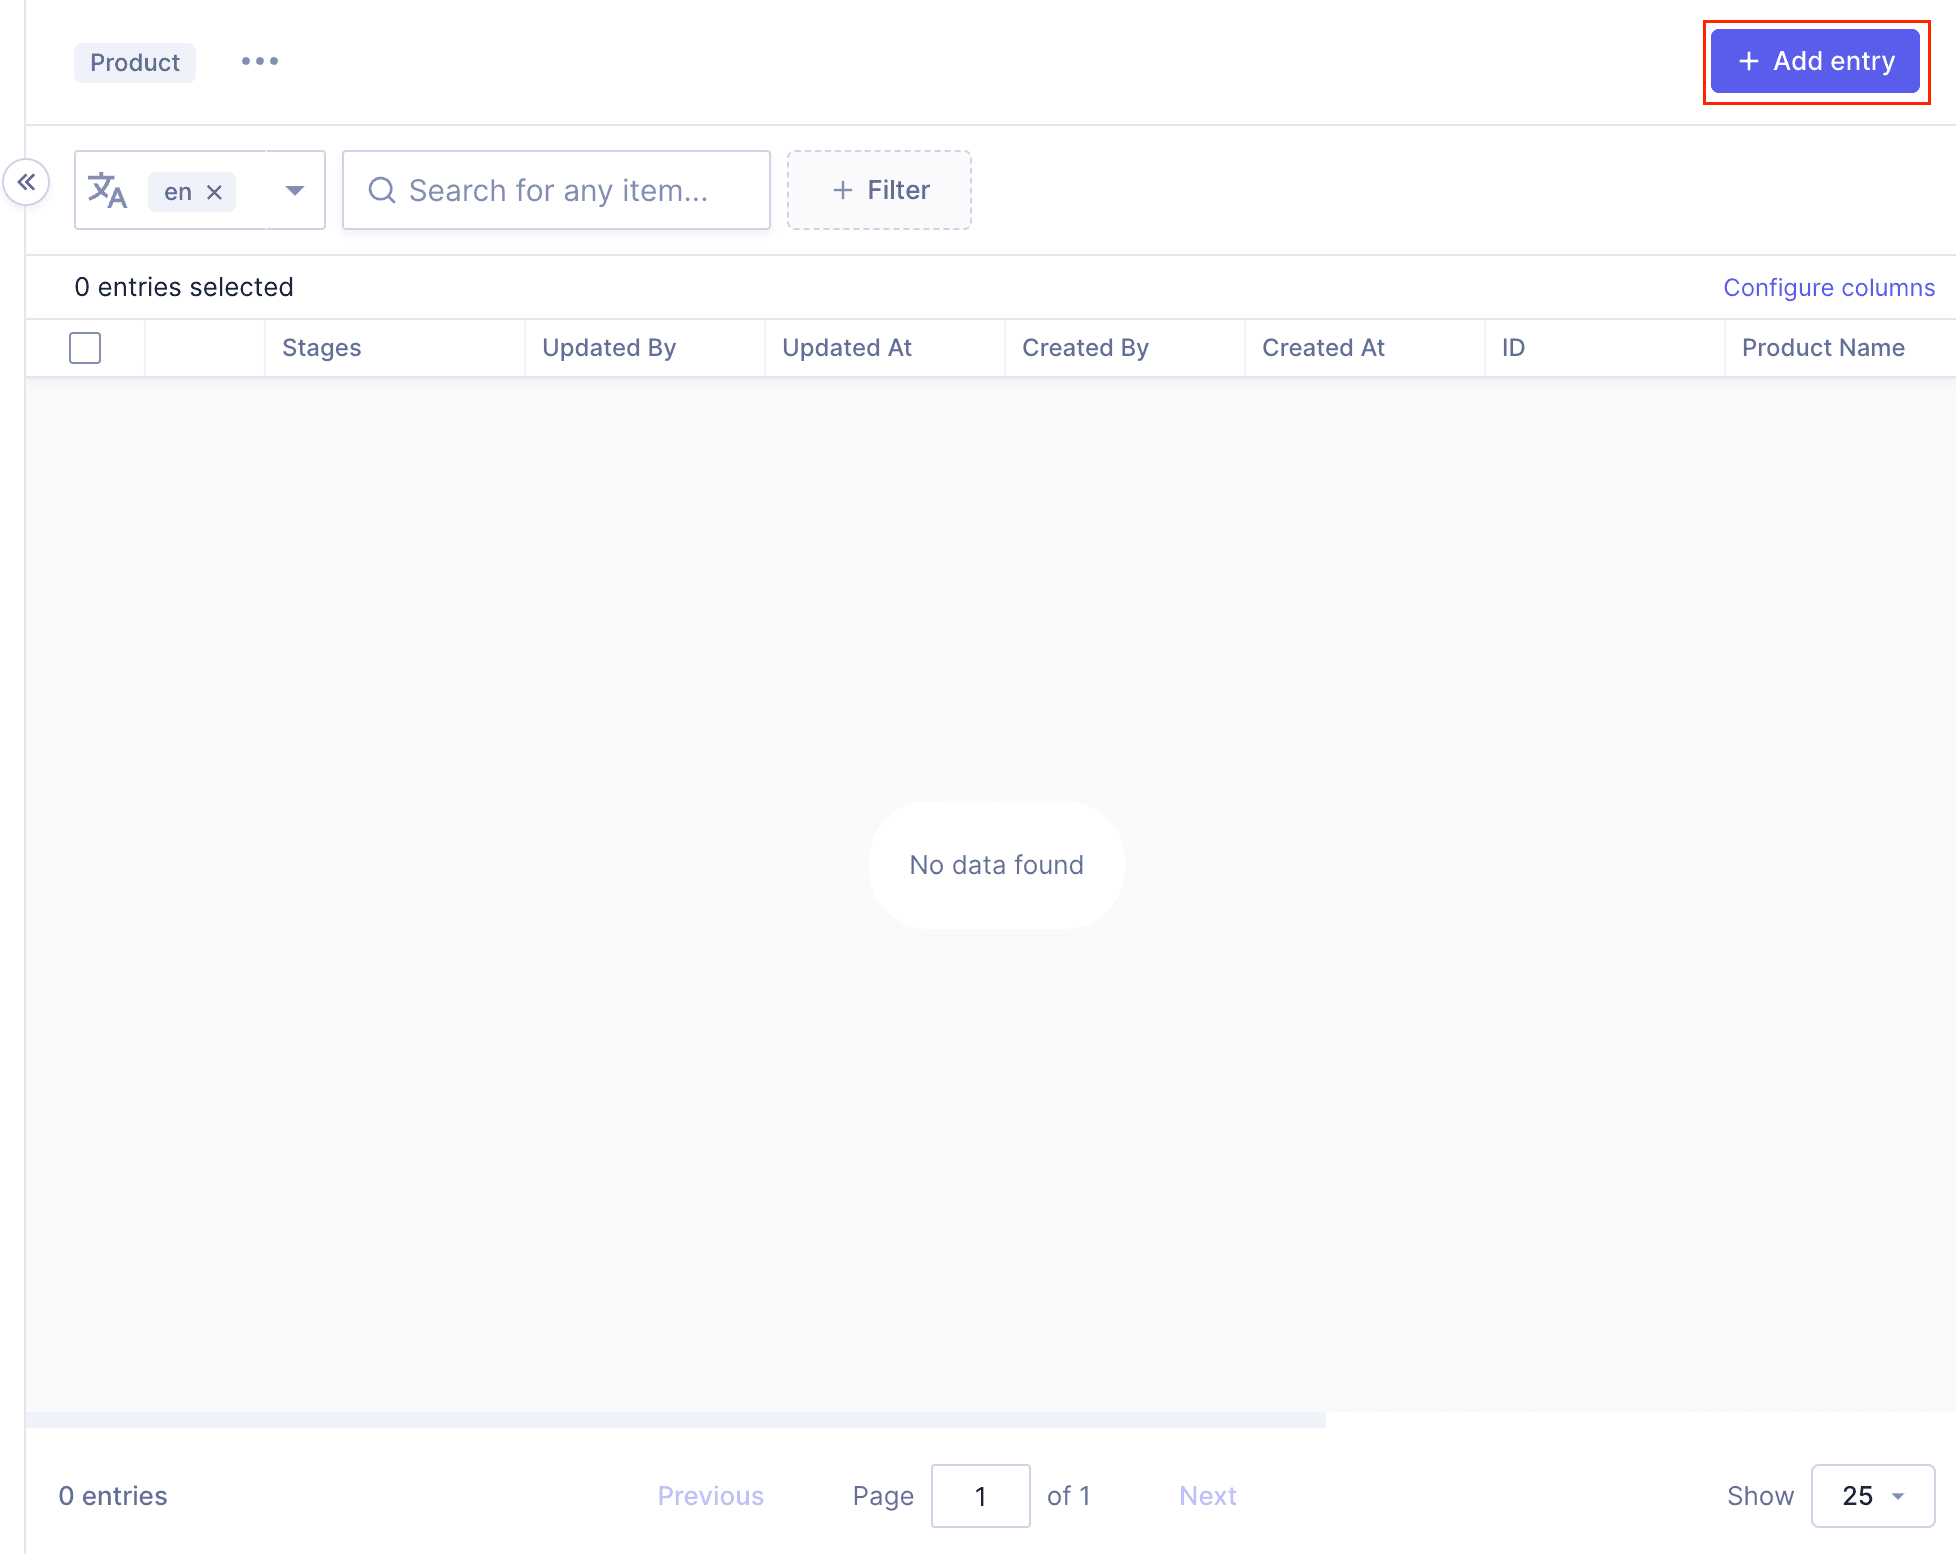
Next, we're going to work on our product entries. These will be the product listings of our e-commerce. Because we currently have no entries for this model, we will work on this in two steps: first, we'll create a basic product listing, and then we'll add the related products by editing our initial entries.
We'll navigate to the Product content model in the content editor and click on + Add entry.
Add product content entry
We'll use the following information:
Field
Input
Product name
Black leather shoes
Product slug
black-leather-shoes
Product category
We'll click on Add existing Product categories, and we'll select Shoes, New arrival
Product image
we'll click on Add Product images, and we'll select the images called black leather shoes. To find them quickly, we can type “black leather shoes” in the search filter on top of the table, and we'll add them to the entry by clicking on Add selected images.
Product description
These black leather shoes seamlessly blend sophistication with durability, making them a versatile choice for both formal occasions and everyday wear. The sleek design and high-quality leather ensure a timeless appeal that complements any outfit.
Product variant
We'll click on Add component to display our options, and then we'll select Shoes. We configured the Shoes component to have the size and color enumerations, so we'll select Size “Size_40” and color “Black”.
Product price
170
At this point, because we have no other products published to relate, we'll just go ahead and click on Save & publish at the top right corner of the screen. We'll come back to our entries later to add relations.
Product content entry
Now it's time to practice. We'll create some additional content so we can query it later when we work with the API Playground. You'll create three more content entries, following the same process we just went through together, using the following information:
Blue running shoes
Field
Input
Product name
Blue running shoes
Product slug
blue-running-shoes
Product category
Select Sportswear, and Shoes.
Product image
Select the images with the file name blue running shoes.
Product description
These blue running shoes offer both form and function, providing exceptional support and style for your active pursuits. The breathable material and cushioned sole ensure a comfortable experience mile after mile.
Product variant
Select the product type “Shoes”, and then Size “Size_42” and color “Blue”.
Product price
130
Plaid shirt
Field
Input
Product name
Plaid shirt
Product slug
plaid-shirt
Product category
Select New arrival, Urban, Clothes.
Product image
Select the images with the file name blue plaid shirt.
Product description
This plaid shirt exudes a timeless charm, perfect for a casual day out or a relaxed evening gathering. The classic checkered pattern and comfortable fit make it a wardrobe staple for effortless style.
Product variant
Select the product type “Clothing”, and then Size “XL” and color “Blue”.
Product price
60
Necklace
Field
Input
Product name
Necklace
Product slug
necklace
Product category
Select Accessories.
Product image
Select the images with the file name necklace.
Product description
This white necklace is crafted from parts of seashells, evoking a relaxed, beachy vibe. Perfect for those looking to add a touch of the sea to their daily style.
Product variant
Select the product type “Accessories”, and then Color “White”.
Product price
12
Headband
Field
Input
Product name
Headband
Product slug
headband
Product category
Select Accessories.
Product image
Select the images with the file name headband.
Product description
This white cotton headband provides an elegant and sophisticated touch to your hairstyle. Perfect for completing your look with a blend of fashion and comfort.
Product variant
Select the product type “Accessories”, and then Color “White”.
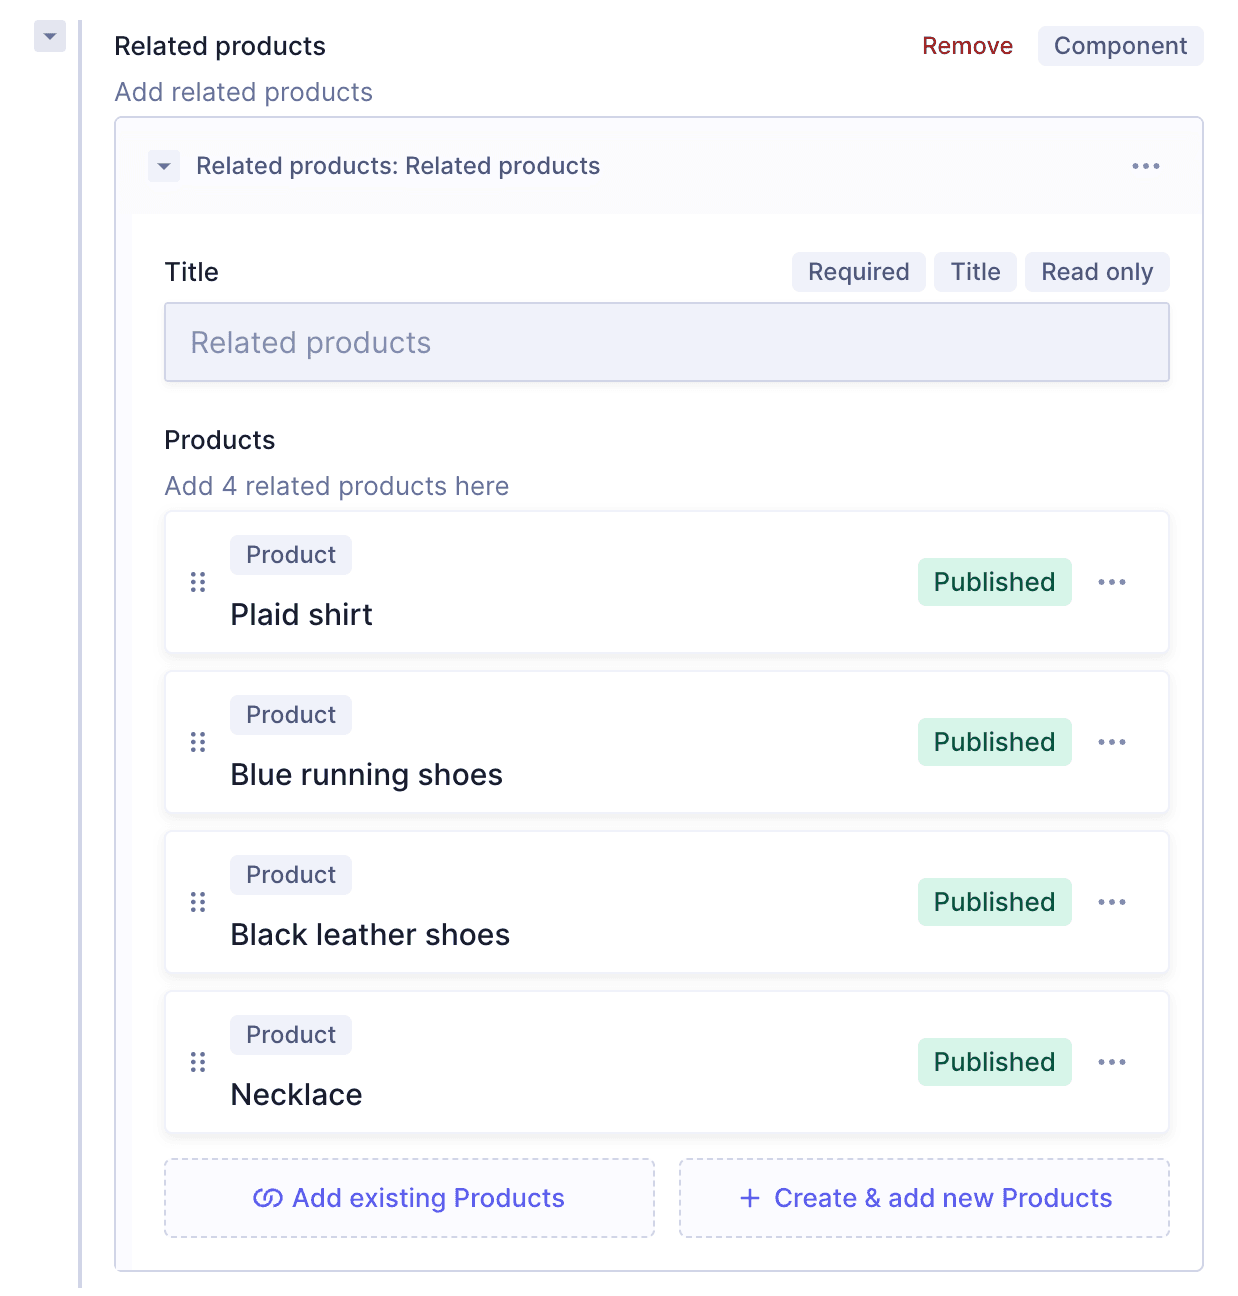
Now that we have all our basic content entries, we should add related products to each one.
Just like before, we'll go over the first one together, and then you can work on the rest:
We'll click on the pencil icon of the Headband product entry; this will take us to the edit view. We'll scroll down to where we have our Related products component, and we'll click on + Add Related products.
Remember that when we configured this component, we wanted the title section to be read-only to ensure it'd be the same throughout our e-commerce, so we can now see that the title “Related products” is grayed out and can't be edited.
Next, we have the products section, which says “Add 4 related products here”. This is exactly what we'll do. We'll click on Add existing products and use the checkboxes to select the black leather shoes, necklace, blue running shoes, and plaid shirt. We'll click on Add selected products, and that's it. We can now see the 4 products that we related to our content entry listed in our component:
Component with related products
We'll click Save & Publish at the top right corner of the screen to save the updated entry.
Now, please follow the same steps for our other product entries. Here's a table containing each product entry and the products you should relate them to:
Product content entry
Related products
Blue running shoes
black leather shoes necklace headband plaid shirt
Black leather shoes
blue running shoes necklace headband plaid shirt
Necklace
black leather shoes blue running shoes headband plaid shirt
Plaid shirt
black leather shoes necklace headband blue running shoes
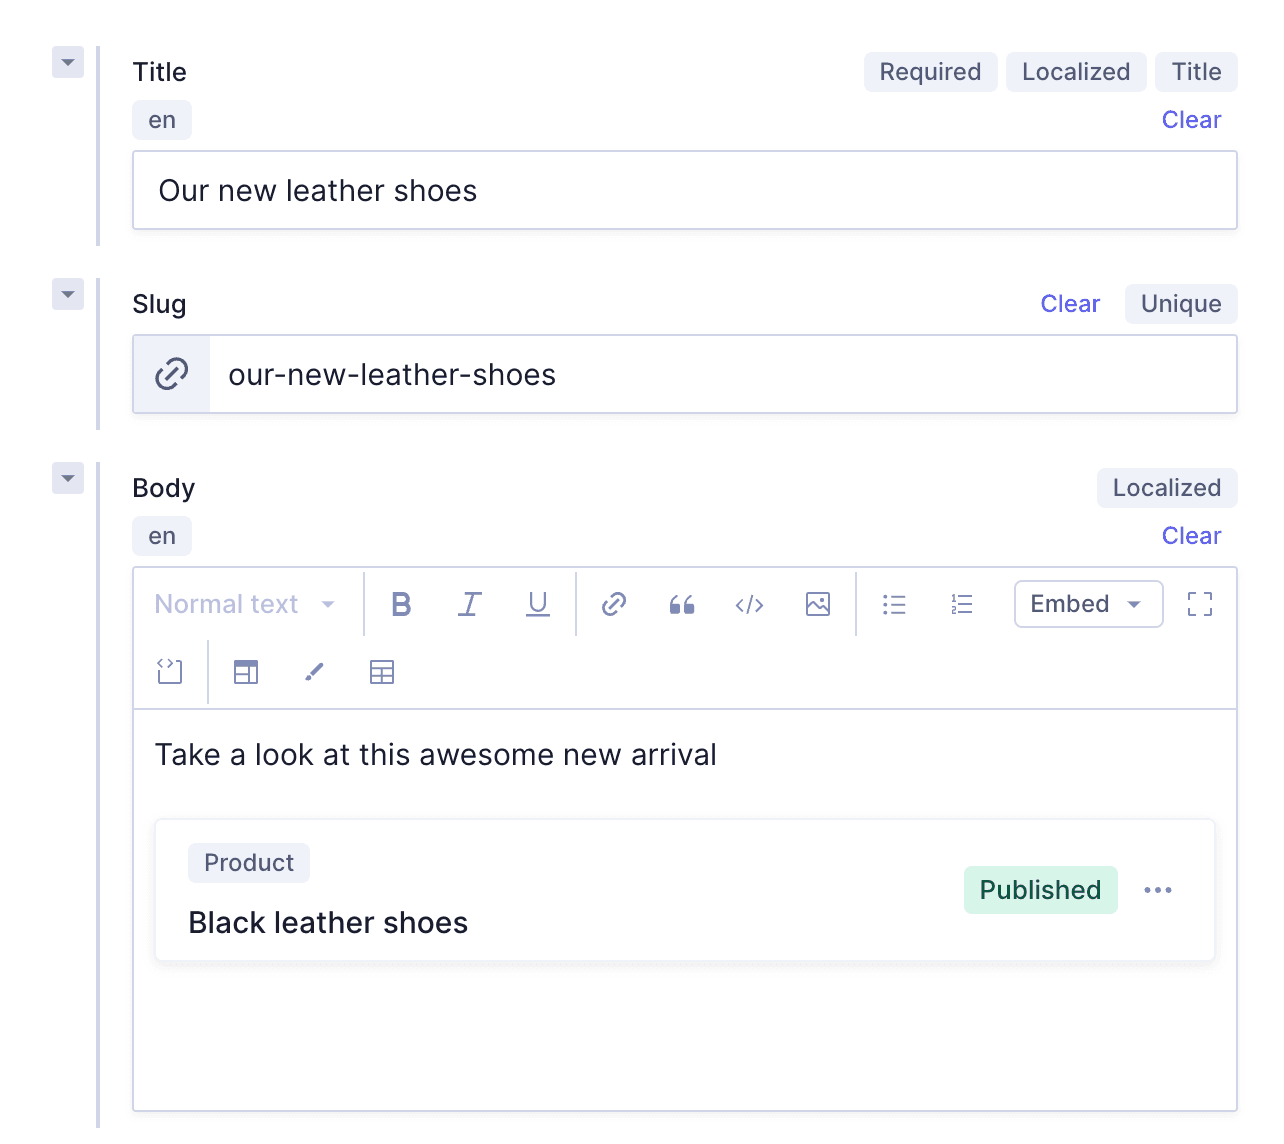
Let's also create a blog post entry that we can later display for promotion on our landing page.
We'll open the Blog post model in the content editor and create a new entry using the following information:
Field
Input
Title
Our new leather shoes
Slug
The Slug will autocomplete since we configured it to autogenerate from a template.
Body
We'll write “Take a look at this awesome new arrival”. When we configured this Rich Text field, we decided to allow embeds, so let's use this to showcase the product we're talking about. We'll click on Embed, select Block, we'll use the dropdown to select the Product model, and then we'll click Select model. A screen will pop up, showing us all the product entries that we created previously. Let's click on the relation icon - first column - to select our Black leather shoes product entry.
We'll create two landing pages for our e-commerce project: One that will be our homepage, and another one that will hold information for our summer campaign.
Let's create our homepage. We couldn't have created this page earlier, because we configured it to contain mostly related content, so we needed the rest of the content to be created before we could get into it.
We'll open the Landing page model in the content editor and create a new entry with the following information:
Field
Input
Landing page title
Home
Link
Simply write / here.
Blog posts
We'll leave this empty for now.
Product categories
We'll leave this empty for now.
Seller information
We'll add the seller information we created before.
Stripes
Click on +Add component and add a call to action & a product grid, using the information in the following tables.
Call to action
Field
Input
Heading
We'll write “Main Headline for the page”.
Body
We'll write “We provide amazing products from outerwear, shoes, homegoods, and more! Be sure to check out all the amazing products”.
Image
Add “Hygraph_Logo”.
Button
Click on + Add Button and write “Shop Now” in the Text field, and https://google.com in the URL field.
Product Grid
Field
Input
Headline
We'll write “Picks of the month”.
Products
We'll add relations to the following product entries: blue running shoes, black leather shoes, necklace, headband, plaid shirt.
You would normally use a many more products here, but our e-commerce only has a few for now.
Now that we're done, let's click Save & publish.
The landing page model we created allows us to create other pages as well. We want our e-commerce to have a dedicated section for the summer campaign, so we'll create it using this model.
We'll follow the same steps as for the homepage, using the following information:
Field
Input
Landing page title
Summer Campaign
Link
summer-campaign
Blog posts
We'll leave this empty for now.
Product categories
We'll leave this empty for now.
Seller information
We'll add the seller information we created before.
Stripes
Click on +Add component and add a call to action & a product grid, using the information in the following tables.
Call to action
Field
Input
Heading
We'll write “Get ready for Summer with these amazing deals”
Body
We'll write “The Summer Sale is in full swing! See the amazing summer deals we have listed below!”.
Image
We'll leave this empty for now.
Button
We'll leave this empty for now.
Product Grid
Field
Input
Headline
We'll write “Summer wear”.
Products
We'll add relations to the following product entries: blue running shoes, black leather shoes, necklace, headband, plaid shirt.
In a previous lesson, we added a Link component to our Navigation model. That model allows us to add links to a Navigation content entry, that can later be used by our frontend.
We want our e-commerce to have a main navigation that displays some of our important categories - such as clothes, shoes, accessories, and decor - as well as the Summer Campaign page we created in the previous step.
We'll open the Navigation model in the content editor and create a new entry with the following information:
Field
Input
Nav ID
main
Nav Link
This is the component we added in the lesson about adding component fields to a model. We will add one of these components for each link we want in our navigation. We'll click on + Add Link to start and complete the fields inside the component with the information in the following table.
Clothes link
Field
Input
Display Text
Clothes
Page
We'll leave this as is for now.
External URL
/category/clothes
Our first navigation link is ready, time to add the rest of the Nav Link components. We'll click on + Add another Link to start and we'll repeat the process for each link with the following information:
Shoes link
Field
Input
Display Text
Shoes
Page
We'll leave this as is for now.
External URL
/category/shoes
Accessories link
Field
Input
Display Text
Accessories
Page
We'll leave this as is for now.
External URL
/category/accessories
Decor link
Field
Input
Display Text
Decor
Page
We'll leave this as is for now.
External URL
/category/decor
Summer Campaign link
Field
Input
Display Text
Summer Campaign
Page
We'll click on Add existing document and elect the Summer campaign landing page that we created in the last lesson.
External URL
We'll leave this as is for now.
Now our Navigation content entry has all the links the frontend needs to show. We'll see them later on when we integrate our content with our frontend.
Next step
Once you've created some content for your project, move on to our next lesson: