#Overview
Content Workflows help teams manage content creation and approval in a clear and structured way.
#Why content workflows matter
Publishing content often involves multiple steps, like reviews, QA, translations, and asset creation. Without a workflow, teams face challenges such as:
- Content consistency: Changes can be made after review, leading to mistakes.
- Transparency: It's hard to track content status and know who needs to take action.
- Workflow enforcement: Content might get published before it's fully approved.
Hygraph Content Workflows solve these problems by creating a structured, step-by-step process. This ensures teams follow a clear path from draft to publication.
#Key features & benefits of workflows
Hygraph Workflows help teams manage content efficiently by providing:
- Structured workflows: Admins can set up step-by-step workflows with clear stages.
- Granular permissions: Each step can have assigned roles, ensuring only the right people can edit or approve content.
- Automated publishing: Content can move to the next stage or be published automatically after approval.
- Better visibility and tracking: Editors can filter and track content based on its workflow stage.
- Stronger compliance and control: Prevents unauthorized changes and keeps content versions consistent.
#Create a workflow
 Create a workflow
- Navigate to
Project Settings > Governance > Workflows.
- Click
+ Add Workflow to create a new one.
- Provide a name and a description, then click
Add workflow to continue.
- Newly created workflows will contain default start & end steps. You can edit the default steps by clicking
Edit step, or move them to a different place in the workflow using the arrows that display on hover or the handlebars.
If your project has no workflows configured, you will see the following screen:
 Workflows screen - empty state
#Initial setup
Once the workflow is created, you land on the setup screen:
 Content workflows initial setup
Select initial setup options:
| Field | Description |
|---|
Model | Optional. Use the dropdown to select which models the workflow applies to. |
Workflow override | Optional. Use the dropdown to select roles that can choose to ignore the rules of the workflow to perform actions on content entries, in cases where changes are needed urgently. |
Click Update configuration to save your selection.
Next, you must configure the workflow steps.
#Add a workflow step
All workflows have two steps by default, the Start & End steps. This is the minimum number of steps a workflow can have, as each workflow must have a beginning and an end. You can add any number of steps in between them.
To add a new step, click Add step:
 Add a workflow step
#Step configuration
You will see the step configuration panel every time you add a new step or edit an existing one.
 Content workflows step configuration
| Field name | Description |
|---|
Step name | Enter a name for the step. |
Step color | Use the dropdown to select a color to identify the step. |
Description | Optional. Write a description for the step. |
Access | Select one or more roles that can move the step to the next or the previous one and who will be granted the edit permissions you configure next. |
PAT Access | Optional. Select the Permanent Auth Tokens (PATs) allowed to perform actions on entries in this step. This option is available only if your project includes a Permanent Auth Token and applies to all workflow steps except AI agent steps. Existing PAT permissions continue to apply, so you need to make sure the selected token has the necessary permissions to run this step. |
Edit permissions | Use the radio buttons to choose whether the users with step access can edit entries or not. |
Return to | Optional. Use the dropdown to select a step that entries can return to if necessary. You can only select a previous step. |
Publish to | Optional. Select one or more content stages to automatically publish content entries to when they move to this step. |
After configuring the step, click Add step for new steps, or Update step if you were editing an existing one.
Any AI agents configured in the workflow appears automatically as a workflow step.
#Publishing & unpublishing actions
In Workflows, publishing actions are automated. Content entries in the workflow cannot be published on demand; they are automatically published when they move to a specific step with a Publish to stage configured.
Unpublishing actions are allowed from any stage at any point, but republishing after that requires sending the entry back to the previous step to restart it.
Pro Tip
Unpublishing actions are not the same as moving a content entry back to a previous workflow step.
When you return a content entry to a previous step in the workflow, the content entry is not unpublished, and is still accessible online.
#Moving workflow steps
When you hover over a workflow step card, the following options display:
 Moving content workflow steps
Click on the arrow icons to move a step up or down in the workflow.
Consider that workflow steps can have Return to steps configured. Editing the position of a step in the workflow to a step before its Return to step, will break this logic and clear the configured return field.
In the following example, moving the step Middle 2 before Middle 1 (its configured Return to step), will clear the return field configuration:
 Content workflows - clear return step
Pro Tip
You can also use the six-dots handlebars to drag and drop a workflow step to move it.
#Edit a workflow step
To edit a workflow step, click the Edit button that displays when you hover over the step card:
 Edit a workflow step
Check out the Step configuration section of this document to see all possible actions on the edit screen.
#Delete a workflow step
To delete a workflow step, hover over the step card, click on the contextual menu to display the options in it, and click Delete step:
 Delete a workflow step
You will need to confirm this action by clicking Delete step again on the confirmation popup. This action cannot be rolled back.
#Enable or disable a workflow
To enable a workflow, select the Enable workflow toggle that you can find at the top-right corner of the Edit workflow screen, or on the workflows table in Project settings > Governance > Workflows.
 Enable or disable a workflow
When the workflow is enabled, its rules apply to all entries in the configured models.
To disable an enabled workflow, click on the toggle as well. When a workflow is enabled, the toggle reads Disable workflow.
#Edit a workflow
To edit a workflow, go to Project settings > Governance > Workflows and click on the workflow hat you want to edit on the table:
 Edit a workflow
The Edit workflow screen will display, and you can change its configuration.
#Delete a workflow
To delete a workflow, go to Project settings > Governance > Workflows, click on the context menu, and select Delete Workflow:
 Delete a workflow
You will need to confirm this action by clicking Delete Workflow again on the confirmation popup. This action cannot be rolled back.
#Workflows in content entries
When you open a content entry, the system checks if it is assigned to a workflow, and if editing is allowed.
If editing is not allowed, you will access a read-only version of the content entry. You can read the entry and leave comments, but you cannot modify the contents. You can also move it to the next step in the workflow if you have this permission.
If editing allowed, you can work on it normally.
On the sidebar, you can see what workflow step the entry is on:
 Workflows in content entries
Pro Tip
Even if the user does not have access & the Workflows sidebar widget is disabled, it will show which roles can work on the content entry.
If a workflow step is assigned to an AI agent, the agent automatically starts processing as soon as an entry moves into that step. This ensures tasks run seamlessly within the defined workflow.
#Move the entry to a different step
If you have permission to move the entry to the next step in the workflow, the Move to button at the top-right of the screen will be enabled.
You can click Move to, to move the entry to the next step in the workflow, or click the arrow icon to display the workflow actions:
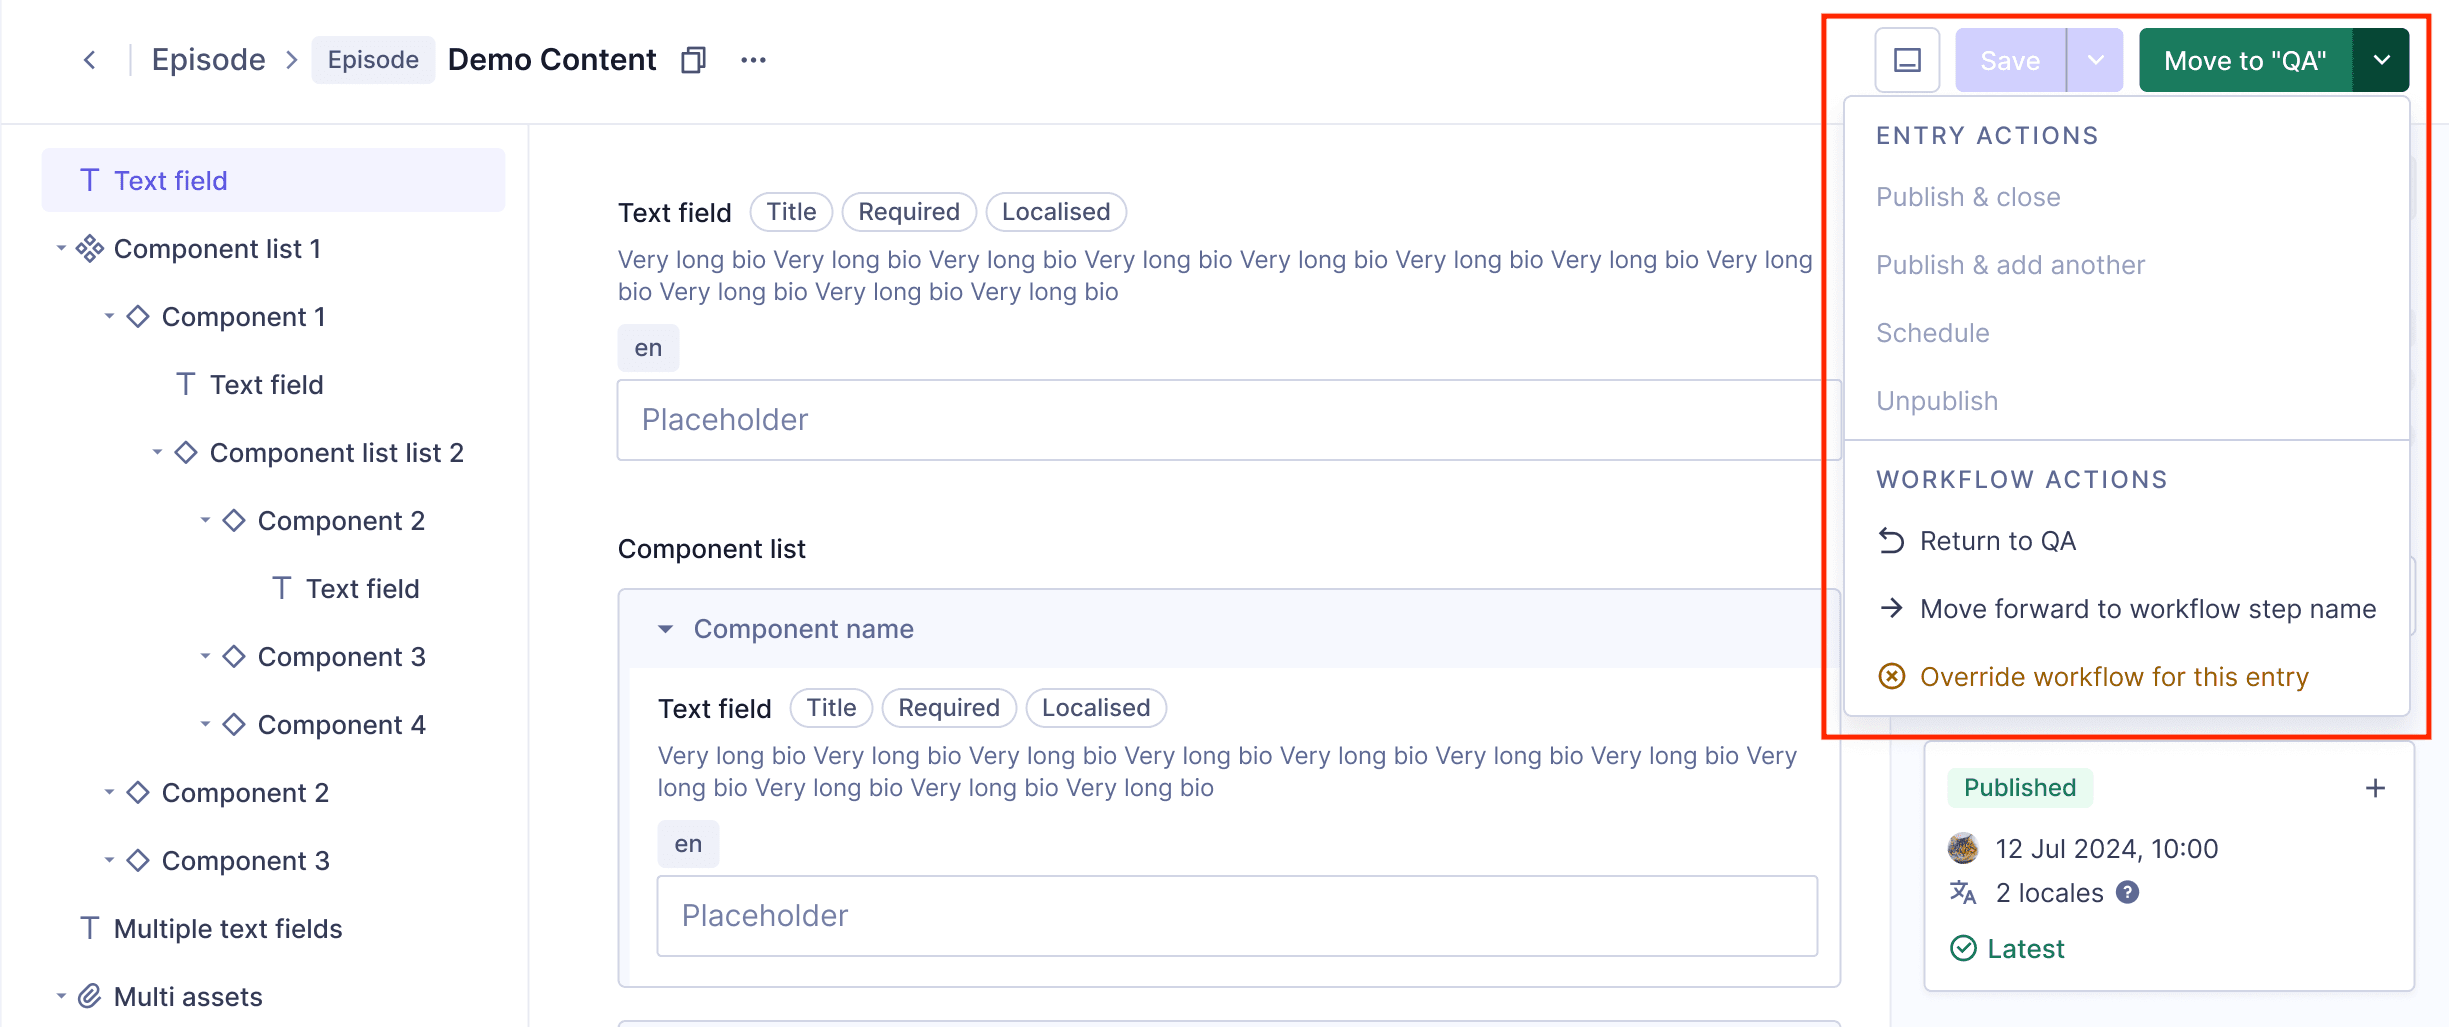 Content workflows - entry actions
| Workflow action | Description |
|---|
Return to | Select this option to return the content entry to its configured return step. This option is enabled only if the workflow step has a Return to step configured. |
Move forward to | Select this option to move the content entry to the next step in the workflow. |
Override workflow for this entry | Select this option to override the workflow for the entry. When you override the workflow, you can perform any actions, just as if there wasn't a workflow configured. This option is enabled only if you have override permission. |
#Publish a content entry in the workflow
If you move a content entry into a step with Publish to configured, the entry will automatically be published to the configured stage. You can publish entries to intermediate content stages such as QA, or to PUBLISHED.
When publishing an entry to the PUBLISHED stage, you will have the option to publish it right away or to schedule publishing.
#Publish now
This action publishes your content to the PUBLISHED stage, meaning it will be available online for others to consume. If your content entry contains unpublished assets or references, you will be prompted to publish those too.
Moving an entry to the next step & publishing at the same time is an atomic operation. This means both events will succeed or fail.
#Schedule publishing
If you select scheduled publishing, the side sheet will open for you to schedule publication of the content entry.
Pro Tip
When you schedule an entry to publish to a stage, the workflow will move it to that stage but since publishing is scheduled in the future, it will not be published right away. If you open the content entry at this time, it will display as read-only.
In order to avoid workflow inconsistencies, the only way to edit this entry is to return it to the previous step, if you have the permission.
Check out our scheduled publishing docs to learn how to schedule single entries or add them to a release.
#Webhooks for workflows
You can trigger a webhook when you move to a new workflow step. While configuring your webhook, choose the following settings:
- Under General, select the Include payload check box. This ensures that the webhook delivers a detailed payload including the workflow step,
workflowStep.
- Under Actions, select Transition Step. This ensures that whenever your workflow transitions to a new step, the webhook is triggered.
 Webhooks for workflows
#Workflows troubleshooting
#I can't edit content entries
If your role is configured to edit entries in a model, but you are not able to see this model or edit the content entries, you need to check permissions. Content workflows are an additional layer of control over permissions, but do not override them.