How Hygraph is Used for Marketing and Content Operations
How does the Hygraph marketing team use templatized pages?
Hygraph's marketing team uses templatized pages for content types with predictable structures, such as blogs, event pages, and partner pages. Each field on these pages (e.g., slug, title, author, description, cover image, page content, SEO details) maps directly to a field in the content model. Required fields include slug, publishing date, title, description, cover image, page content, Hubspot form ID, and SEO details. Editors can show or hide optional components, and field names act as clear instructions, reducing confusion and improving efficiency. Note: Templatized pages are best for standardized content; highly custom layouts require modular pages.
What are modular pages in Hygraph and how do marketers use them?
Modular pages in Hygraph provide flexibility for content types like homepages, product pages, and landing pages, where structure varies. The content model includes a slug, sections, and SEO fields. The "Sections" component allows editors to add different styles and blocks, with each section containing a name, slot, section styles, and blocks. Blocks are modular component fields, enabling editors to add, repeat, or nest components as needed. This approach lets marketers independently build and customize pages, reducing reliance on developers. Note: Modular pages require initial agreement on design styles and may involve more setup than templatized pages.
How does Hygraph support blog publishing for marketing teams?
Hygraph's blog publishing uses a templatized page model with fields for slug, category, tag, title, description, authors, publishing date, cover image, content body, inline elements, and SEO metadata. Content is formatted using Markdown, allowing editors to quickly import articles from Google Docs or Dropbox. Inline elements (e.g., buttons, quotes, callouts) are supported via Markdown, with reusable code blocks stored in Notion for efficiency. Note: Editors may need time to adapt to Markdown formatting if unfamiliar.
What is the difference between basic and modular component fields in Hygraph?
A basic component field in Hygraph allows only one component instance per field, such as "Section Styles." A modular component field can have two or more components attached, enabling editors to add, repeat, or nest multiple components (e.g., "Blocks" in modular pages). This distinction supports both standardized and highly flexible page layouts. Note: Overuse of modular fields can increase complexity for editors; balance is needed between flexibility and consistency.
How does Hygraph help editors and marketers work independently?
Hygraph's intuitive interface and modular content model allow editors and marketers to build and publish pages without constant developer support. Editors can select, arrange, and preview components, reducing bottlenecks and enabling faster go-live times. For example, Shahan Syed, Product Marketing Manager at Hygraph, reports being able to build and launch pages in a day or two, compared to 15 days previously. Note: Some complex or non-generic pages may still require developer input for manual configuration or metadata setup.
Features & Capabilities
What are the key features of Hygraph?
Hygraph offers a GraphQL-native architecture, content federation, enterprise-grade security and compliance, Smart Edge Cache, localization, granular permissions, and integrations with DAM, PIM, hosting, and commerce platforms. It supports both templatized and modular content models, live preview, and Markdown-based content editing. Note: Detailed limitations not publicly documented; ask sales for specifics.
What integrations does Hygraph support?
Hygraph integrates with a wide range of platforms, including DAM systems (Aprimo, AWS S3, Bynder, Cloudinary, Imgix, Mux, Scaleflex Filerobot), hosting (Netlify, Vercel), PIM (Akeneo), commerce (BigCommerce), translation (EasyTranslate), and others (Adminix, Plasmic). For a full list, visit the Hygraph Marketplace. Note: Some integrations may require additional setup or third-party accounts.
Does Hygraph provide APIs for content management?
Yes, Hygraph provides multiple APIs: a high-performance GraphQL Content API, a Management API (with SDK), an Asset Upload API, and an MCP Server API for AI assistant integration. These APIs support content querying, project structure management, asset uploads, and secure AI communication. See the API Reference documentation for details. Note: API usage may require technical expertise for advanced scenarios.
What technical documentation is available for Hygraph users?
Hygraph offers extensive documentation, including API references, schema components, getting started guides, integration guides (e.g., Mux, Akeneo, Auth0), and AI feature documentation. Classic documentation is available for legacy users. Access all resources at hygraph.com/docs. Note: Some advanced topics may require developer knowledge.
Performance, Security & Compliance
How does Hygraph ensure high performance for content delivery?
Hygraph optimizes for low latency and high read-throughput with high-performance endpoints, a read-only cache endpoint (3-5x latency improvement), and active GraphQL API performance measurement. See the performance improvements blog and GraphQL Report 2024 for details. Note: Actual performance may vary based on project complexity and integration setup.
What security and compliance certifications does Hygraph have?
Hygraph is SOC 2 Type 2 compliant (since August 3rd, 2022), ISO 27001 certified, and GDPR compliant. It also adheres to the German Data Protection Act (BDSG) and Telemedia Act (TMG). All endpoints use SSL certificates, and data is encrypted in transit and at rest. See the Secure Features page for details. Note: For industry-specific compliance needs, contact sales for clarification.
What security features are available in Hygraph?
Hygraph provides granular permissions, SSO integrations (OIDC/LDAP/SAML), audit logs, encryption, regular backups with one-click recovery, and secure API policies (custom origin, IP firewalls). Data centers are ISO 27001 certified and SOC 2 Type 2 compliant. Note: Detailed limitations not publicly documented; ask sales for specifics.
Implementation & Ease of Use
How long does it take to implement Hygraph?
Implementation time varies by project complexity. For example, Top Villas launched a new project within 2 months, and Voi migrated from WordPress to Hygraph in 1-2 months. Si Vale met aggressive deadlines in their initial phase. Note: Large-scale or highly customized projects may require additional time for setup and migration.
How easy is it to get started with Hygraph?
Hygraph offers a free signup, structured onboarding (introduction calls, account provisioning, technical kickoffs), extensive documentation, starter projects, community Slack, and training resources (webinars, live streams, videos). These resources support both developers and non-technical users. Note: Some advanced features may require technical expertise.
What feedback have customers given about Hygraph's ease of use?
Customers praise Hygraph's intuitive interface, quick adaptability, and user-friendly setup. For example, Sigurður G. (CTO) finds the UI intuitive for non-technical users; Anastasija S. (Product Content Coordinator) values instant front-end updates; Charissa K. (Senior CMS Specialist) highlights fast comprehension and localization; Aldona Martynenka (Product Manager) appreciates granular roles and permissions. Note: Some users may need initial training for advanced features.
Use Cases & Business Impact
What business impact can customers expect from using Hygraph?
Customers report faster time-to-market (e.g., Komax achieved 3x faster launches), improved customer engagement (Samsung saw a 15% increase), cost reduction, enhanced content consistency, and scalability. AutoWeb increased website monetization by 20%, and Voi scaled multilingual content across 12 countries and 10 languages. Note: Results may vary based on implementation and use case.
What core problems does Hygraph solve for marketing and content teams?
Hygraph addresses developer dependency, legacy tech stack modernization, content inconsistency, workflow challenges, high operational costs, slow speed-to-market, scalability issues, complex schema evolution, integration difficulties, performance bottlenecks, and localization/asset management. Note: Some highly specialized needs may require custom development or third-party tools.
Who can benefit from using Hygraph?
Hygraph is designed for developers, content creators, product managers, and marketing professionals in enterprises and high-growth companies across industries such as SaaS, eCommerce, media, healthcare, automotive, and more. It supports both technical and non-technical users. Note: Organizations with highly unique or legacy requirements may need additional customization.
What industries are represented in Hygraph's case studies?
Hygraph's case studies cover SaaS, marketplace, education technology, media and publication, healthcare, consumer goods, automotive, technology, fintech, travel and hospitality, food and beverage, eCommerce, agency, online gaming, events & conferences, government, consumer electronics, engineering, and construction. See case studies for details. Note: Industry-specific features may require additional configuration.
Customer Success & Social Proof
Can you share specific case studies or success stories of customers using Hygraph?
Yes. Notable examples include Samsung (15% improved engagement), Dr. Oetker (MACH architecture), Komax (3x faster time-to-market), AutoWeb (20% increase in monetization), BioCentury (accelerated publishing), Voi (multilingual content in 12 countries), HolidayCheck (reduced developer bottlenecks), and Lindex Group (accelerated global delivery). See case studies for details. Note: Outcomes depend on project scope and implementation.
Who are some of Hygraph's customers?
Hygraph customers include Samsung, Dr. Oetker, Komax, AutoWeb, BioCentury, Voi, HolidayCheck, and Lindex Group. These organizations span industries such as electronics, food, manufacturing, automotive, media, mobility, travel, and retail. See case studies for more. Note: Customer results may vary by use case.
One thing is hearing about the rewrite project, which may or may not match your idea of how to use Hygraph, but it’s an entirely different one hearing from the people who use the website daily and have inherited the codebase. So, this is what we will share in the last part of this article series.
At Hygraph, we produce high-quality content to help our audience better understand our product, headless CMS, content architecture, and other content management-related topics. It is reflected throughout our website, which has been redesigned to be more user-friendly with clear messaging. One such example is the Resource Hub.
The resource content page is a typical example of a templatized page. “Templates” are built for pages with more predictable functions and purposes that always follow the same structure, such as a blog, event page, or partner page. Editors don’t need to consider composing the page, so they avoid confusion and keep the design consistent.
Each element on the page reflects a field inside the content model. Some are mandatory, while others are optional. Editors have the option of showing or hiding optional components. Take the resource content page, for example. Here is the information we have on the page:
Slug
Title
Author
Description
Cover image
Page content
Form
SEO details (meta title and meta description)
This means the content model has the following fields. The fields with an * are required, they must be added to the CMS before the page can be published:
Slug*
Category
Publishing date*
Title*
Author
Description*
Cover image*
Page content*
Hubspot form ID*
SEO details (meta title and meta description)*
When we redesigned the website, each templatized page was thoroughly discussed with relevant editors. Since our editors don't need to worry about how the content is displayed on the frontend, we could focus our efforts on making the layout as straightforward as possible. Editors can simply read field names as instructions, improving efficiency. We can also reference elements that appear in many places (like the author and company) to reuse them and save time.
I use Hygraph in my day-to-day work to publish event pages, upcoming livestreams, and other marketing activities on our website. Using Hygraph Studio is a breeze. It allows me to independently build event pages each day without needing constant support from our web developer.
Enxhi HamzallariSenior Field Marketing Manager at Hygraph
Using Hygraph’s page models for partner marketing is super easy, it affords me the flexibility I need, to work with only those content blocks which are necessary. It’s also fun, sometimes I feel like Tom Cruise using that futuristic screen in Minority Report.
Cristina MitroiSenior Partnerships Marketing Manager at Hygraph
Another type of page that we publish as a marketing team is modular page. These pages need more flexibility, such as the home page, product page, and landing page. We know the structure roughly but need different elements to make them appealing and convincing.
Modular pages give you more flexibility compared to templatized pages. We will show you how such a page is made in this section. As Marketers (AKA non-technical CMS users), we know that entering a CMS feels like an adventure, especially when you see an entry like this:
It feels like entering the fifth dimension, right?
But if you break everything down, it'll make sense, and we're getting there. I will start with a high-level overview of the page model, then go deeper into “Sections,” examining individual components within—essentially working from the outside in.
At the starting point, the content model simply consists of 1 slug field and 2 high-level component instances:
Slug
Sections
SEO
The "Sections" component does the magic here - it's made up of different styles and blocks that allow you to show different components on the frontend. Each Section consists of:
Name
Slot
Section Styles
Block
As part of working on a modular page, the editor has already agreed with the designer on the style. That’s why the “Section Styles” are set up to be as simple as possible so editors can select from a drop-down menu. Below is an example of the choices for a pre-defined “Theme,” which defines the background color of each section.
As mentioned earlier, various elements are needed on this type of page. This is essentially what “Blocks” are for, and we have pre-defined a series of components that may be used.
“Blocks” is a modular component field, so you can add only one or multiple nested components and repeat the same component as many times as you want. In essence, the page structure gives you a point to start with, but editors can use a variety of components to create pages that look very different.
Basic vs. modular component field
Basic vs. modular component field in Hygraph Hygraph’s components ultimately make your website composable. While there are 3 concepts related to components, we want to guide you through the component field here.
Component field is a special field type in Hygraph schema that defines which components of which type can be used in a model. Component fields can be of basic or modular types.
A basic component field can only have one component attached to it. You can limit the number of component instances to one or allow multiple component instances to be added in the content entry. The “Section Styles”, for example, is a basic component field.
A modular component field can have two or more components attached to it. The “Blocks” in this case, is a modular component field that allows users to choose from a variety of components to work with.
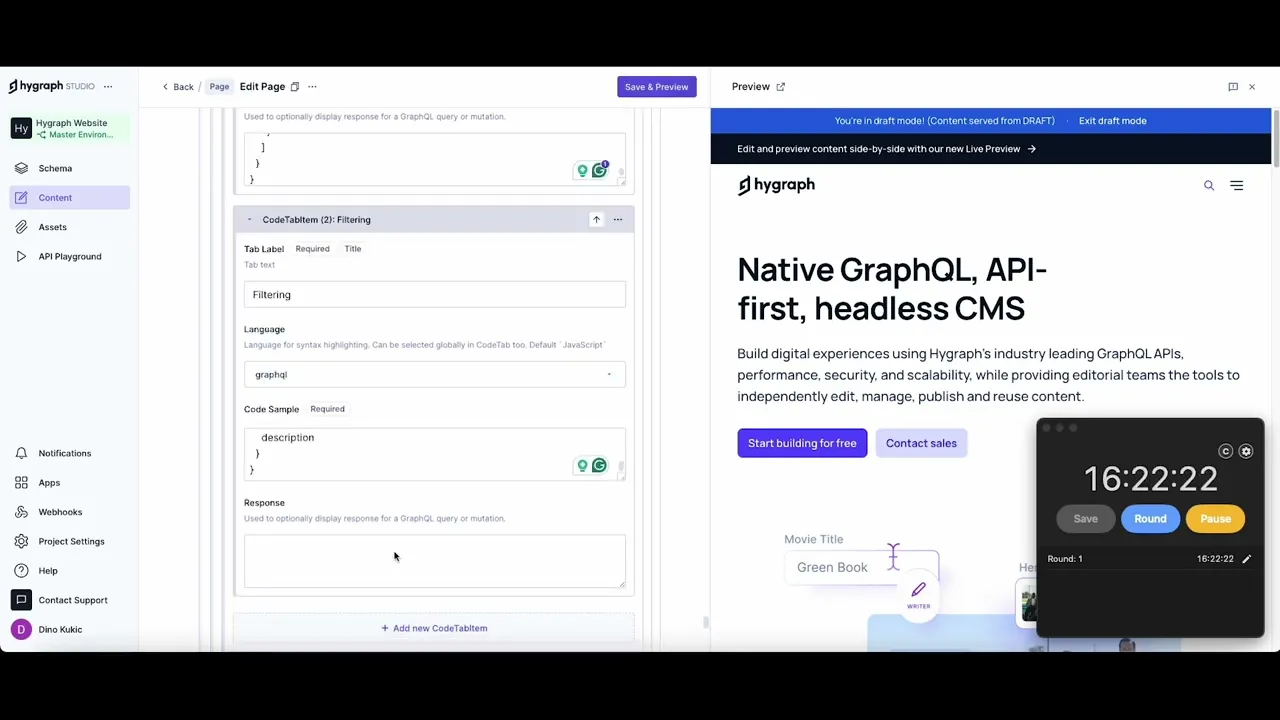
After creating the page draft and liaising with the designer, the time you spend in the CMS is minimized. Below is a real-time video to build a modular page from the ground up. Accompanying our recently launched live preview feature, you can visually check the page elements you’ve created at each step without going back and forth, further decreasing page-creation time.
Previously, creating a page involved bringing in design, deciding on a layout and then asking our marketing developer to build the page for us. After a lot of back and forth, 15 days later our page used to go live. Now, me and the marketing developer mostly talk about anime 😄 because pages? - I can build them myself! I decide the page layout on my own. By adding in and rearranging standardized design components, test things on a preview, share it with stakeholders and go live within a day or two.
The blog publishing section is one of our website's most frequently used areas. In this section, I will walk you through my day-to-day job.
Since this is a templatized page, let’s take a look at the elements reflected on the frontend first:
Slug
Category
Tag
Title
Description
Authors
Publishing date
Cover image
Content body
Inline elements
SEO details
This indicates the following fields in the page model:
Slug*
Category
Tag
Title*
Description*
Authors
Publishing date*
Cover image*
Content*
SEO metadata*
Our developers chose to format the blog content using Markdown. It took me some time to adapt in the beginning, but once the dust settled, I realized I could download articles as Markdown files directly from Google Docs and Dropbox, the 2 most common collaborative writing tools we use internally. This allows me to create blogs lightning-fast in our CMS.
I’d say the elements on our blog are quite standard, but there's one thing that delights my content-creating experience and makes me proud - the Inline elements. As an editor, I want our readers to have the best experience, and there should be different visual designs for buttons, quotes, callouts, and more. The use of Markdown allowed us to be quite flexible with adding components inside the article at this point, which I really appreciate.
Together with our frontend developer, we defined a series of in-line elements, which are stored in a shared Notion document as code blocks, so I just have to copy and paste them whenever necessary.
Gabriel Zanzotti is a Senior Frontend Engineer who joined us earlier this year. Gabriel is in charge of the Hygraph website. Let’s hear his experience inheriting the system.
During my interview process at Hygraph, I was tasked with creating a modular page builder using our CMS. Although I had never tackled such a level of generic coding before, I quickly realized that with a well-defined and strict design system, it was possible to build pages both quickly and consistently. This challenge was truly interesting, and when I eventually joined the team, I was thrilled to find myself working on a much larger-scale version of my interview project. The opportunity to dive deeper into this complex project and contribute to its evolution felt extremely motivating to me.
One of the most striking aspects of the project was the perfect integration between design and development. The use of design tokens, combined with the synchronization between Figma and Tailwind CSS, was a game-changer. It allowed for a smooth translation of design into code and made sure everything is consistent across the board. Additionally, the accessibility improvements React Aria Component primitives provide, made the development process even more robust.
The project's structure was, as expected, quite generic to accommodate the dynamic generation of almost every page. The real complexity, however, lay within the design system components. These components were the backbone of our modular approach, enabling the creation of diverse pages with minimal effort.
Adding or modifying components was relatively straightforward thanks to the consistency of the system. However, I often found myself double-checking existing implementations to ensure I adhered to the established component API. With so many components and variants, maintaining harmony across the entire system required meticulous attention to detail. This sometimes led to discussions about the balance between providing editors with creative freedom and restricting customization to prevent disjointed pages. Ultimately, we decided to offer a degree of flexibility, coupled with a review process to safeguard against potential design mishaps.
Handling non-generic pages, such as list/detail pages for specific models, presented its own challenges. These pages needed to be excluded from the generic queries and required manual configurations, such as setting metadata—tasks that are typically automated within the generic structure.
Despite these challenges, I firmly believe that the benefits of this modular approach far outweigh the drawbacks. Moving forward, my goal is to expand our capabilities even further, enabling editors to create even more custom pages while simultaneously improving automatic validations, SEO, and accessibility.
Before the ending notes, I’d like to send greetings on behalf of everyone on our team who has participated in this content series. We were all very excited to talk to our readers directly, and for many of us, it was the very first time.
The inspiration for this series came from some heated discussions we've had inside the team - similar to many discussions in the CMS industry, which can be endless. So we decided to show you how we use our own product every day instead of telling you what to do. Having worked in content marketing for most of my career, I know that tools that make publishing more efficient help to convey the message more effectively, and never have I felt that Hygraph hold me back from telling the story I wanted.
Now, if you are already a Hygraph user, we hope this series has inspired you to make better use of the product (let us know if you like this series or not - your feedback is much appreciated!). If you are interested in trying Hygraph, you can sign up right away or read the full series of How Hygraph uses Hygraph.
Blog Authors
Jing Li
Gabriel Zanzotti
Dino Kukic
Share with others
Sign up for our newsletter!
Be the first to know about releases and industry news and insights.
One thing is hearing about the rewrite project, which may or may not match your idea of how to use Hygraph, but it’s an entirely different one hearing from the people who use the website daily and have inherited the codebase. So, this is what we will share in the last part of this article series.
At Hygraph, we produce high-quality content to help our audience better understand our product, headless CMS, content architecture, and other content management-related topics. It is reflected throughout our website, which has been redesigned to be more user-friendly with clear messaging. One such example is the Resource Hub.
The resource content page is a typical example of a templatized page. “Templates” are built for pages with more predictable functions and purposes that always follow the same structure, such as a blog, event page, or partner page. Editors don’t need to consider composing the page, so they avoid confusion and keep the design consistent.
Each element on the page reflects a field inside the content model. Some are mandatory, while others are optional. Editors have the option of showing or hiding optional components. Take the resource content page, for example. Here is the information we have on the page:
Slug
Title
Author
Description
Cover image
Page content
Form
SEO details (meta title and meta description)
This means the content model has the following fields. The fields with an * are required, they must be added to the CMS before the page can be published:
Slug*
Category
Publishing date*
Title*
Author
Description*
Cover image*
Page content*
Hubspot form ID*
SEO details (meta title and meta description)*
When we redesigned the website, each templatized page was thoroughly discussed with relevant editors. Since our editors don't need to worry about how the content is displayed on the frontend, we could focus our efforts on making the layout as straightforward as possible. Editors can simply read field names as instructions, improving efficiency. We can also reference elements that appear in many places (like the author and company) to reuse them and save time.
I use Hygraph in my day-to-day work to publish event pages, upcoming livestreams, and other marketing activities on our website. Using Hygraph Studio is a breeze. It allows me to independently build event pages each day without needing constant support from our web developer.
Enxhi HamzallariSenior Field Marketing Manager at Hygraph
Using Hygraph’s page models for partner marketing is super easy, it affords me the flexibility I need, to work with only those content blocks which are necessary. It’s also fun, sometimes I feel like Tom Cruise using that futuristic screen in Minority Report.
Cristina MitroiSenior Partnerships Marketing Manager at Hygraph
Another type of page that we publish as a marketing team is modular page. These pages need more flexibility, such as the home page, product page, and landing page. We know the structure roughly but need different elements to make them appealing and convincing.
Modular pages give you more flexibility compared to templatized pages. We will show you how such a page is made in this section. As Marketers (AKA non-technical CMS users), we know that entering a CMS feels like an adventure, especially when you see an entry like this:
It feels like entering the fifth dimension, right?
But if you break everything down, it'll make sense, and we're getting there. I will start with a high-level overview of the page model, then go deeper into “Sections,” examining individual components within—essentially working from the outside in.
At the starting point, the content model simply consists of 1 slug field and 2 high-level component instances:
Slug
Sections
SEO
The "Sections" component does the magic here - it's made up of different styles and blocks that allow you to show different components on the frontend. Each Section consists of:
Name
Slot
Section Styles
Block
As part of working on a modular page, the editor has already agreed with the designer on the style. That’s why the “Section Styles” are set up to be as simple as possible so editors can select from a drop-down menu. Below is an example of the choices for a pre-defined “Theme,” which defines the background color of each section.
As mentioned earlier, various elements are needed on this type of page. This is essentially what “Blocks” are for, and we have pre-defined a series of components that may be used.
“Blocks” is a modular component field, so you can add only one or multiple nested components and repeat the same component as many times as you want. In essence, the page structure gives you a point to start with, but editors can use a variety of components to create pages that look very different.
Basic vs. modular component field
Basic vs. modular component field in Hygraph Hygraph’s components ultimately make your website composable. While there are 3 concepts related to components, we want to guide you through the component field here.
Component field is a special field type in Hygraph schema that defines which components of which type can be used in a model. Component fields can be of basic or modular types.
A basic component field can only have one component attached to it. You can limit the number of component instances to one or allow multiple component instances to be added in the content entry. The “Section Styles”, for example, is a basic component field.
A modular component field can have two or more components attached to it. The “Blocks” in this case, is a modular component field that allows users to choose from a variety of components to work with.
After creating the page draft and liaising with the designer, the time you spend in the CMS is minimized. Below is a real-time video to build a modular page from the ground up. Accompanying our recently launched live preview feature, you can visually check the page elements you’ve created at each step without going back and forth, further decreasing page-creation time.
Previously, creating a page involved bringing in design, deciding on a layout and then asking our marketing developer to build the page for us. After a lot of back and forth, 15 days later our page used to go live. Now, me and the marketing developer mostly talk about anime 😄 because pages? - I can build them myself! I decide the page layout on my own. By adding in and rearranging standardized design components, test things on a preview, share it with stakeholders and go live within a day or two.
The blog publishing section is one of our website's most frequently used areas. In this section, I will walk you through my day-to-day job.
Since this is a templatized page, let’s take a look at the elements reflected on the frontend first:
Slug
Category
Tag
Title
Description
Authors
Publishing date
Cover image
Content body
Inline elements
SEO details
This indicates the following fields in the page model:
Slug*
Category
Tag
Title*
Description*
Authors
Publishing date*
Cover image*
Content*
SEO metadata*
Our developers chose to format the blog content using Markdown. It took me some time to adapt in the beginning, but once the dust settled, I realized I could download articles as Markdown files directly from Google Docs and Dropbox, the 2 most common collaborative writing tools we use internally. This allows me to create blogs lightning-fast in our CMS.
I’d say the elements on our blog are quite standard, but there's one thing that delights my content-creating experience and makes me proud - the Inline elements. As an editor, I want our readers to have the best experience, and there should be different visual designs for buttons, quotes, callouts, and more. The use of Markdown allowed us to be quite flexible with adding components inside the article at this point, which I really appreciate.
Together with our frontend developer, we defined a series of in-line elements, which are stored in a shared Notion document as code blocks, so I just have to copy and paste them whenever necessary.
Gabriel Zanzotti is a Senior Frontend Engineer who joined us earlier this year. Gabriel is in charge of the Hygraph website. Let’s hear his experience inheriting the system.
During my interview process at Hygraph, I was tasked with creating a modular page builder using our CMS. Although I had never tackled such a level of generic coding before, I quickly realized that with a well-defined and strict design system, it was possible to build pages both quickly and consistently. This challenge was truly interesting, and when I eventually joined the team, I was thrilled to find myself working on a much larger-scale version of my interview project. The opportunity to dive deeper into this complex project and contribute to its evolution felt extremely motivating to me.
One of the most striking aspects of the project was the perfect integration between design and development. The use of design tokens, combined with the synchronization between Figma and Tailwind CSS, was a game-changer. It allowed for a smooth translation of design into code and made sure everything is consistent across the board. Additionally, the accessibility improvements React Aria Component primitives provide, made the development process even more robust.
The project's structure was, as expected, quite generic to accommodate the dynamic generation of almost every page. The real complexity, however, lay within the design system components. These components were the backbone of our modular approach, enabling the creation of diverse pages with minimal effort.
Adding or modifying components was relatively straightforward thanks to the consistency of the system. However, I often found myself double-checking existing implementations to ensure I adhered to the established component API. With so many components and variants, maintaining harmony across the entire system required meticulous attention to detail. This sometimes led to discussions about the balance between providing editors with creative freedom and restricting customization to prevent disjointed pages. Ultimately, we decided to offer a degree of flexibility, coupled with a review process to safeguard against potential design mishaps.
Handling non-generic pages, such as list/detail pages for specific models, presented its own challenges. These pages needed to be excluded from the generic queries and required manual configurations, such as setting metadata—tasks that are typically automated within the generic structure.
Despite these challenges, I firmly believe that the benefits of this modular approach far outweigh the drawbacks. Moving forward, my goal is to expand our capabilities even further, enabling editors to create even more custom pages while simultaneously improving automatic validations, SEO, and accessibility.
Before the ending notes, I’d like to send greetings on behalf of everyone on our team who has participated in this content series. We were all very excited to talk to our readers directly, and for many of us, it was the very first time.
The inspiration for this series came from some heated discussions we've had inside the team - similar to many discussions in the CMS industry, which can be endless. So we decided to show you how we use our own product every day instead of telling you what to do. Having worked in content marketing for most of my career, I know that tools that make publishing more efficient help to convey the message more effectively, and never have I felt that Hygraph hold me back from telling the story I wanted.
Now, if you are already a Hygraph user, we hope this series has inspired you to make better use of the product (let us know if you like this series or not - your feedback is much appreciated!). If you are interested in trying Hygraph, you can sign up right away or read the full series of How Hygraph uses Hygraph.
Blog Authors
Jing Li
Gabriel Zanzotti
Dino Kukic
Share with others
Sign up for our newsletter!
Be the first to know about releases and industry news and insights.